Browsed by
Category: Wet Felting

More Natural Wools and Fibres

More Natural Wools and Fibres

Another couple of natural wool and natural fibre combinations I’ve used recently are Oatmeal Bluefaced Leicester with Ingeo top, and Humbug Jacob Tops with black and white Bamboo tops.

Humbug Jacob tops are a stripey blend of black and white Jacob wool tops. Just on its own it produces a nice result, but I thought I’d try using strips of black and white bamboo tops for effect. Both bamboos are really soft, white bamboo looks silky, but black bamboo is fluffy and more like fluffy cat fur. They felt quite differently too, the white keeps its silkiness and shines really nicely, and the black almost fades into the background, staying very matt.

Ingeo is made from corn, it is soft and shiny and smells faintly of caramel 🙂 I decided to cover the whole piece with Ingeo as it has such a lovely sheen. This was another fibre which shone even in dim light. The effect after drying is gorgeous, Ingeo is such a nice silky fibre and went really well with the Oatmeal Bluefaced Leicester. I think this combination would make a lovely soft and shiny scarf.

More Dryer Felt and Easter Eggs

More Dryer Felt and Easter Eggs

As you know I wasn’t very happy with the dryer felt I did last week but I thought I would try some nunofelt. This went much better. I made this piece called snowy night.

Snowy Night

I used fine merino on a silk chiffon. It was inspired by the snow falling outside my window the other night. I had tried this before without being all that happy. I use plastic top and bottom as recommended but didn’t like it. I went back to using my sheer curtains. I did rub it on the back for about 5 min. There wasn’t a lot of wool on this one. I rolled it up around a damp towel an then wrapped another one around it , tied it up and tossed it in the dryer with no heat for 20 min. when I rook it out is was attached somewhat to the sheer. When I roll by hand this happens too. I carefully peeled it off . I though it was done really well and ready to full. For some reason I though I would roll it up the other way and give it more time in the dryer to be sure. I  opened the dryer to find everything had come undone and was in a pile. When I untangled everything I found the scarf was completely fulled and very close to dry. I need ironing but I havn’t done that yet.

Felt Easter Eggs

I made these Easter eggs the other night. I will be teaching an Easter egg class at Just knitting in Carleton Place, Ontario. If your close why not join in.

Natural Wools and Natural Fibres

Natural Wools and Natural Fibres

One of the projects I’ve been working on in the last few months is using natural coloured wools with natural ‘other’ felting fibres. It’s not always easy working out which fibre will match with which colour wool because they often look very different when felted, and some fibres which seem to felt well on most wools, suddenly don’t with another. A couple of natural fibres I really like are soybean fibre and flax (linen).

Flax looks like dried grass, it doesn’t look like it’d felt very well, but it does.  I used it here with natural brown Merino tops.

Flax Fibre
 

Merino and Flax before felting

After felting it is a lot softer and shinier than before. 

Merino and Flax after felting

Soybean top is gorgeous. It is soft, golden yellow and much shinier than silk. I used it with some natural black Jacob tops. After felting, I’d left it to dry on a table, and walking past, I saw the soybean top shining like gold in the dim light. I took a few photos hoping it’d show up and was really surprised when it did. It looked gorgeous. It wasn’t as easy to capture the true colour and shine once it had dried, but it really is a gorgeous fibre.

Soybean top
Jacob and Soybean top drying
Jacob and Soybean top

Do you have any favourite natural fibres and wool breeds?

Experiment in Dryer Felting

Experiment in Dryer Felting

I have been hearing about felting in your dryer all over the place.  I wouldn’t mind less time rolling my felt so I thought I better give it a try. I wanted to try some of the felt batts I made last week and wanted to try some designs for belt pouches. None of these have been ironed or blocked yet

I used batts for all of these. The orange(supposed to look like leather and does in person) one is merino I dyed and carded into a batt.  The pink is from last weeks carding of left overs. It is mostly merino with a little corriedale in it. The brown striped pouch and flat piece of felt are from last weeks left over carding as well but has a lot of different fibers with different micron counts, some dyed and some natural.

This one came out the best. It felted the most in the dryer.  It didn’t shrink much. It didn’t buckle it’s resist.

This one did the next best. The ropes attached well and it was felted but not as much as I would like.

These two were felted but not much.

For this experiment I decided to treat them all the same. I laid  the wool out around the resists, covered them with netting and rubbed them all the same. I then wrapped them around a damp towel then wrapped that in another towel and tied the bundle. I let it bump around in my dryer with no heat for 20 min then unrolled it, made sure the net wasn’t stuck and rolled them up from the other end.  I let it do another 20 min in the dryer. I took it back to my work table unwrapped them, cut out the resists and then rolled all of them 50 times  in both directions in my reed mat with a pool noodle in the middle. This was  to set the cut edge and felt them a little more.

I then fulled them as I  normally would, rinsed out all the soap and blocked them a little. I would say that over all it worked.  They are not felted enough for my liking and need more work.   The felt was not far enough along when it came out of the dryer. I normally wouldn’t has started fulling them when I did for this experiment but the idea was to eliminate the manual rolling.  I am not to happy with the pink pouch or the brown pieces. I am going to wet them again and roll them in my stick blind. Next week I will let you know how that went.

I think it definitely has potential. There are things that would make it better.  I think if the dryer didn’t have the fins in it that would be better. It would roll it more and thump(drop) it less. I see that some of the modern dryers don’t have fins.  I have plans for a roller that uses a big tube. Right now I am looking for a suitable tube. If I ever find one and get my hubby to make it I will definitely let you know.

Hairy Alpaca and a Merino Vessel

Hairy Alpaca and a Merino Vessel

I love alpaca, so a few years ago when my mum was buying me fibres for Christmas, I asked for Alpaca tops. I’d only used raw alpaca before and hoped the tops would be more convenient. They couldn’t have been further from raw alpaca if they’d tried. I’m sure all alpaca tops aren’t like this, but it seems I got some made from guard hair or something! They were thick and wiry and kind of stiff. I hoped they’d be different after felting, so I made a sample square. It was the weirdest felt I’d ever made, hairy and although felted, didn’t really feel felted, and strangely, still quite soft. So, I put those bags at the bottom of a sack and forgot about them.

I recently did a ‘stock check’ to see what I needed to order more of and rediscovered the alpaca tops. I left them out hoping I’d get time to try them again. Last week I did. I decided to make a small bag with a flap. I thought that if it turned out strange I could always use it for sewing on. It turned out exactly as I’d remembered! Hairy, stiff, not feeling like it was felted, but oddly soft. I used a rusty colour for the inside layers and aptly, a grassy green colour for the top ones. I’ve already started to add the stitches, so I’ll post about that soon 🙂

I had more success with my merino vessel. I thought I’d try making a vessel starting with a flat resist. I thought it’d be less fiddly and messy than felting over a ball, but I didn’t think so. I think if I do it again I’ll use something a bit thicker than bubblewrap for the resist. It came out alright though, but it’s a bit thin because I only used a couple of layers of merino.

I’d be interested to know if anyone else has had similar problems with commercial alpaca tops or if you’ve actually had some nice ones.

Inspired by Hans Hoffman

Inspired by Hans Hoffman

I’m involved with a group locally that meets once a month and works on a variety of surface design techniques. We decided that this year, each of us would pick an artist and then the group would each do some sort of project inspired by the artist. We didn’t set any specific guidelines as to what the project had to be as we all do different types of work. The first artist that was picked was Hans Hoffman. I took a look online to find a bit more about him and to find some photos that would inspire me. He worked with color and did mostly abstract paintings. I like the painting above so I decided I would make something with this photo in mind. I needed a new pair of slippers so what could be better than Hans Hoffman inspired slippers? 🙂

I made a few batts on my new drum carder from wool that I had previously dyed. Two of the batts were just plain wool (mixed 56’s) and the third batt was several different shades of wool and a few different colors of silk noil for the tops of the slippers. That gave me a nice mottled background and I then added different sized rectangles of pre felt to give the look that many of Hans Hoffman’s paintings include.

When I’ve made slippers in the past, I always used one resist for both slippers and then the slippers have a cuff. I wanted this pair to be more like clogs. So I used two separate resists and then cut out the opening on top. The last pair of slippers I made was too small for me as they somehow shrunk more than expected. These fit like a charm and even though my last pair of slippers was grey, I love the bright colors.

I enjoyed learning a bit more about Hans Hoffman and I certainly wouldn’t have come up with this design on my own as it isn’t really my style.  Challenges are always fun and push you to try things that are new. Have you tried anything out of your comfort zone lately?

Surface Texture Challenge – Mouldy Cheese

Surface Texture Challenge – Mouldy Cheese

A couple of weeks ago I joked that I’d found inspiration for Ruth’s Texture Challenge in my fridge. I wasn’t really joking 🙂 I’ve always liked the look of mould, but there was a really nice looking piece of mouldy cheese that I thought would be perfect for the Challenge. I didn’t get to photograph it straight away, and the mould had grown a little more than I liked by the time I did, but it still looked good. I discovered that photographing mould is as ‘easy’ as photographing felt, so it’s not a great photo, sorry.

Mouldy Cheese

 I started with a couple of layers of merino to get the shape, then I blended different amounts of greens and mustardy merino shades with some plastic fibre for the main mouldy parts and used white prefelt and wool nepps for the white parts, then I wet felted it. I didn’t get the colours quite right, but I like the way it looks and it was fun to do. Now I’m wondering where I should look next for inspiration? 🙂

Felt
Beading & Felting

Beading & Felting

Beading and Felting

I know there are some spectacular bead artists out there and this week I thought I’d try my hand at some beading, I’ve been following Robin Atkins blog called Bead Lust

http://beadlust.blogspot.com.au/

 Her work is so beautiful. I’ve never really wanted to learn about beading before but since getting into more of the mixed media side of things it’s made me more interested in the beading process, of course not on the scale of Robins though , just enough to try to work into my pieces.  Robin has been beading for a long time and she has written a couple of books, she has now put out her first book as a free book for anyone to read, so since I was following along I thought I’d take the time to read it.  She explains her methods of beading and basically works free hand with no pre conceived ideas, or nothing set in stone.  So having read that I thought I’d give a small piece a go, mind you I don’t have thousands of beads to choose from so I started this little one with one of Zed’s hand made buttons and went from there.

It definitely helped to read her book as I was under the impression that I should have some sort of design in mind before I started, but I actually found it so much easier not to.  This is only a small piece I know but reading her book  gave me the courage to have a go !!

I’ve also made a couple of small note book covers, inspired by Zed once again, and I wanted to  do something else with my flat pieces of felt and not just wall hangings.  The first cut was the hardest I must admit, spending all that time rubbing and rolling the felt only to cut it up in the end. These 2 covers were made with the one piece and then cut in half so I had the 2 different colours in each cover.

I then embellished with embroidery stitches learned from the TAST 2012, so I used Blanket, Fly & Cretan stitches and then added some beads in too.

I did not have any success with creating skeleton leaves so we’ll leave that for another day lol

I hope everyone’s had a productive week and I’d love to hear what you’ve been up to.

Merino and Hemp pouch

Merino and Hemp pouch

Just before Christmas, Karen sent me some gorgeous fibres. One of the fibres was hemp. A couple of days ago I made a small pouch from Merino wool with the hemp as a surface embellishment.

I didn’t really intend to make a pouch, I was planning to make an unusual shaped vessel. I started by laying a piece of cotton gauze in the centre of a rectangular template, then added a couple of layers of merino and the hemp fibre on top. Just after I’d wetted it all down, I saw a 3d resist I’d used previously and thought that would work better than what I’d planned to use. I lay the resist on the felt (the resist is basically a couple of lightbulb boxes wrapped in bubblewrap and packing tape), then wrapped the felt around, snipping it in a couple of places to overlap. When it was almost felted, I removed the resist and shaped the bottom and sides to soften the edges.

I was really pleased with the way it turned out, especially the way the hemp looked with the white merino, and the texture of the gauze inside is really nice, too.

Surface Texture Challenge – From Studio Journal to Finished Piece

Surface Texture Challenge – From Studio Journal to Finished Piece

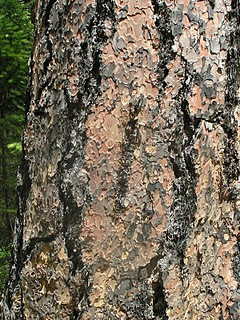
Here is one of my many photos of bark. This type of bark has flat looking pieces that resemble puzzle pieces. The pieces gradually flake off and I collected a bunch of these off the ground. I love the different layers and colors that result. Many times, I work in a studio  journal when I find an inspirational source. Over the last several years, I have played around with these bark pieces.

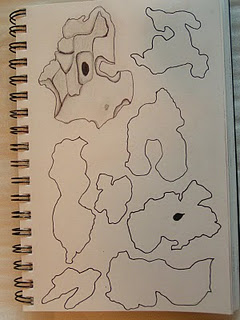
Here I have sketched the various shapes of the bark. Most are multi layered like the sketch in the top left hand corner. I just shaped the overall shape of most of the pieces. I made several different stamps and a few stencils of these shapes.

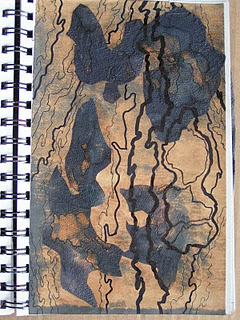
This is a collage that I did in my studio journal with pieces of discharged paper and stamps. I also added the linear components to give it the feel of bark on a tree. This has been in my studio journal for two years and I really haven’t done anything else with it. This past weekend, I decided I was going to try a technique that I have been thinking about for a long time. Because I had this challenge to work on, I finally got this idea in motion.

I took two pieces of water-soluble fabric and sandwiched some wool and viscose fiber between them. On the top piece of water-soluble fabric, I had traced some of the imagery from my paper collage. I then free motion stitched with zigzag stitch over the lines and shapes. I ended up not putting in as much detail because it shrunk so much with the stitching. And it would shrink more with the next step.

I then took the free motion design and added it into a felted cover I was making for my new Kindle. Since the fabric is water-soluble, it would wash away during the felting process and just leave the stitching. When you stitch directly on felt with the machine, it gives a quilted effect. I was trying to add machine stitching without getting that quilted look. I also want to be able to add machine stitching easily to 3D felt objects. It is hard to get a three-dimensional felt to fit under the sewing machine.

Here is the result. It was a bit dark when I was taking the photos so sorry for the quality. (Click on the photo so you can see the details better.) I loved the result! The stitching is completely attached as the fibers it was sewn to, felted right in with the rest of the fibers. And the stitching is right on the surface, it worked perfectly. The darker lines in the middle were yarn that was couched down by machine stitching. The machine threads are shiny in comparison with the felt and add a very interesting texture as the thread didn’t shrink but the wool did. I will definitely be trying more of this technique.

Here’s the Kindle sliding into the top of the cover. I made the cover fairly thick so that when I put this in my bag, it won’t get banged around so much. That shows a little bit of the way I tend to work. Have you tried anything yet for the surface texture challenge? Do leave a comment and let us know.