Browsed by
Category: Uncategorized

Spinning Day

Spinning Day

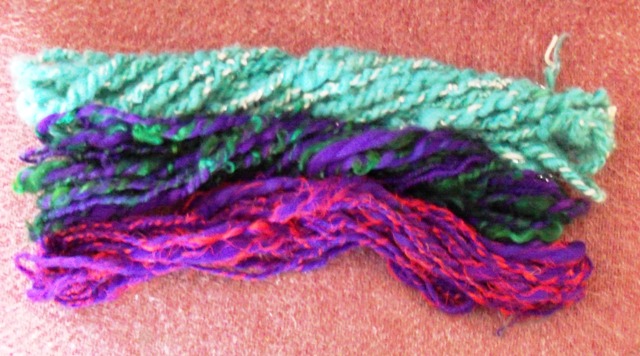
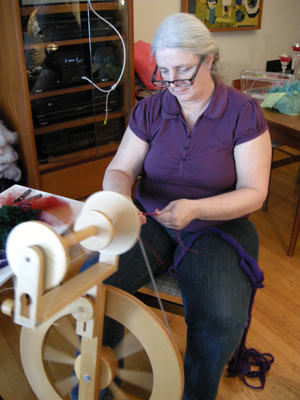
During the Christmas holidays I got together with 2 friends to do some spinning. I was trying to do some art yarn with a Lendrum wheel I rented from local guild, Ottawa Valley Weavers and Spinners Guild.

I borrowed it because it had a bulky head with a large orifice. Unfortunately the drive band was really tight so it made the wheel very difficult to treadle so I didn’t get a lot done but learn that I would like to do some more art yarns, so now I am saving to get the bulky head for my Ashford traveler. I had a little trouble trying to ply one batch and ended up with a big tangle of yarn.

Getting in a tangle while trying to ply from both ends

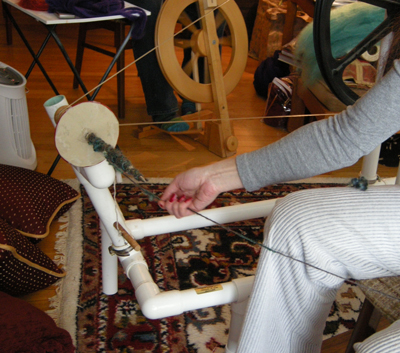
My friend Judy brought her Babe Big River Spinner wheel for us to try.

It’s an interesting wheel made from plastic pipe and it has a quill (long sharp spike) rather than a flyer.

You have to spin off the end of the spike. It is a very fast wheel and you build up to much twist very quickly. It was fun to give it a try.All in all it was a fun day with friends even if I didn’t end up with much yarn to show for it.

Resist Shapes

Resist Shapes

Several people have asked me about what shape resists I use when making hats or vessels.  A resist is used in felting to make three dimensional objects from a flat pattern. The resist can be anything flat that will keep the two sides of felt from felting together, i.e. it “resists” the felting process. I usually use a thin foam as it is waterproof, inexpensive and can be used over and over again. The resist shown above is from floor underlayment. That is the stuff that is used under laminate flooring. It comes in huge rolls so unless you’re making large patterns for things such as clothing, you might want to use a craft foam or recycled packing materials. You can also use bubble wrap, plastic, cardboard or anything that will hold up to the felting process. The resist above made the orange hat in the next photo. The hat block shown in the middle gives you the idea of how much shrinkage occurred. I used merino with a shrinkage of about 30%. But if you’re going to be adding lots of folds in the felt, that takes lots of extra room in your original pattern.

For this hat, I wanted to have random folds but it could have been finished different ways. That is the fun thing about using a resist with lots of extra room in it. You can make small, subtle changes in the shaping of the hat and you’ll get a completely different look. This hat could have had uniform folds done concentrically and it would look like a completely different hat.

This is the resist shape that was used for the hat shown below.  All of the space at the top is used for the concentric folds that make the top of the hat.

This hat is made from a Stratta batt from New England Felting Supply. It felts very easily and is a quick and easy lay out as you don’t have to pull the wool all apart, just tear it to shape and you’re ready to go.

Here is the resist used for the Iris flower vessel shown below. I leave the top open so the edge is uneven, given it a more organic look. You could cover the entire resist with wool, cut it open and then have a straighter edge on the top of the vessel if that was the look that you wanted.

I made this vase for my sister as she loves iris. It is made with a variety of wool and silk.

This is the basic shape I use for making slippers. The resist shown here was for my husband’s slippers and I didn’t make as a big a cuff for him. The cuff is the connecting part between the two slippers. The more space in between the two foot shapes, the longer the cuff is. Or you could make it really long and make boots. Just remember to make them wide enough to get your feet in and out. You can see I’ve taped this resist back together again with duct tape. You cut the two slippers apart after you’ve gotten to the soft felt stage to remove the resist. But you can use the resist again, you just have to retape it each time.

Here are slippers made on a similar shape resist. I don’t wear these because they ended up just slightly too small. I’m going to need to make a new pair soon!

This is an experimental resist shape. If I was going to make this again, I would not leave the edges so pointy. Any pointy edge or really sharp angle is hard to cover in wool. I have found that the best resist is the most simple one. Just make the resist bigger for extra room if you want folds.

Here is the resultant felt vessel from the resist shape above. It’s kind of odd, isn’t it?

This is a vessel resist covered with wool and wet down. I used this same shape resist to make both of the vessels below. This shows that you can use the same shape resist but come up with a very different end product.

This taller vessel was made by stitching ridges lengthwise and then felting them together. You can see the thread at the top before it was removed. This formed a tall and slender vessel.

This vessel was made from the same resist as the tall vessel. However, I made concentric folds around the shape to make a short and squatty vessel.

As you can see, almost any shape can be used to make felt. The fun thing is that even if the same shape resist is used, the final shaping of the felt can change the end result. What shape resists do you use when felting? Or perhaps you haven’t tried felting with a resist? Give it a try and let us know how it worked out for you!
New Lamb on the Farm.

New Lamb on the Farm.

We promised some sheep farming posts so here is one of the first lambs of the season.

She came 2 nights ago when it was bitter cold. She was also stuck.  We had to catch mom to check, as I was sure she was having trouble. I was right. The lamb was stuck. Lambs are born with the toes and nose coming out together, like they are diving into life. This little girl had decided to come with one leg back. She isn’t really very little either as she is about 9 or 10 pounds. She was too far out to push back and fix the leg positions. I wiggled and pulled and wiggled and pulled with mom pushing and we got her out. She is up and doing fine. We gave her a heat lamp the first night and then it warmed up. In the morning we had another little one born too. She had the lamp for a few hours and then was fine.

Just for fun here’s a picture of the snow we got today. This picture is across my lane. You can’t see it for snow.

Diversifying Your Product Line

Diversifying Your Product Line

If you’ve been selling your work for a year or more, consider reviewing your line to decide if you need to diversify. The buying public notoriously changes tastes and styles. You should prepare yourself to expect changes in the marketplace. You can prepare for these changes by keeping an eye on fashion trends, home decor styles and color forecasts. Most of this information can be found very easily online. You can also do research in craft trade journals or join an industry specific organization such as a felting guild or a surface design group to gather more ideas.

Use the information that you find by thinking of how it applies to your product line. Maybe you need to add a new color to a product that sells well but is looking a little stale with the same old color themes. Perhaps there is a new electronic “gadget” that needs a felt cover that could be added to your already existing products.

Some of the reasons that will determine that you need to diversify are:

  • a particular style has been exhausted, for example, the lodge look (everywhere but NW Montana)
  • consumer demand slows for a particular item
  • you find a new and unexpected niche
  • customer’s continually ask for this type of product
  • a competitor adds a new product
  • you need more income
  • a new trend or style excites you
  • you examine your side lines and see that they could offer more profitability with more effort or changes
  • you have many repeat customers, they will need to see something new to continue to buy your products

Expecting change and diversifying your product line periodically will keep your work fresh and appealing. If you find that your market is becoming too crowded with people making the same sort of items, look for intersections with other markets. Look around for other types of customers who might benefit in an unexpected way from your products. Perhaps you could sell to a certain type of collector if you made a product geared specifically focused towards that theme.

As a buyer for my store, I always look for “new” products and something different from what I’ve seen over the years. The artists who continually work to upgrade and diversify will get my attention much more readily than someone who “has the same old stuff”. I’d love to hear about how you’ve dealt with a changing market and the “fickle” buying public.

Our First Giveaway Winner

Our First Giveaway Winner

Hello Everyone

Wow we did have an impressive number of entries for our first giveaway so thankyou you all so much its really been a lot of fun.

I drew the winner using a number generator and Kathy Bennett is the lucky recipient for this fibre pack, Congratulations Kathy i hope you enjoy them. We’ve put a time limit on contact information so Kathy has 5 days to claim her prize, if we havent heard from her in that time we will re-draw

We will be having more giveaways throughout the year so please check back often and also to see what were all up to, were also having challenges just for fun to so please feel free to join in with us 🙂

Thanks again Everyone and Happy Felting

Our First Giveaway

Our First Giveaway

Our First Give Away

We’ve decided to have a giveaway in celebration of our new Felting and Fibre Studio and also just for fun! To enter and win this fibre pack you need to leave a comment on this post for one entry. Competition will be for 1 week and the winner will be announced by random number draw.

The pack contains just over 100grms of Fibre

Some hand dyed and carded small batts

Romney Fibre

Merino Roving

Natural Merino Roving

Merino Silk Blend

Natural Silk Noil

Silk ribbon

                        This is a fun pack to use in your fibre arts.

Competion will end on  Sunday the 16th at 9.00pm Australian Time

A look back at the last year.

A look back at the last year.

Well time to look back at the year and see what has happened. There was lots of felting  for sale and some teaching along with family, work, farm and farmers’ market. I decide early I wanted to make a nice nuno felt vest for myself. It doesn’t sound very hard thing to do but I never seem to make the time to make things for myself. It took a month to design the resist and find the time to do the felting and I ended up with a not very good-looking vest. As it turns out it was a good thing because it allowed me to become better friends with Linda as she helped me reshape it with her sewing skills. We went on to design jackets for ourselves this summer. I am still working on the jacket, hems on the sleeves and bottom and it needs some form of closure but I haven’t decided what yet.

I managed to try a couple of new shows to sell my work and expand my felting skills with the help from felting friends when we got together for our annual spring fun felting weekend.

One exiting thing that happened was being asked by Ruth to send some felt to her publisher to have its picture taken to be in her new book. So soon I will be able to say I’ve been published. Supporting Ruth while she wrote her book was a real pleasure and an eye opener as to what is involved in getting a book put together.

Starting the new blog and forum with friends from around the world has been fun and hectic as we decided to do this at the busiest time of the year. It really is amazing how the internet has made it possible meet like-minded people, make friends and take on projects with people you may never meet in person and otherwise wouldn’t have met at all. I feel very lucky indeed. Now I need to have a good long think about what I want to get done this coming year.

Happy New Year everyone,

Ann

Wet Felted Hat Class

Wet Felted Hat Class

Wet Felted Hat Class

I taught a small hat class this last week-end. I had 3 great students all doing different style hats. Donna was making her first hat and wanted a winter hat with a folded up brim.

Dona laying out

Linda also a first time hat maker wanted an oversized pill-box hat in 2 pieces.

Linda Laying out

Jan who is on her 5th class and wanted a large turned up brim and a long tail to add curls and yarn embellishments to.

Jan Laying out

With patient rubbing

.
Jan rubbing with a little to much soap

And Rolling

Dona Rolling

Then fulling and shaping (sorry no picture)

Everyone ended up with the hat they wanted.

Jan's hat
Donna's hat
Linda's Hat

Linda will need to sew the top piece into her hat when it’s dry and Jan will add her embellishments to the tail. I will post a picture when she has it finished.

Direct Dyeing

Direct Dyeing

Direct dyeing is a method where the dye is applied directly to the fibre. This can be done with very small or fairly large amounts of fibre depending on what utensils are available to you, but it is particularly good for smaller amounts. One advantage is that the fibres don’t move around so there is less tangling or felting. Another advantage is that very small amounts of dye can be made up, reducing the risk of waste.

Dyed Silk Throwster’s waste

 I have written a step by step tutorial with lots of photos and a table to help work out very small amounts of dye/solution. I apologise to anyone more familiar with imperial measurements, the quantities used are so small that the tiniest measuring spoons are used and they are metric, so it was easier to stick to one measurement. And also US and UK fluid ounces differ, and even cups have metric, US and Canadian versions 🙂  If anyone needs a converter I find online conversion is excellent for everything.

Direct Dyeing Tutorial, please click for PDF

Spiral Challenge

Spiral Challenge

This is my first item for the spiral challenge. It’s a large heavy shawl I made for a cool fall demonstration. It started out about 10 feet across the long side and 4 feet from the point to the top.  After felting it’s about 8 feet long and 3 feet deep.  The main body is 23 micron merino wool and the spirals are multicoloured merino. It is lovely and warm.