Browsed by
Category: Dyeing

Dyeing Cotton Fabrics

Dyeing Cotton Fabrics

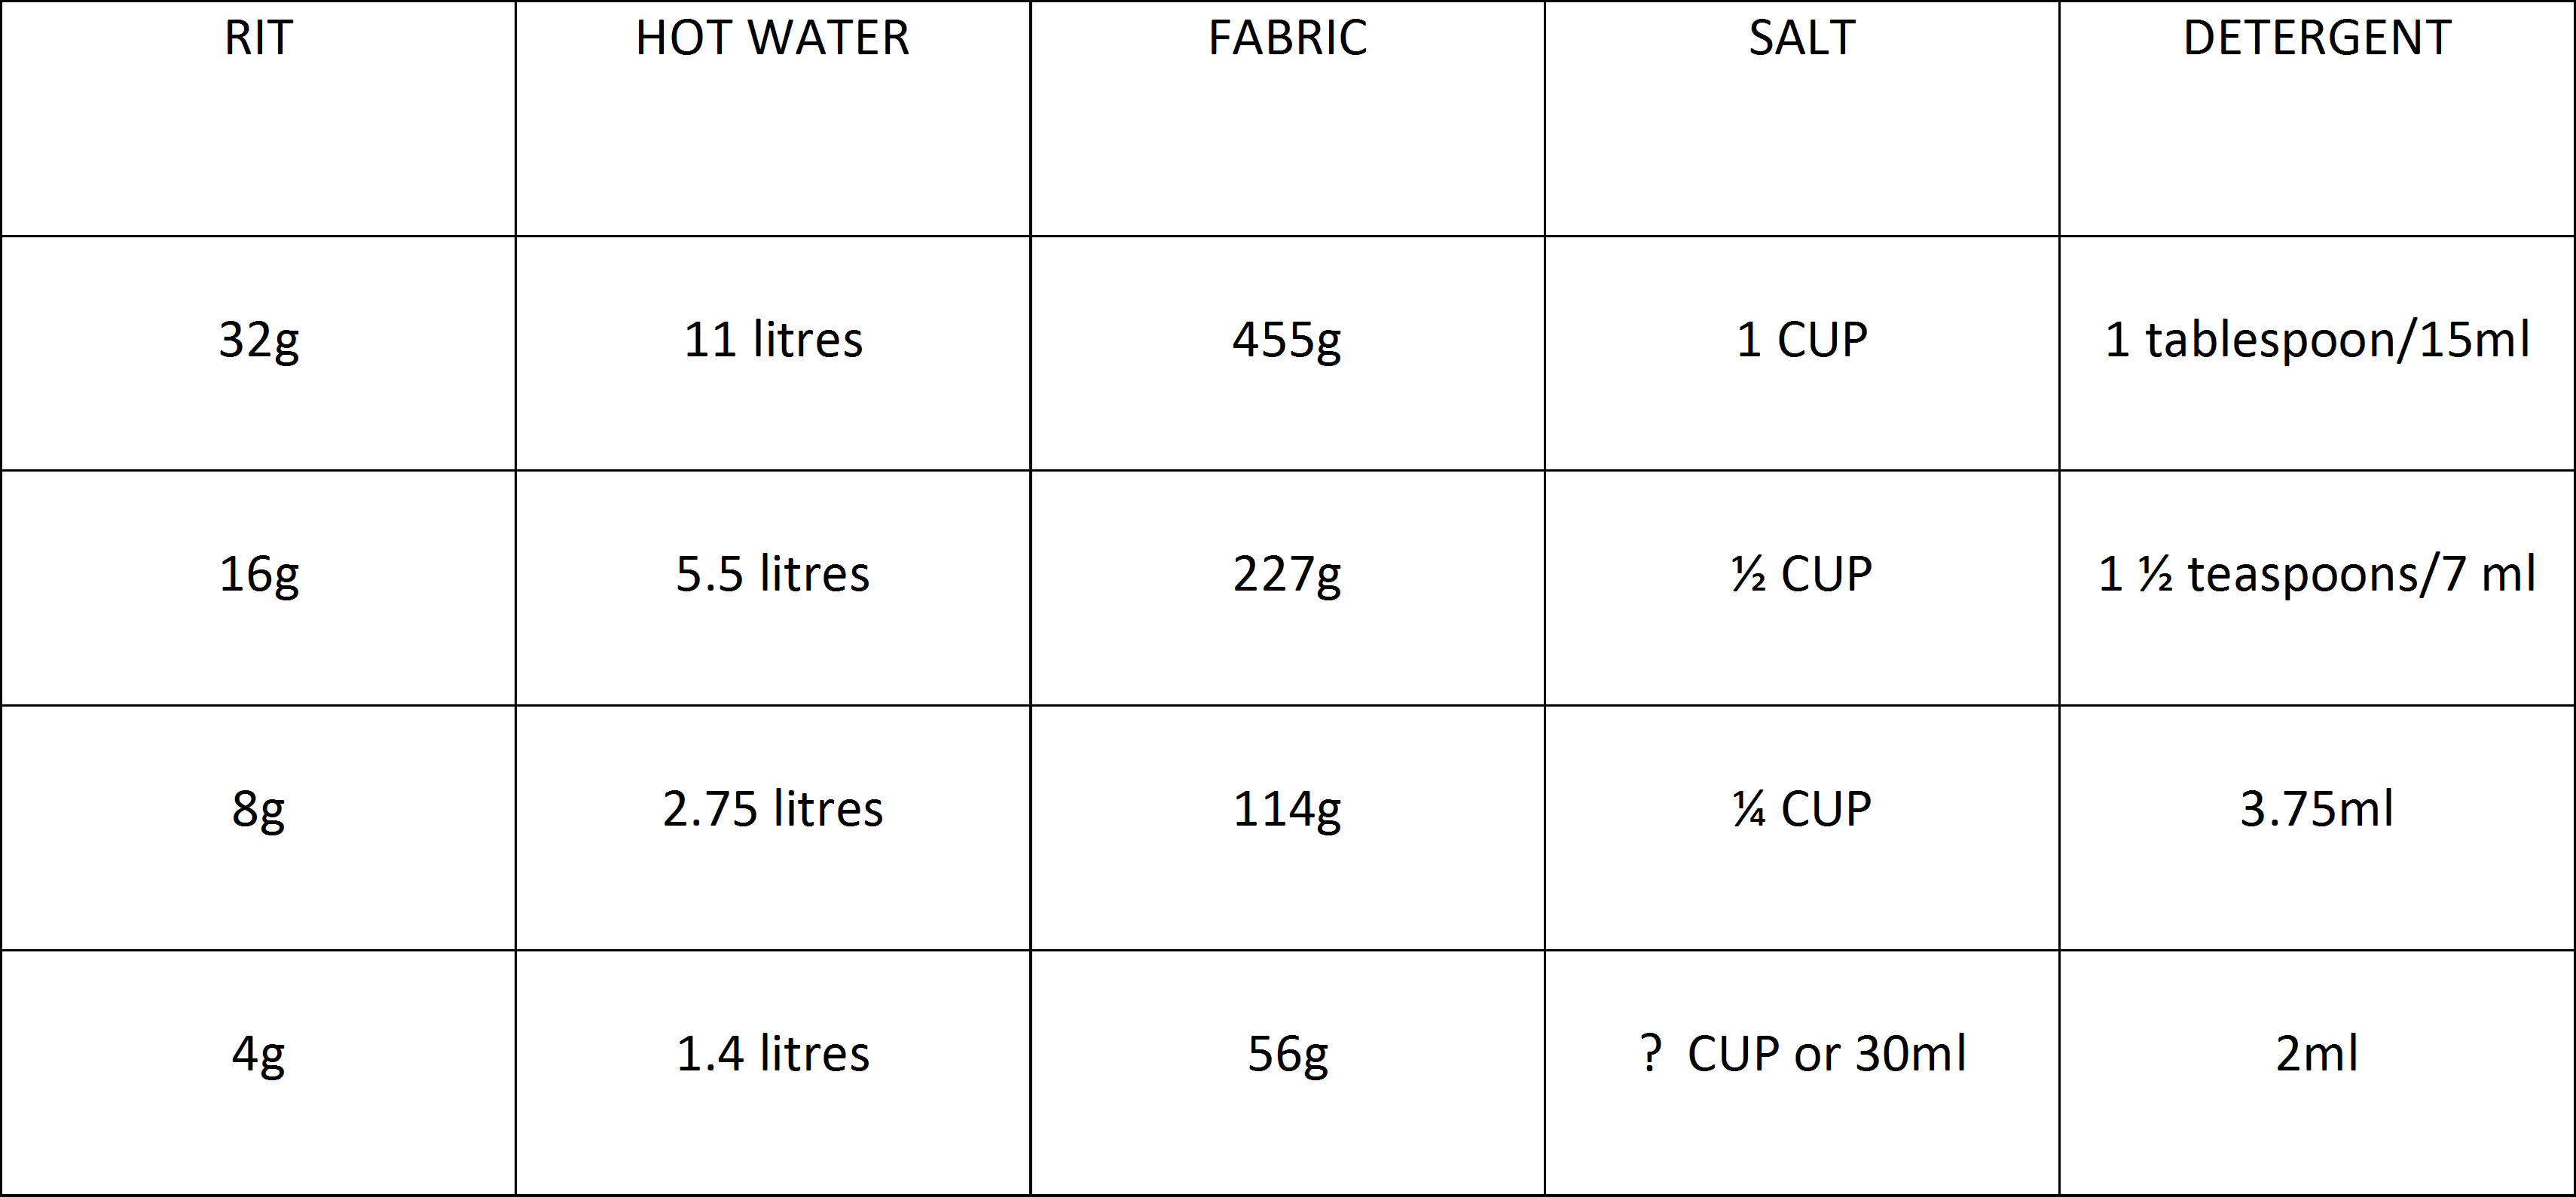
A few weeks ago I decided to dye some of the cotton fabrics I was using in felting: Cotton Gauze, Cheesecloth, Muslin, a few lightweight cottons and some cotton/synthetic mixes. I started out using some Scarlet RIT dye and I was really pleased with how easy it was to use and how well the colours turned out. I used the ‘Hot Water in a bucket’ method. I weighed the amount of fabric I had and then ran some really hot water into a bucket and measured out how much I needed. I poured this into the dyeing bucket, saving a little in a jug to add to the dye I’d measured out  into an old glass jar. I added salt to the dyeing bucket, then poured the dye solution in, and gave it a stir around. The instructions had said to wet the fabric before adding to the dye bath, so I’d put the fabrics in the other bucket while I prepared the dye bath. The instructions said to stir constantly for about 30 minutes until the desired colour is reached, but I just stirred occasionally. I also added fabric at different stages or tied/scrunched to get different shades/effects. Using the instructions on the RIT packet, I made some calculations for dyeing smaller amounts of fabrics and used this as a guide for dyeing the fabric a medium shade.
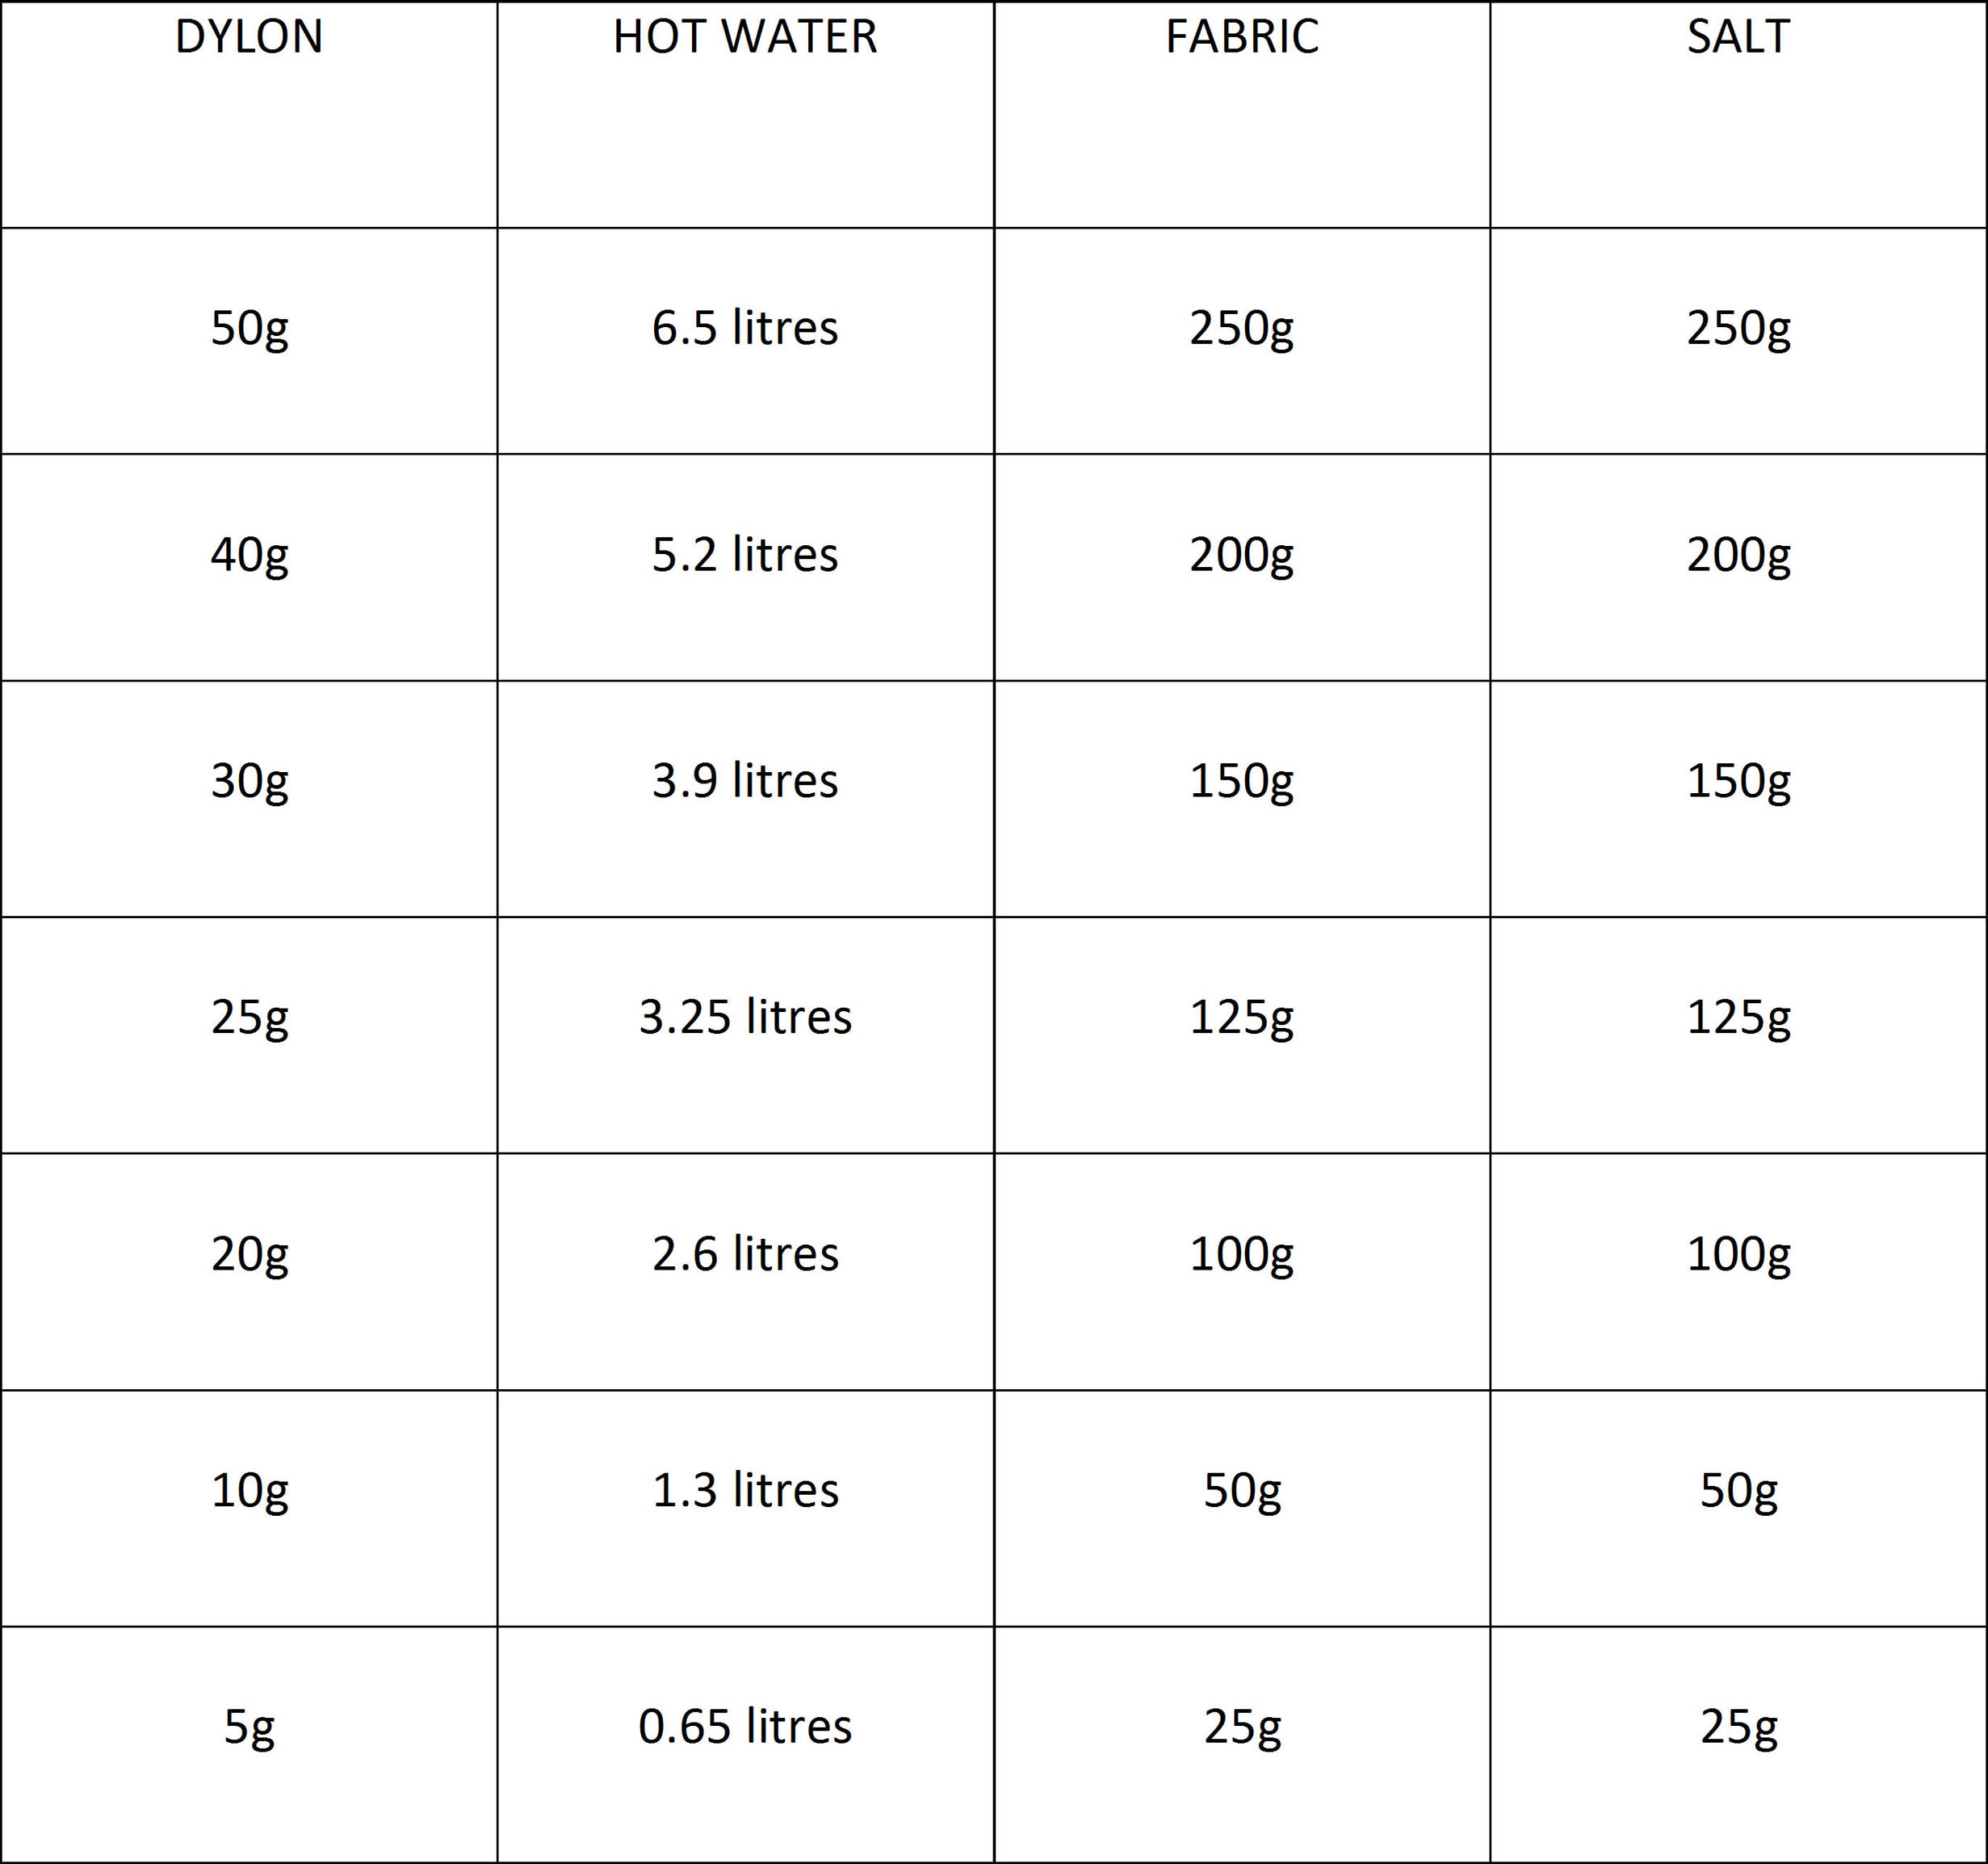
The second dye brand I tried was Dylon, I bought the 50g hand dyeing pack. I used to buy the Dylon Multi purpose dyes years ago, they were meant for using in a pan on the stove, but gave excellent results just using hot water in a bucket, so I expected these Hand Dyes to be really good. The instructions were pretty much the same as for RIT except no laundry detergent was used. I bought a dark brown so that I could add fabrics at different stages and get lots of gorgeous natural looking shades. What I actually got was a load of fabrics all very much the same pale shade of beige 🙁  I think I would have got richer colours using tea or coffee. I made some calculations for dyeing smaller amounts of fabric for the Dylon too, though I’m not sure I’ll use it again.
The next time I dyed some cottons, I used a RIT dye again, Navy Blue. I was really pleased with the way those fabrics turned out too. I even dyed some egyptian cotton top, which turned out nice, the photos didn’t though 🙂

Do you have a favourite dye for cottons or maybe a favourite method? Do you have any hints or tips to share with us? We’d love to hear your opinions. Click on the pictures for bigger images.

Fiber Reactive vs Acid Dyes

Fiber Reactive vs Acid Dyes

I have always used acid dyes for wool and silk because the results are good, the colors are strong and the dye is fairly light and wash fast. Since I need to use fiber reactive dyes for my stitch class, I decided to see if fiber reactive dyes (Procion MX) would work on wool.

In class, while we were dyeing cotton threads, I decided to try some wool thread. With fiber reactive dye, you use soda ash as a fixative. So that’s what I used on the wool thread. The results were very disappointing. The colors didn’t hold at all and the resultant thread was not the color expected at all especially with blue dye.

Ann then suggested that I try using an acid as the fixative with the fiber reactive dyes. So my next trial was wool thread soaked in vinegar water and then dyed. These results were much better. Still not as strong as the acid dyes but the colors held much better, even the blue.

I discussed my findings with Gail Harker (my stitch class instructor) and she questioned whether these results would be light and wash fast. So more experiments to try. I decided to take the thread I had already dyed and put it outside in the sun and rain for a month and see what happened. The photo above shows the results. The threads on the left are the control threads which I did not put outside. The threads on the right were exposed to rain, weather and sunlight for one month. I just attached them to a card and stapled them to my picnic table outside which is in full sun all day.

The top three threads are wool dyed with Procion Mx and vinegar. The second set of three are wool dyed with acid dyes and vinegar. The third set of threads (only two) were wool dyed with Procion MX and soda ash. The last set of threads is cotton dyed with Procion MX and soda ash.

I’m not sure you can see this in the photo but the wool threads dyed with Procion and vinegar faded a moderate amount. The acid dyed wool held very well and had little fading. The wool dyed with Procion and soda ash faded significantly from the color that was already really off from the original dye color. The cotton threads faded slightly.

I also sent an e-mail to the good people at Dharma Trading to see if they had some input about the use of fiber reactive dyes with wool. I learned a lot from Sharon’s (Dharma) response. She said that fiber reactive dyes were originally developed to dye wool fabric in the 1950’s. The manufacturers were disappointed with the results but accidentally discovered how well they dyed plant fibers and happily marketed the fiber reactive dyes for that use.

Sharon also said that the blue fiber reactive dyes do not strike well on wool or silk and tends to come out half strength or less. Therefore, any mixtures with blue dye will have a shift in color for example, purple may come out magenta and black shifts to brown or maroon. Blue is also the slowest dye to strike on cotton or other plant based fibers.

Sharon recommended to treat the fiber reactive dyes just like acid dyes when dying wool Therefore, use acid as your fixative such as vinegar or acetic acid and steam the fiber for 30 minutes to help fix the dyes. She also states that rinsing with higher temperature water will rinse more of the dye out so you will always need to wash/rinse the dyed wool with cool water or dry clean it. She also reports that the fiber reactive dyes will not exhaust like the acid dyes so there will be more fiber reactive dye rinsed out at the end of the dyeing process than with acid dyes.

My next experiment will be with fiber reactive dyes, acid and heat. I’ll see if that helps set the dyes in the wool better than just the acid. The nice thing about fiber reactive dyes is that you don’t have to set the dye with heat in plant fibers. But if I only had to have one type of dye, that would be better so I’ll let you know the results the next time I dye.

I’d love to hear about any experiments you’ve done using fiber reactive dyes and wool and see photos of your results. Feel free to post them on Flickr or join us on the forum and start a discussion about dyeing results.

Dyeing Silk with MX Dye

Dyeing Silk with MX Dye

I dye my own silk and one of the ways I do that is with MX dye. MX Dye is a fiber reactive dye and works on cellulose or plant fibers like cotton , linen and hemp. It also works on silk. As far as I know silk is the only fiber that you can use both weak acid dyes that are for protein fibers and the MX dyes on.

Scarves blowing in the wind.

I like to use the low water dye method. With this method you use a jar and just a little water. What I do is scrunch or twist or pleat up my silk to be dyed. In this case they are all about 2 feet wide and 8 feet long. Then you pack it into the bottom of a jar that is big enough to hold the silk and the dye (1/2 a cup) and the fixative (1/4-1/2 cup).  It is important that it be a snug fit for this method to work.

I mix up 2 colours of MX dye in 1/4 cup of room temperature water. Pour them over the silk in the jar one at a time making sure they silk is covers with liquid. If it floats as you can see a couple of my jars did you need to carefully weight them down with something non metal. Metal will effect the dye. Once the dye is in the jar you don’t want to disturb them. You don’t want the dyes to mix completely and give you a solid colour.

dye in jars

I am very impatient. So I usually go do something else for 20 min to an hour then I come back and add the fixative. With MX dye you have to raise the PH to get the dye to stick. The cheapest thing for this is PH up from the pool store.  You can use washing soda( not bicarbonate of soda) or order it from your dye supplier but pool chemical is cheap especially at the end of the season. I add a tablespoon for each cup of water including the mix water. Stir to dissolve and then pour it into the jar.  You should leave it for an hour to react but I am impatient as I said and usually dump everything out after about 20 min. Rinse the silk in cold water then hot soapy water then one more cold. Here are some results.

I am sorry the pictures aren’t better but the wind wouldn’t cooperate.  They were dry in about 10 min. If you want really good detailed instructions I would read about it on Paula Burch’s site. http://www.pburch.net/dyeing/lowwaterimmersion.shtml

Over Dyeing a Shrug Jacket

Over Dyeing a Shrug Jacket

I’ve been dying some shrug jackets this week. I made all the fabric white then sewed them with silk thread before dying. this way the thread will get dyed with the fabric and it will match.

This one I did spiced pumpkin. I would say it came out of the dye pot pumpkin without any spice at all. So, it needs to be over dyed.

Orange shrug before over dying

I decided to add my own spice. i found a reddish brown to use. I mixed it up and poured it on in stripes across the wet jacket.

Orange shrug with dye poured on.

Then I rolled it up and popped it the microwave for a few min to get it started. I wanted some of the striping to remain and not have the dye just disperse into the water and dye the whole thing. for plastic I used half a cheap plastic drop sheet. the are nice and thin but huge.

Orange shrug ready for the microwave.

Here it is after cooking and drying. It’s not a great picture because it is a really bright sunny day.

Orange shrug after over dying

You can see some of the stripe but it’s not a rigid line and the orange has gone  a little spiced and not quite as blinding orange.

Dyeing a Color Wheel

Dyeing a Color Wheel

Usually, when I dye, I don’t have the patience to dye the full color wheel. I end up picking colors at random and mixing a variety of colors, usually ones that I neutralize. Then I either end up with threads or fiber that’s all in the same color range or colors that I probably won’t use ever.

Recently, my friend Carole gave me 60 skeins of #5 Perle cotton threads. What an amazing gift, thanks Carole! When I was considering dyeing the threads, I decided that since I had so many threads, I would try dyeing a color wheel. I already had the Procion MX Dyes mixed up and had all 12 colors of the color wheel mixed from turquoise, magenta and lemon yellow.

So I finally did it! I dyed the full color wheel. I had 5 skeins for each of the 12 colors. So what I decided to do was do the full strength color for a dark value, a half strength color for mid range value and a very watered down color for a pale value. Then for the other two skeins I added black to one to make a shade and I made a neutral color for the last skein by adding that colors complement. You find the complement of a color by looking on the opposite side of the color wheel. It took me all day to dye these threads and a few pieces of fabric but I’m pleased with the outcome. If I mix colors again, I think I need to add more blue to the blue-violet and more blue to the blue-green. The blue is the slowest of the dyes to set and attach to the fiber. Therefore, it seems you need a bit more than you think because the other dyes mixed in will attach to the fiber before the blue even starts.

Here’s a close up of some of the threads. Aren’t they delicious? Now the only problem is that I am so enamored with all the colors that I’m hesitant to use any of the threads because then I won’t have my full color wheel. I’m sure I’ll use them but for now I just like to admire them 🙂

Direct Dyeing Felt Samples

Direct Dyeing Felt Samples

A few days ago, on the Direct Dyeing post, Shana was asking whether the same method could be used to dye felt pieces. I hadn’t tried it, but I had a couple of white sample pieces of felt that I thought would be good to try it with, so I did that yesterday. The first piece I tried it with was a sample made from two layers of 23 micron merino with wisps of egyptian cotton top between the layers and on the top. It started out roughly 9 x 12.5 inches, and after steaming for 30 minutes, it was 7.5 x 11.5 inches. The interesting thing with this piece was how the cotton took the dye, in some parts where I’d used a colour made from two shades of dye, the cotton took just ones of the shades

The second sample piece was made from two layers of 18.5 micron merino with milk protein fibre tops between the layers and on top. This piece started out 7 x 14.5 inches and ended up 6.5 x 13 inches. Both pieces were soaked in water and vinegar before dyeing.

I probably should have rolled the pieces instead of folding, from the photos of the backs, it’s easy to see where they have been folded. They didn’t take the dyes as well as wool tops or silk does, and there was still dye in both pieces that had to be rinsed out. The results were interesting though, both pieces felt the same afterwards, they didn’t feel extra fulled or less soft. Thanks for the idea, Shana 🙂

Click ‘Permalink’ under each photo in the carousel to see larger pictures.

Food color dying

Food color dying


Because we’ve been talking about all sorts of different dying methods and different dyes i thought i’d show you how i usually dye my wool. this pdf shows dying fibre with food coloring and a steamer which is an inexpensive way to create lots of different colors. If you dont have a free standing electric steamer then just use your stove top with a pot and steam basket. It is a lot of fun to do this,  its quick and easy and the dye does hold up to wet felting but sometimes the red will run. If your dying fibre to use in needle felting then this technique is perfect.

food color dying   

Stock Solutions for Accurate Dyeing

Stock Solutions for Accurate Dyeing

There is another way to do small or large amounts and get the same results each time.  The easiest and safest way is to make a stock solution.  It’s safest because dyes are most dangerous in there powder form, when the powder can fly around and land incredibly far from where you are measuring it.  It’s best to use a mask when measuring the powder. You don’t want to inhale the powder. You need to keep records so you know what you did. What I do for acid dyes is measure 10 grams of acid dye powder into 1 litre of boiling water.  This solution will be good for up to 6 months in sealed jars. Remember to labels your containers very well so everyone knows what they are. It’s best if you keep them separate and away from any food so there are no mistakes. This gives you a 1% solution so you can use 1cc (measured in a syringe for ease) of die solution for every gram of dry dye stuff (wool roving for instance) I want to dye to a medium shade. If I was pale shades I use half as much and for dark shades up to 4 times as much. This is the most accurate method. This can be hard if you don’t have a scale that measures very small amounts. Now if you’re not that precise that’s ok. As long as you use the same amounts every time you make your solution so if you use 2 teaspoons of dye in 1 quart of water and use a syringe to measure you will be fine. When you dye something write down how much wool you had then how many cc’s of each dye you used to make the colour. I used to keep a small sample of each batch on a card with the amounts of dye used so I could reproduce it when I wanted too.

A weekend of dying
Direct Dyeing

Direct Dyeing

Direct dyeing is a method where the dye is applied directly to the fibre. This can be done with very small or fairly large amounts of fibre depending on what utensils are available to you, but it is particularly good for smaller amounts. One advantage is that the fibres don’t move around so there is less tangling or felting. Another advantage is that very small amounts of dye can be made up, reducing the risk of waste.

Dyed Silk Throwster’s waste

 I have written a step by step tutorial with lots of photos and a table to help work out very small amounts of dye/solution. I apologise to anyone more familiar with imperial measurements, the quantities used are so small that the tiniest measuring spoons are used and they are metric, so it was easier to stick to one measurement. And also US and UK fluid ounces differ, and even cups have metric, US and Canadian versions 🙂  If anyone needs a converter I find online conversion is excellent for everything.

Direct Dyeing Tutorial, please click for PDF