Browsed by
Category: color

Hair to dye for the Mer’s.

Hair to dye for the Mer’s.

Hair to dye for the Mer’s.

After a long pause from felting to work on the Guild Library survey (why did no one tell me data analysis was so much fun?) with interruptions to torture incent unsuspecting flax plants, I am now back to working on the Mer’s.  Shark Boy is coming along nicely but seems to be missing something… hair!! They will all need hair, but I want it to work with their tail colours too.

Well, I should have some locks or at least some bits of fleece that might work for long hair, because what Mer would not want long hair? All that floating along behind them in the water, looking flowy, and lustrous. Gorgeous tresses, getting in their eyes when they are hunting. ok maybe a braid might be better or another somewhat controlled hairstyle but long, defiantly.

I am imagining picking up bits of colour from the body may be a base of black or dark gray with streaks and accents of some of the body tones. Since Hair should be different than skin, I want to use a different fibre than the Corriedale I have used for the body. Something with a bit more body, (without the use of styling products or heavy conditioners).

In 2019 I picked up a couple of “Coarse” fleeces from the Wool Growers Co-op. Both are quite soft but are more towards a wavy hair than a fluffy crimpy type of sheep. Both are off white to light gray. I also have a reddish-brown Shetland fleece that might be interesting overdyed. I collected a sandwich zip lock bag of each from my stash and turned to the problem of changing their colour.

I need hair dye! Well, I have threatened my hair with that if it didn’t do something interesting as it’s progressing back to the “blond” I was born with. (Ann says it’s a shade of light gray, I claimed it’s just transforming to blond a very light shade of blond that I hope one day will be white) so I don’t have any hair die and none in greens and blues. Humm.
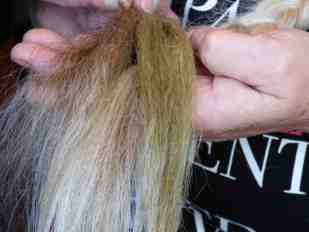
 1 I don’t have any hair die

I do have some old Ritz dies in the basement but they are for dyeing medieval gowns so a bit too much for small samples of fleece. I have heard rumours that you can use food colouring to dye with. Yep, checked youtube, they seem to show only dyeing yarn but it should work with what you make yarn with! Ok, check the kitchen, no food colouring.  I have a plan! Ask Glenn to pick some up on his way back from work! Thanks, Glenn.

So I had collected samples of the two coarse fleeces and a bit from one of the Icelandic. My final fibre to add was horsehair to give a bit more body. I have some dark and light tail hair but unfortunately, it was clumped together and tangled. I was able to extract some and got them laying parallel, held together with a bulldog clip.

Now what do I cook all this in. it’s a bit small for even my smallest pot. Hummm. I am not using the plastic organizer trays I was using for saucers on some of the outdoor plants. I wonder if they would go in the microwave? They don’t say that they don’t go in the microwave!

 2-3 Plan B

I am likely too impatient but I soaked the fibres in warm water and vinegar to prep them for dying. I realized I could fit most of my samples in one organizer and left one sample in the other.  I let it soak until the fibre seemed quite saturated and removed some of the excess water.

  4-6 Soaking in water and vinegar

When I could not stand the wait any longer, I dripped in drops of strait blue die on one end of the containers.
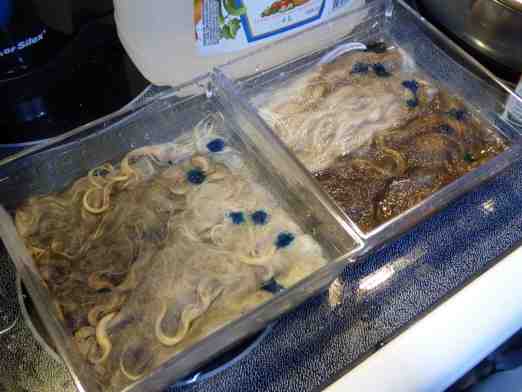
 7 Dye just sitting there

Well, that was disappointing. They just sat there, maybe I took out too much water. I think it needs a poke to inspire the die to migrate a bit. (One of the YouTube videos poked at their skeins in the dye bath) where did I put the spare take out wooden chopsticks? Found them! Why are they with the plastic straws? (maybe filed by the similarity of shape?) Poke, poke, stab, poke and the die is migrating along the top. Ok, let’s add some green and see if we can get a bit of migration and mingling. This is starting to sound quite social. I should put out cookies and make drinks! Again, green drips just sat there. Maybe a bit more water, AH! Yes, now it’s mingling better. More poking but not stirring and I have a nice blue-green, not the Prussian blue I was hoping for but it’s not the right base blue I suspect.

8-9 Poked with chopsticks then tipped the container to migrate the dye

Next, I dripped in some yellow to both samples and worked that in with more poking. Finally, I tipped the containers and got the unattached die to migrate towards the undyed parts. I assessed how it looked and deemed the blue was not quite what I wanted. Maybe a bit of red to get the blue a bit more towards purple would be better?  Let’s try that on the samples with the darker one. A few drops! Oh, my! Red is an aggressive colour! Well, I’m not sure you would call that blue but it is investing. Let’s see what it looks like when it’s dry.

10 3 drops of red

11-13 Heating it up, then letting it cool

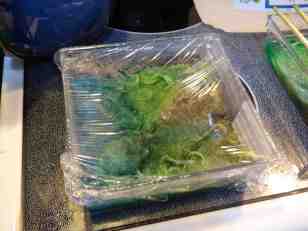
Now on to the microwave, let’s guess a minute at a time. Two minutes total gave a nice hot dyebath but still a lot of suspended die. I cooked both for 2 minutes covered with cling wrap and remembered to take the mettle bulldog clip off the horsehair before I stuck it in the microwave. Now let it sit covered until it cools down on the stove and see if I have suspended dye left in the wool.

 14 one leaked but it did seem to have survived the microwave

Usually, I am much better at this patents thing, maybe I will go make some oolong tea. In addition, one of the last of the season’s butter tarts made by Ann. She is amazing and her butter tarts are Really good!

15-16 Oolong with one of the last tarts of 2020.

17 Cooling fibre on the stove

Enjoyed the Butter tart, drank most of the tea and worked on the computer….. Then went to drain and rinse the wool samples. Looking good!! I added some soap and re-rinsed, seems to have mostly stopped leaking blue.

18-19 Rinsing in the sink

So a light squeeze and draped over a chopstick and paper towel to dry.

  20-21 set out to dry

Went back to the computer (played Rune scape) then back to the kitchen to check on the wool and start dinner (miso and ginger soup with shitake mushrooms, onion and noodles). The wool seems to have left a few spots on the paper towel but is looking very colourful.

22 a bit of staining on the underside of the paper towel

  23-24 dyeing made me hunger for dinner
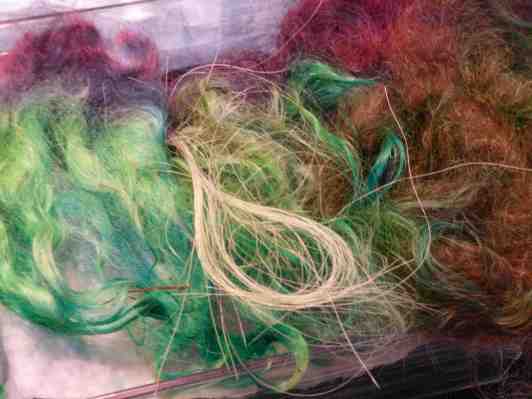
  25-26 Dry and ready to use

It was interesting to see how little die the white horse tail hairs picked up. I may get better results by letting them simmer overnight in a die bath but there is a bit of colour and they may still work.

It has been years since I got a chance to dye anything and this was a lot of fun. I will have to keep an eye out for variegated grey fleeces in 2021 and consider doing some dyeing outdoors next spring. (Glenn does have that second forge but it might make the dye bath a bit too hot. So maybe I can use the barbeque.)  Have fun and happy felting!

27 now on to more butter tarts!

More dyeing shenanigans (with a twist)

More dyeing shenanigans (with a twist)

The last time I wrote, I talked about dyeing yarn. As an indie dyer, my job is to create colourful yarn that someone else will turn into something beautiful. That’s pretty much the norm.

Now, what if I turned that regular idea around and dyed the finished item instead? What would happen? Let’s find out!

I had some very lovely 4-ply yarn at hand, plus some mohair lace that was just coarse enough to be uncomfortable if used alone. Paired together they would make the perfect DK weight yarn for a cardigan I wanted to knit.


Fast forward 2 or 3 days, and here’s the finished cardigan, minus the buttons.

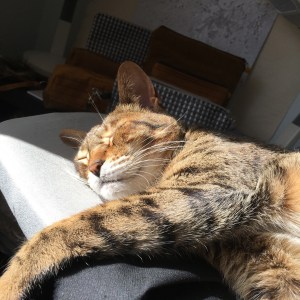
Let the experiment begin! I wanted a red base. I had to add that to the dye bath first. It looks very much like a murder scene, so let me tone it down by inserting a cute photo of my cat Marshmallow next to it.


Since I wanted the red to be soaked up slowly and evenly, I started with cool water and no acid for binding. This will ensure the colour is seeped up gradually and has time to get to the whole garment. I then added the wet cardigan, turned on the heat to medium-low and kept an eye on it.

After 15 minutes, the water was warm and I could see that the red was all over the cardigan. Time to add citric acid gradually. Then turn up the heat, simmer for 10 more minutes, turn it off and wait for the water to clear up and cool completely.

A good sign that you’ve used the right amount of dye and acid is that the water clears up completely once cooled. This is also a great sign of minimal bleeding in future washes, the bane of any dyer.
(If your water isn’t clear, try adding more acid and simmering for another 15 minutes. Let the water cool completely and see if things aren’t better.)

I really liked this colour, but a rule of thumb is, if it looks perfect under water, it’s too light when dry. I also wanted a bit more dimension to the red, so some dark grey was needed.
I didn’t want this new colour to soak up evenly, so I didn’t remove the cardigan from the bath water as I added the new dye, and I kept the same acidic, fast-absorption water from before.

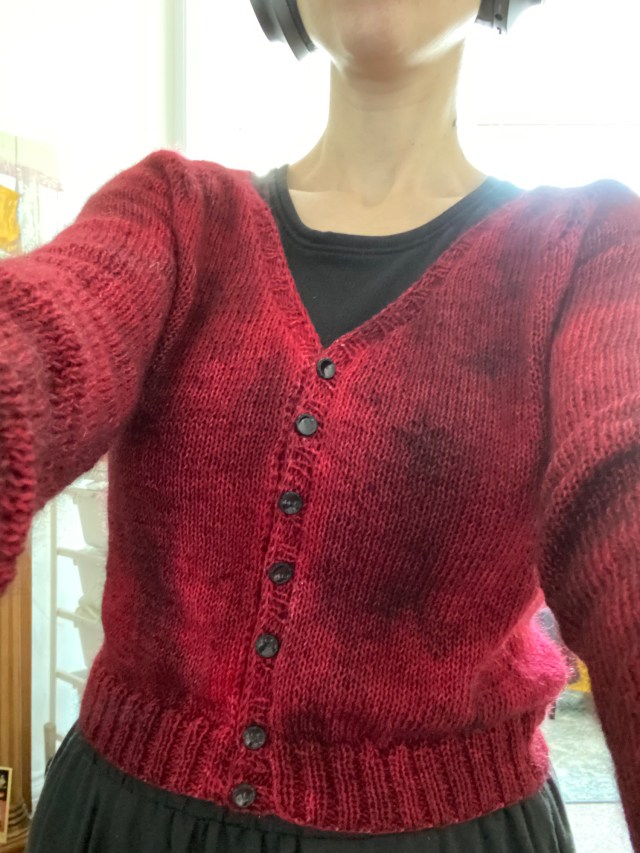
And here she is afterwards in all her glory!

I know the “scruffy look” might not be everyone’s cup of tea but I love it. It looks like a long-worn cardi, something my nan might have passed on to me. The vintage buttons complete the look.

Now, the important question: is the end result the same as dyeing the yarn in the skein? The answer is a resounding No. Depending on how tight you knit, you might end up with a lot of areas that the dye won’t get to because the stitches act as a resist. You can see lighter areas in the photo below, something I fully expected, even though I’m a fairly lose knitter. I actually like this feature because it’s very different from what you normally see.

I had never done anything like this before, and you might be horrified to know that after this, I’ve knit a shawl and now have a second cardigan on the needles, and both will receive the same after-completion dye treatment…

I wore it for the first time yesterday (at the time of writing) and it kept me warm all afternoon indoors.

I hope you enjoyed this experiment. Let me know if you’ve ever tried anything like this before, and what the outcome was! If not, what dyeing shenanigans have you been up to or would like to try?

Stay safe and enjoy the rest of your day.


Decorating the cowl

Decorating the cowl

As you recall I was dying some silk lap for my cowl. They turned out well. Silk always looks so raggy after dying. I think it’s the squeezing out of the excess water. They look a little better dry after a little shake and stretch.

With the cowl being different colours of purple I think either the gold/orange or gold/ orange/purple.


I decided on the gold/orange/purple. the gold/ orange was to close the leaf fabric. I cut a small amount from one side of the lap.


I stretched the silk over the back of the cowl leaving enough on each end to cover the front.

I flipped it over and then cut up the leaves to decorate the ends. I put some on the underside( the silk side) and some on the top.

Then the other end

You saw above I had about 10 grams of silk. After stretching it out to get the amount of silk lap I wanted, I ended up cutting about 1/4 of it off the 2 ends.

I covered it up and gave it a good rubbing on both sides and rolled it up. Next up, the rolling. I am starting to feel like this is the never-ending cowl but I hope to show you it all finished in the next post. Before I can do that, I have to make some more masks, my mom wants a couple and some more pie making. And of course, today is Halloween. No trick or treating for the kids but the grandkids are having a haunted walk in the field. The grownups have as much fun setting it up as the kids will have running around in it.


Soon to be leaves; purpose made prefelt

Soon to be leaves; purpose made prefelt

If you remember I started to work on a new cowl design for maybe teaching or maybe selling but at least one for myself. here the blog if you missed it or want to remind yourself. https://wp.me/p1WEqk-9Ha

Sorry to disappoint but it still isn’t finished. I did decide I wanted to put some autumn leaves on it so I made some prefelt to cut them out of. I started with green, I want it to be in the middle. I was thinking of having a little green showing at the edges might look nice.

then I added some reds orange and golden yellow. I did it in an odd pattern so I could cut out leaves that were not all one colour. The pictures are not great. No matter what I did they looked blurry. I think it’s too much light bouncing off the fibres it just can’t focus.

I flipped it over and laid out to “match” the other side. The green is thin so it wasn’t hard to see the colours through it.

Next, I got out my silk top and my silk hankies and put some on both sides to give it some shine. I tried to get pictures of it but it doesn’t show at all.

This is the finished piece. You can see the silk now.

There is only one more regular market day, this Saturday and then I get a break until the Christmas markets on Nov. 21 and 28. I plan to get the cowl done and to make some baskets to sell. So, fingers crossed, more to come.


What goes into hand dyed yarn?

What goes into hand dyed yarn?

A few days ago, Ruth had the courtesy of sending me an email reminder about my upcoming blog post (this one). I mentioned I was sparse on ideas, so she suggested I talk about my dyeing process.

This ended up being serendipitous, as yesterday I received a custom order request for a new colourway I launched as part of my new collection. Voilá, I’ve got a blog post!

Now, this isn’t meant as a How To on yarn dyeing, so I shan’t go into too much detail (although, if you’re interested, I’d be happy to write a more in-depth post in the future – let me know in the comments). I will, however, mention a few basic things you definitely need to dye yarn/fibre safely if, like me, you’re using acid dyes:

  • The hardware you use shall be for dyeing only. So don’t use that fancy pot if you’re even thinking of making Sunday roast in it ever again.
  • Always, always wear a respirator mask when handling dyes, especially when in powder form. Dye particles travel far – I’m all for fluorescent green wool but not in one’s lungs.
  • Gloves are a must. You don’t want bright pink fingers for a week (ask me how I know), and you also want to avoid absorbing pigment through your skin.
  • No food or drink near the dyeing station, and you’ll need to clean everything before and after if dyeing in the kitchen.

Ok, so let’s get to the good stuff.

This is the yarn I need to reproduce. It’s called Mossy Moggy (moggies being what we call non-breed specific cats in the UK, do you call them the same in the US?). I needed 3 skeins.

If you want to be able to reproduce colourways in the future, you need good note taking habits. I have a dedicated folder where I keep all my cauldron inventions. If you think you’ll remember how you created something months later, trust me, you won’t.

This is my dye sheet. I leave the space on the upper left corner blank so I can attach a photo of the finished item to jog my memory.

Now on to the dyeing itself. Since I mentioned how important it is to wear a mask, allow me to show you myself in my best Breaking Bad impersonation.

You’ve no idea how hard it was to procure this mask and filters. I needed a new one during the pandemic and everything was sold out. For the life of me, I never thought particulates masks would sell out, but I guess some people want to be extra careful.

There’s plenty of ways to hand dye fibre, and endless techniques. Each will yield different results, and it’s a lot of fun to play around. In this particular case, I’m doing low immersion dyeing: this means I’ll be using just enough water to cover the fibre, on a stovetop.

I’m using a Gastronorm pan, which might look familiar to you if you’ve ever been to a buffet in a restaurant. These are super handy, large enough for up to 6 skeins, sturdy, and fit my electric stove perfectly (over two hobs). There’s several standardised sizes to choose from, this being the largest one.

Mossy Moggy is created by dyeing part of the yarn first, without pre-soaking it first. As it sinks, the first colour gets absorbed gradually and allows for differences in depth. Then I add another colour to the top that has remained undyed, and after it’s all exhausted (meaning all the dye has been taken in by the fibre), it’s time to add sprinkles.

Sprinkling yarn is a favourite activity of mine. Wearing gloves (and donning my respirator), I scatter some dye powder over the yarn here and there. Less is more. The water here is fairly acidic (I use citric acid, you can also use vinegar to get the dye molecules to bind with the fibre) so the sprinkles stay relatively put. I love seeing those little dots of colour.

As I write this, the yarn is cooling down in the pan. I always let the water get cool before I remove the fibre, it allows for more vibrant colours. If I manage to remember to come back to this post before it’s scheduled to publish, I’ll add a photo of the drying skeins.

One interesting thing to remember if you’ve never dyed: colours always look one to two shades deeper whilst wet. If you’re trying to reproduce a certain colour and think it’s spot on in the pot, it’s probably too light.

Once these beauties are done they’ll be heading over to California. I’ll be very excited to see them reach their destination and even more if my client tags me on social media once she starts knitting with them!

Let me know if you have any questions, and if you’d like a more in-depth post on dyeing in the future (and what you’d like to read about the subject). Have a great week.


Burning the fuzz off a basket and then dying it.

Burning the fuzz off a basket and then dying it.

I thought I would try burning fuss of some felt, a bergschaf wool basket to be precise. My son gave me his cool little cigar lighter he picked up. It worked for about 5 seconds then was out of fuel. no problem we will just get some butane and fill it. Well, you would think that was easy but no.

So I will try a candle. We really only have beeswax candles so I got a tealight and tried it. It worked  (it looks more scorched than it is)  but I spilled wax on the basket and that’s not good. Good thing I decided to try the inside of the handle where it won’t show so I will not have to look up how to get beeswax out of wool. I seem to remember something about ironing with paper from my grade 7 batiking class. We will not mention just how long ago that class was.

Next was to see if Walmart has a little torch in the kitchen section for doing the tops of Creme Brulee. No, they do not. How about some butane? No, you have to order that on the online platform. No flammable gas in the store but they will ship you pressurized gas in the mail. No time for that, buy a BBQ lighter. They have that. I had to return that seems it won’t light. Next, let’s try Canadian Tire. Yes,  according to the website they have butane and even have a little torch on sale cheap ($9.99 marked down from $39.99). No, they are sold out even if the app says there are 2 left. And where is the butane? Nowhere to be found. Another fail. I am starting to think the universe is telling me not to do this. But there are BBQ lighters at the cashout. Let’s try again, I grabbed one and off I went.

This BBQ lighter works, now I can give this a try.

I worked well. A little hard to keep it lit because of all the safety features on lighters these days but I managed. I was wishing to the flamethrower lighters of my teen years. Just not the same waving a phone light. Not to mention you cant singe hairs of wool with them.

It wasn’t easy trying to get a picture of the singed hairs. If the pot had been white maybe it would have been easier but many tries later I got this good one. Keeping the torch moving is the key to not singing it. and the hairs shrivel quite fast.

The problem is it looks like it’s nice and hair free and then you brush off the burned bits and it just raised more hairs. I tried to be gentle but still. after a second pass, it was better but still, there were hairs. It’s too bad it didn’t work as I wanted because even though is it a bit stinky it was fun to do.

Oh well moving onto the next step, dying the basket. This time I picked magenta and purple.

First into the dye pot upside down to do the lighter colour on the top. it cooked loner than usual as when I went to take it out I realized I hadn’t added any vinegar. Oh well, no harm done.

Then the other way up to do the darker purple. You can see the wax I didn’t get off, on the top. A very effective resist.

I was very happy when I rinsed the basket, there was no bleeding at all.

I rolled up the handle to dry in the right shape this time. So there is a happy face instead of an alien this time.

This is a nice close up that shows the colour changes nicely. When it is dry I will shave it.


Here is t is off the ball. I will add some stitching but that’s a job for Sunday.


By now, with basket 3, I am sure you are sick of hearing about may baskets. I promise not to do another basket post next week when it is my turn to post again.


3rd Quarter Challenge and Summer Poker Challenge in One.

3rd Quarter Challenge and Summer Poker Challenge in One.

My guild does a summer poker challenge every summer. first, you pick weaving or spinning or new this year felting. You pick 3 cards from a deck of cards to find out your challenge for the summer. The idea is to get you to try something you wouldn’t usually do.  I picked my card in June. I got blue, cotton and metallic.  Then Lyn and Annie announced the 3rd quarter challenge of a personal item to keep you warm. There is more about the challenge here:

2020 Third Quarter Challenge

The first thing I did was dye some open-weave cotton I had.  You can read more about that here in this blog post I did:

Cotton dyed and some new fibre.

All the pictures will open larger if you click on them.

My plan is to make a lightweight poncho for cool evenings. This requires a big layout. the start is 4feet by 4feet. I put the first layer of cotton down and decided to use thin plastic for the resist so it would roll up easily. I don’t need to feel the edge of the resist like you do making a hat.

I added the second piece of cotton and sewed around the edge using big basting stitches.

Then I took it all out and overlapped the edges and sewed it up again. The edge will be visible on the inside and I didn’t want the seam sticking out.

All sewn together

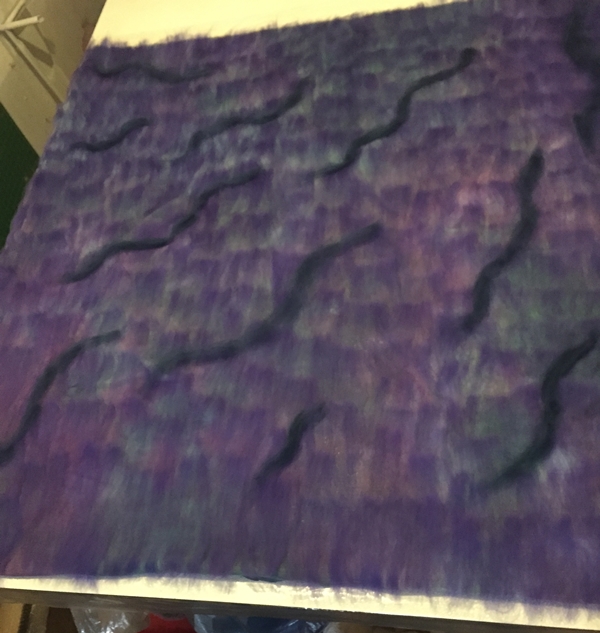
Next, I added a very thin and not perfectly neat, layer of medium blue. I want the cotton to show through. Then started adding the embellishments. Sorry about the pictures not being great but I am holding my phone as high up as I can, trying to get an overall shot.

This one is a bit better. Mostly the embellishments are wool in different colours.  I added the metallic threads to take care of that part of the poker challenge but didn’t get a good picture.

These are the 2 sparkly nylons I used for the metallic part of the challenge; bronze and steel. I only used a little. I don’t want to sparkle very much.

Next is wet it all down, and start felting- rubbing and rolling.

When it was starting to shrink I opened one corner to be the hole for the head and opened the bottom 2 sides.

Here it is finished.

And the cotton sides

Here are some closeups

The cotton side

The wool side

And the metallic bitts, they don’t shrink so they get wiggly.

I am very happy with the result. The wool separated out and let the cotton show through. It has a nice light feel and I think it invokes the feel of moving water or ripples on a pond. It should work well for cool nights.

Final Bark Color Mixing Experiment

Final Bark Color Mixing Experiment

I tried one last experiment with creating bark and color mixing. I showed you last week my attempt with color mixing with a drum carder. And there was another experiments here.  I had part of the mixed batt left over from last week so I decided to combine all of my techniques and see what happened.

First I split my batt in two layers. You can see the felted piece from last week on the right. I then added two layers of green wool over the surface of the bottom batt.

Then I cut up the felt piece from last week and placed it over the green wool. I wanted more green migrating through between the felt pieces.

Then I added the other layer of batt over top of the felt pieces. With everything layered up, I was ready to wet down.

I wet it down and then did a lot of rubbing. I worked carefully between the thick felt pieces in the center of the sandwich so that they would stay in place and there would be a nice indentation between. I also fulled the felt very hard to get lots of green migrating through the top surface.

And here is the finished piece of bark. (Edgar is helping me take photos.) Finally, this is the look that I wanted when I started this experimentation. It has a wonderful texture and the color mixing is what I envisioned. So a combination of carded batt and layered colors with thick felt in between did the trick. Yay! I will have to decide if I am going to add any stitching or other embellishments to this piece or just leave it as is. What do you think?

Basket Mark 2 Finished.

Basket Mark 2 Finished.

This week I finished the basket. All it really needed was to have the handle finished and that would have been fast and easy. But a white basket is not only boring it does not fit with me. I can’t keep anything white clean for long.

So faze to of the basket: dying.

I have a turkey fryer/corn cooker for dying outside. After clearing a spot on the porch for the dye pot and my son cleaning all the bugs and spiders and webs out of the hose and burner I got some water heating. Usually, when you are going to dye wool you wet it first. it gets you a more even take-up of the dye. I didn’t want that in particular so I popped it in dry.

you can see I only put it in partway. Ther is about half the bottom of the basket sticking out. This is limy green. after it had cooked for about 45 min just under a boil the water was clear and I removed it and added a dye from ProChem called Mallard. It’s a blue-green and put the basket into the pot the other way up. I forgot to take a picture of that, sorry.

Once the dye was exhausted I rinsed it and blew the beach ball up in it again, another alien.  I am really pleased with the way the colours came out.

Since I had the dye pot hot I dyed some wool too.

My original idea was to use a piece of a tree branch in the handle.

It was ok when I was holding it but as soon as I put it down this happened.

It dropped right to the bottom. So much for the cream buns you just bought. It is much too heavy. Looking back at the pictures I had seen with wood in the handles, they were all small and the wood was mostly driftwood, which is much lighter. Those baskets seemed to be more decorative than useful.  I went back to just rolling all the excess wool up into the handle. It makes a nice sized comfortable to hold handle.  You can see the colour mixing better now its dry.

when I let go of the handle It still falls to the side but not nearly as much, so the cream buns are safe.

You may have noticed that one side of the basket stretched out more than the other. I think it was from the ball being blown up in it. I should have rewet it and fulled it some more but I didn’t want to. I was thinking of how to fix it or make it a feature rather than a flaw.

I pinched it a couple of different ways and that would have worked but I didn’t really like it. the heck with it, it’s just for me.

The basket part feels a little light even though there is 200grams of fibre in it.  It was a bigger resist but I reasoned to myself that there is more wool in 200 grams of Corriedale then there is in the same weight of Fin. I didn’t put any yarn in it, mostly because I forgot. I wanted to prevent the basket lip form stretching out any more. I tend to overfill my baskets and bags. Off to search my handspun for some appropriate yarn. I found a yarn that is predominantly the same colour as the Mallard on the bottom of the pot and did some decorative and structurally helpful stitching. I am pleased with the results.  Sorry about the pictures. I was trying to keep my arm out of the way and get far enough back to get the whole basket.

I think there will be more baskets in my future.

Playing with Color Mixing in a Bark Sample

Playing with Color Mixing in a Bark Sample

I’m still playing around with Ponderosa pine bark samples. This time I wanted to play with colors and add some nuno felted silk to the top layer. I wanted to see how neutralized the colors would become with fiber migration in the felt. You can see my first bark sample here.

So I started with blue green and red orange, complementary colors on the opposite sides of the color wheel. When you mix these type of colors with paint, you will get a neutralized color leaning towards brown or black. So what would happen with felt with the fiber migration? I didn’t have a true blue green so I used a layer of darker green leaning towards blue and then added turquoise on top of that. Then the red orange on top since the Ponderosa pine bark leans toward more red orange. I used a herringbone style layout.

Then at the last minute, I decided I wanted to add more texture and decided to use the left over pieces of pre felt from my poppy vase I showed you last week. It wasn’t even really felted at all, just laid out and wet down. I put it underneath the layers of laid out wool as you can see in the photo on the right. I should have used harder felt as you will see later.

I then wet it all down. You can see the back in the middle photo. On the right, I added some cut pieces of hand dyed 5mm silk that Paula gave me. (Thanks Paula!) These were cut in the shapes of the bark after it falls off the tree and I just randomly applied them. There are two layers of silk in some places.

Here is the piece after felting. We have been having a discussion over on the forum about rubbing vs rolling and I was thinking about everyone’s replies when I was felting this piece. It seems everyone has different ways of felting. Check out the discussion here. We’d love to have your input too! If you want to know how this piece was felted, I use a ribbed mat underneath and mainly rub, apply pressure and gently vibrate with my hands.

And here’s the piece after fulling. I fulled this piece very hard as I wanted a lot of fiber migration and mixing of colors. I did that by rolling the felt against itself on the ribbed mat, throwing, and scrunching between my hands. I will definitely have to play with mixing colors more this way because I love the end result. I think I will try making some batts with these colors and then felting them to see the difference in color mixing. I didn’t like the end result of the use of prefelt to add more depth to the piece. The prefelt just squashed out and felted into a sort of small hill. The already hardened felt in my first bark sample was much more defined as you would expect.

I am planning on adding some free motion machine stitching to get more definition in the depth. I may also add more fabric applique but haven’t decided yet. What do you think it needs?