Browsed by
Category: Announcements

In Memory – Marilyn aka Pandagirl

In Memory – Marilyn aka Pandagirl

It is with great sadness that I am writing this post. I was notified that Marilyn, aka Pandagirl, died from complications of a respiratory illness, while recently visiting her family in California. I emailed her husband Craig and expressed our condolences from The Felting and Fiber Studio. He kindly gave his permission for me to write a post in memory of Marilyn.

Marilyn joined The Felting and Fiber Studio forum in June of 2013, where she has written almost 5,000 posts. When one of our original members stepped down, Marilyn joined our team and posted to the website here for five years (March 2014 – April 2019). She had a background in marketing and wrote quite a few posts about how to market artwork and gave some great ideas on boosting small businesses like many of us run.

In Marilyn’s first post, she introduced herself and talked about her fascination with textures. I think a lot of fiber artists have that inclination to be a “hands on” type of person and Marilyn showed us many different fiber textures over the course of her posts.

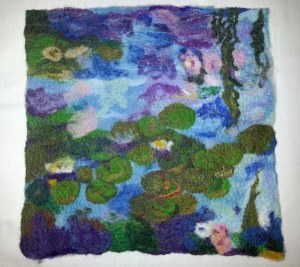
Marilyn’s work ranged from Easter baskets, nuno felting, felt bags, dyeing, surface design, 3D pods, creating her own hand carded batts, and many felt pictures. She often made gifts for her family members and even one for her retiring physician (wine bottle cover above).

When I asked our other members about their memories of Marilyn, I heard over and over how kind and thoughtful she was. I have included their comments below, interspersed with photos of Marilyn’s work.

“I remember Marilyn from my first postings on the Forum, she was always very present and generous in her suggestions.” Caterina

“She will be missed. Marilyn always contributed to TFFS, either in her posts or with her thoughtful comments.” Antje
“It was only last week that I was wondering how Marilyn was.  Soon after I joined the Studio, I remember a post from her mentioning that she was not well.  Having delved into the archives from time to time, I have come across her posts and I remember that they were always very upbeat and interesting.” Ann B.
“Marilyn was an enthusiastic felter (one of her many talents) and she made beautiful items – many of which were gifts for her family in California. She was always cheerful and very encouraging in her comments on all members efforts. She will be sadly missed by many.” Lyn & Annie
“It was always lovely to see Marilyn at our gatherings, always cheerful and bright.   I briefly knew her through social media (Facebook).   She came across as a beautiful person with family at the centre of her universe.” Helene
“I’m heartbroken to hear that Marilyn passed away. She and I used to exchange emails occasionally, talking about our lives and exchanging news. She always had lovely photos of her grandchildren to share and made me feel a little like I was part of her family life. Marilyn was a lovely human being, always ready to help and always upbeat (even when her illness was taking its toll). I’ll miss her dearly. She’s actually the reason I started blogging with TFFS, so she could have some time off – so Marilyn is the reason I got closer to you wonderful people :)” Leonor
“I remember Marilyn as much for her encouragement as for her interesting and inspiring posts. When I first started felting and discovered this wonderful online community she was so supportive. No matter how crude my early attempts with fibre were Marilyn always responded with a positive comment and that encouraged me to continue trying!” Karen
“This is very sad news, Marilyn was such a lovely person, always cheerful, kind and generous, she will be sorely missed. She was the inspiration behind this watercolour sketch from 2018, may she always be happy and smiling.”  Teri
“She was always so positive and encouraging in her kind comments that I felt I got to know her a little as a kind, loving and generous person.” Lindsay W.
Marilyn will be missed by us all. If you have memories of Marilyn or wish to express your condolences to her family, please leave us a comment. If you would like to read more of Marilyn’s posts, use the search function on the right side bar using “Marilyn Aka Pandagirl” and her posts will come up.
Learn a New Felting Skill! Or Develop Your Art and Design Knowledge!

Learn a New Felting Skill! Or Develop Your Art and Design Knowledge!

Teri Berry has two online classes that start in a couple of weeks. Registration opens today so you can sign up now. Choose between learning how to make a felted concertina hat or a more complex felt bag.

The Felted Concertina Hat class teaches you the basic skills of making a concertina type felt hat. Then the course progresses into further variations of creating felt hats and Teri helps your ideas transform into hats that fit well and develop your own style. Read more about the class and register here. 

Here are just a few of the hats created by students in Teri’s class. You can see more here.

Felted Bags online class will teach you how to use multiple resists, introduction of nuno felting into bag making, and learn how to make a closure entirely from wool. You will progress on to how to add internal pockets, a magnetic clasp, adjustable shoulder straps and take shaping the bag to the next level so the bag has a flat bottom and stands up on its own. Again, Teri will assist you in designing your own bag style and moving your skill level forward in felt making. Register now for the Felted Bags online class.

As always, our Wet Felting for Beginners online class is available. For more information about this class, click here. Learn the basics of wet felting, how to use embellishments, all about shrinkage and even how to blend wool by hand. So if you’re curious about wet felting, this is the course to get you started.

© Ruth Lane

Whenever I post or talk to people about Gail Harker’s classes that I have taken, I get inquiries about whether or not her classes are available online. In the past, I have replied that most of the classes were not available entirely online. However, that has changed. Many of the classes I have taken are available to people who don’t live close enough to Washington state to attend in person classes. (I receive no remuneration for sharing information about Gail’s courses.)

Online Art and Design (previously known as Level 3) is now being offered in a four module format. Each module has 8 to 12 sessions. The sessions include online lessons as well as individual online tutorials with Gail. The first two modules are now available and classes will start in December. Click here for information about the first module. The second module is also being offered for students who have completed module one.

© Ruth Lane

There is so much information in Gail’s art and design classes. Take a look at the course brochures (links at the end of this post) for a comprehensive explanation of the classes. I never took any art classes in school and was woefully short on art related knowledge when I first dipped my hands into the fiber art world. After taking Level 3 Art & Design, I was much more confident in my design skills and abilities to create my own compositions. I not only learned many techniques to express my creativity but also how to “see” as an artist does and to evaluate different compositions to understand what made the design more interesting, what needed to be edited and what additions a composition needed.

I can remember many times when if someone asked me if I could draw, I would say “No, I can’t draw, I’m not very creative.” Since taking Gail’s classes, I don’t hesitate to draw or paint or sketch or just try a new technique. I do something creative nearly every day and I am delighted to be taking Level 4 classes.

If you are interested in developing your own art and design skills, I would definitely recommend these classes. They are well worth the investment in yourself and in your growth as a creative person.


Course Brochure: Level 1 Art & Design

Course Brochure: Level 2 Art & Design


New Community Pages

New Community Pages

I’m excited to announce that we have developed some new community pages for all of our readers and followers. We have had loads of requests from interested readers who wanted to submit photos after reading a post or being inspired by a challenge. We now have a place that anyone can submit a photo. Our Community Photo Submissions page is now ready for you to submit a photo. It’s under the Community tab on the menu.

We only ask that you resize your photo before submitting it to something smaller than 1MB. This allows more space for the photos and quicker loading of the site. Please include a description of what you are submitting as well as why you are submitting the photo. Once the submission is complete, we will review the photo and put it in the gallery under the community pages. This may take a bit of time (up to a week) but soon your submission will be available for everyone to see.

We have also included our Links/Resources page under the Community menu tab. There is some great information there if you haven’t checked it out before.

The other page in the Community menu is Links to Blog Posts. The page gives you a list of the last forty blog posts by name. It automatically updates whenever a new post is published. You might wonder what the purpose of this page is or how you would use it. If you read a post in the last several months, and you want to find it again, you can look on this page to find the post easily. That way, you aren’t scrolling endlessly through long posts trying to find a particular post. It’s also a place where Instagram visitors will land so that they can find the post they would like to read easily. Thanks Helene for setting this page up!

These changes have made this site much more interactive and we’d like to encourage all of you to submit some photos of your work. Have you created samples or a finished piece with repurposed or recycled items? The First Quarter Challenge is coming to an end but we’d love to see what you have created. It doesn’t matter if you created it recently or in the past, we would love to see how you are repurposing items into something new. And it doesn’t matter if it’s a finished piece or a small sample, show us your creations. You can upload photos here.

Or do you have some felt samples that you have from different breeds? Ann posted about her felt sample class recently and showed a sample of white welsh mountain sheep. Perhaps you have some samples of some wool breeds that aren’t commonly used in felting? We would love to see the samples with information about how the sample was made, about the breed, how the felting process went and the end result.

Also, don’t forget that registration is still open for the Hanging Felted Spiral with Helene. Class begins on April 8th.


Registration Open for Hanging Felted Spiral by Helene Dooley

Registration Open for Hanging Felted Spiral by Helene Dooley

Registration opens today for the online class Hanging Felted Spiral with Helene Dooley. The class is all about learning to felt a hanging spiral and will begin on April 8th. There are only 30 spaces available so register now to reserve a space. Register here by filling out the contact form at the bottom of the page. 

Helene has developed a method to create the felted spiral shown in the photo above. You will learn with Helene’s excellent videos and downloadable PDF’s. She will also be available on the class website for questions, sharing of your spirals and to encourage you to experiment with the knowledge gained in the class.

If you’d like to learn how to create a felt spiral, now’s your chance! To register for the class, fill out the form on the information page. 

Please note that Helene’s class is aimed at felt makers who have already developed their technical felting skills.  It is not suitable for felt makers who are at the start of their felting journey. A knowledge of book resists is preferable, though not essential.  Previous experience working in three dimensions is essential.  Also required is a basic knowledge of needle felting and sewing.


If you are a beginner, our online unlimited access Wet Felting for Beginners course, is always available. Please click on this link for further information and to register for the class. 


The Winners and a Start to a New Landscape

The Winners and a Start to a New Landscape

We had quite a response to our recent tenth anniversary giveaway post with over 175 comments. We’d love to hear from you more often on our regular posts.

The winners were drawn by random number generator and the choice of prize was given on number generated first through last of the 178 comments.

#1 – Kristina wins an online class of her choice.

 Kristina says:

Thank you for the continuous inspiration and sharing so many skills! I’d love to take the Free Motion Machine Stitching on Felt course.

#2 – Linda Prine wins a sari silk pack.

 linda prine says:

If I win, I choose the sari silk. Thanks, Linda Prine

#3 – Cate Lake Thompson wins an online class of her choice. 

 Cate Lake-Thompson says:

Congrats are due for this 10 year anniversary! Wonderful posts!
I would love to learn free motion stichery on felt.
Cate

#4 – Debbie Loveland wins a sari silk pack.

 Debbie Loveland says:

Happy 10th, FFS! I have been enjoying your posts for the last few years. Thank all of you who share your talent. I wish FFS continued success! I would love to win one of the classes. Print, Stencil and Play with Thickened Dye on Felt looks particularly interesting.

#5 – Shoshana Avramovitz wins a sari silk pack.

 Shoshana Avramovitz says:

Congrats on ten years Ruth!!!
Your posts are always such I highlight for me I so appreciate you 💕
I would love the Sari silk as I have been inspired by your work, to try new things:)
Hope to be here with you for the next ten years
Hugs Shoshana 🤗

Congratulations to all of the winners. We will contact you directly by email to get your information and send your prize.

Now on to what I have been working on. The photo on the left shows one of the nuno backgrounds that I made a while ago that has been waiting for further embellishment. I decided I wanted to use the photo on the right of weeping birch as inspiration. Now to find some fabric that I could applique to the background. I went through my entire stash and found absolutely nothing that would work. What to do? Then I was looking through the silk that I use for nuno felting and realized that I still had a piece of the same fabric. The original background was felted on to black prefelt. What if I used the same fabric and felted it on to white prefelt? That should give me trees that would work with the background but still have enough difference that the trees would stand out. I considered covering a larger piece of prefelt with the silk and then cutting the trees out after felting. But what if I cut the prefelt into tree shapes and then covered with the silk fabric and felted? A new experiment in felting to try!

I cut out the trees free hand, hoping for the best. Isn’t the difference in the background to the original fabric astonishing? The black wool really migrates through and changes the colors and values. The photo on the right shows how I cut the silk to “fit” the tree shapes. I left a border of silk to wrap around to the back side of the prefelt.

I then began felting the silk into the prefelt trees. I did rough up the prefelt a bit with a brush to get good migration of wool through the silk. I did quite a bit of rubbing and minimal fulling. I had given myself a bit of extra room for shrinkage, but not enough for complete fulling. since this is a piece of wall art, I wasn’t worried about the trees not being completely fulled. They just needed to hold together enough for me to stitch them down once dry.

The photo on the left shows the felted trees laying on the background. They have been appliqued down in the right photo. I used a medium value tan thread and the tiny stitches are hardly visible. I have also started adding a couched branch on the right hand tree. This is as far as I have gotten so far.

Here’s a closer look at the stitched branches. There will be more of this type of branch added to the left hand tree as well. I used bullion stitch to make the little seed poddy things at the end of the branches. I will probably add a few more thread colors to the branch.

I haven’t decided yet whether the trees are too much of a contrast from the background. I am considering adding some shading with grey on one side of the tree trunks for shadows most likely done with paint. I am going to add more small branches before I decide. What do you think?


Registration Open for Hanging Felted Spiral by Helene Dooley

Registration Open for Hanging Felted Spiral by Helene Dooley

We are happy to announce that we are now offering an online class with Helene Dooley. The class is all about learning to felt a hanging spiral and will begin on October 29th. There are only 30 spaces available so register now to reserve a space. Register here by filling out the contact form at the bottom of the page. 

Helene has developed a method to create the felted spiral shown in the photo above. You will learn with Helene’s excellent videos and downloadable PDF’s. She will also be available on the class website for questions, sharing of your spirals and to encourage you to experiment with the knowledge gained in the class.

If you’d like to learn how to create a felt spiral, now’s your chance! To register for the class, fill out the form on the information page. 

Please note that Helene’s class is aimed at felt makers who have already developed their technical felting skills.  It is not suitable for felt makers who are at the start of their felting journey. A knowledge of book resists is preferable, though not essential.  Previous experience working in three dimensions is essential.  Also required is a basic knowledge of needle felting and sewing.


If you are a beginner, our online unlimited access Wet Felting for Beginners course, is always available. Please click on this link for further information and to register for the class. 


Olive Sparrow Giveaway Winners and Second quarter challenge, stitching all done

Olive Sparrow Giveaway Winners and Second quarter challenge, stitching all done

First things first:

The winner of the 100 grams of premium washed Teeswater locks is Sttamburo

The winner of the 150 grams of Swiss mountain batt in your choice of colour(s) is Darrel

Congratulations! Monica will contact you via the email you provided.

Now my stuff

My heat erasable pens arrived. They come as a pack of refills and some empty pens. I got one that came with 4 colours, white, red, blue and black. That should cover all possibilities.

I picked the white. I think red would have worked too.


Onto the last part of the design. Diamonds were a popular repeating pattern. I better check to see if this will work the way I think it will. I did not do my usual quick sketch but using a ruler. Are you amazed?

Yes, that should work fine, real diamonds and not just squares on point. Now let’s see if those pens work. A straight line to work form. I may stitch that in too. I wasn’t sure it was going to work, even smooth felt is very textured.  The tendency when a pen doesn’t write is to press harder. That didn’t work. A light touch was much better.


A couple of weeks has passed since I did the lines. I decided to use yellow for the lines.


I really like how the yellow looks against the green but it didn’t look complete so I added some red and black french knots in the middle


Next was finishing the sides. I decided to use double-fold bias tape. I like double fold because it’s easy to sew on invisibly. the bias I like to use with felt is a fleece bias. It blends with felt so nicely but isn’t as bulky as using felt. I had black and green that would work. I chose the green as it was such a good match.

If I had easy access to my machine I would have stitched the first side with it. You can stitch in the ditch of the fold and it’s invisible. That is the way I do it when I put a bias tape on the brim of a hat. As it was, I just stitched both sides by hand.


I think it looks good.


Next is sewing the pockets and filling them up. I should have that done by next time. I have almost a whole month to get it done and still be on time.


Website Changes

Website Changes

Life has gotten in the way of posting this week. I woke up this morning and realized I had forgotten to write my post for the week. If you are reading this on our website, perhaps you will notice that we have made some changes. Our theme that we were using was out of date and there were issues that kept developing here in the background that needed to be fixed. So Ann took on the challenging task of changing the theme.


We have tried to keep everything looking similar to what we have had in the past but we’ve done some editing and pruning in areas that we thought were not getting much use. Have you looked at all the information that is available here? I often notice online that beginners are asking questions about what different fibers look like, what the results of embellishment fibers in felt look like etc. We have tons of photos of different types of fiber. All you have to do is go to the menu at the top and look under Fiber or Other Fibers. There is a drop down menu and sub menus with galleries so you can see samples of a variety of fiber.

We also have free tutorials available under the heading Tutorials on the menu. Again, just look at the top for the menu and there is a drop down list with a variety of topics such as dyeing, fiber preparation, mixed media, needle felting, nuno felting and wet felting.

So I hope you’ll take a few minutes to explore what’s available here on our site. If you find any links that don’t work, we’d appreciate it if you’d let us know so we can fix them. Thank you Ann for taking on this huge task and revamping our site!


Embellishing Felt with Surface Design Techniques Registration Opens

Embellishing Felt with Surface Design Techniques Registration Opens

Are you ready for a fun adventure in surface design on felt? You can now register for any of the four modules in the Embellishing Felt with Surface Design Techniques – A Mixed Media Approach online class. The classes will begin on February 21, 2020 and are only $45 US for 4 weeks of instruction and 2 extra weeks of instructor support.

Module 1 of Embellishing Felt with Surface Design Techniques - A Mixed Media Approach, Online Course by Ruth Lane

Nuno Felting with Paper Fabric Lamination

Paper fabric lamination is a technique of essentially gluing paper to sheer fabric in a specific design. It is not a new technique and has been used by fiber artists for a long time. When  I first learned the technique, I wondered how I would use the result. Many artists use paper fabric lamination and layer the results together with stitching and other methods. When I looked at my samples, I saw sheer fabric with a design and thought “Why not try nuno felting with it?” I tried it, it worked, and I loved the results. It was a way to use my own designs and create a piece of nuno felt that was completely different and in my own style.

If you would like more information or to register for the class, click on the link above.

Experimental Screen Printing on Felt

Have you put off trying to screen print because you thought it was too complicated? This is the course for you then. This course will teach you about a variety of methods of screen printing that are fun and easy although sometimes a bit messy! The results on felt are always interesting and you can add your personal touch to your felt projects.

If you would like more information or to register for the class, click on the link above.

Printing, Stenciling and Playing with Thickened Dye on Felt

Learn to make thickened dye and then use it to make designs on felt or silk. Create your own unique designs with stamps, stencils and stuff found around your house. This course will teach you to experiment and play with thickened dye. Try out this fun course and learn to make your own designs to add to your felt.

If you would like more information or to register for the class, click on the link above.

Free Motion Machine Stitching on Felt

Machine stitching on felt adds wonderful details and is a simple process. It does take a bit of practice but I can show you ways that make it much simpler. Have you always wanted to add that extra touch of stitching to a felt picture or add lines to your composition? Free motion machine stitching could be your answer. This is one of my favorite ways to add texture, line and pops of color to my felt.

If you would like more information or to register for the class, click on the link above.

As always, our Wet Felting for Beginners online course is always available.

Learn the basics of wet felting including layout, adding embellishments, how to felt and full, shrinkage rates and more. Take the mystery out of how to wet felt by joining us in this online class with unlimited access. It’s only $20 US!

Learn something new in 2020!

%d