Browsed by
Author: ruthlane

When I discovered felting in 2007, I finally found the creative outlet for which I had been searching. I love that the versatility of fiber allows me to “play” with a wide variety of materials including wool, silk, fabrics, yarns and threads. Creating one of a kind fiber art pieces to share with the world fulfills my creative passion.
Fabric/Fiber Postcards

Fabric/Fiber Postcards

Have you ever made fabric or fiber postcards and sent them in the mail? I have done quite a few of these over the years and thought you might like to see some that I have made and received. They are fairly simple to make. You just need to make a piece of fabric artwork that is 4″ x 6″, fuse it to a stiff backing such as Timtex or Peltex, fuse a white piece of muslin to the other side and then zigzag stitch around the edges. Write the address, return address and a short note on the white side and it’s ready to send. I actually sent all my postcards without an envelope except one that was heavily beaded and they made it all over the world without a problem.

MINOLTA DIGITAL CAMERA

This one is machine needle felted and one of the first postcards I ever made.

MINOLTA DIGITAL CAMERA

This one used a piece of rusted fabric for the background plus a machine stitched applique and  some free motion machine embroidery. These are a great way to make small compositions and practice your stitching skills.

MINOLTA DIGITAL CAMERAMore needle felting and then FME.

MINOLTA DIGITAL CAMERA

This one was a bit of a private joke as I saw a paramecium in the middle of the rustiness so I stitched a microscope. I have no idea if the recipient understood it or not.

MINOLTA DIGITAL CAMERA

This one I used a bunch of fabric scraps that I had and it says “do what you love”.

MINOLTA DIGITAL CAMERA

This is the one that I mailed in an envelope due to all the beads. All of these got sent to other people all over the world.

MINOLTA DIGITAL CAMERA

I think this one came from Australia. It is really cool and you can’t really tell that from this photo.

MINOLTA DIGITAL CAMERA

This one was needle woven and I think it’s from the UK.

MINOLTA DIGITAL CAMERA

Here’s one that was painted and stitched. I can’t remember where it’s from but I really enjoyed getting all of these in the mail. If you are interested in being in a postcard exchange try this site art2mail or they also have postcard exchanges on Stitchin’ Fingers.


P.S. I forgot earlier that if you want to feel safe with sending these type of postcards in the mail, you can seal them in clear plastic envelopes or ask the post office to hand stamp the postcard. It usually costs a bit more for hand stamping but then it won’t get caught in the postal machine.

First Quarter Challenge Drawing to a Close

First Quarter Challenge Drawing to a Close

A Daily Dose of Fiber challenge is coming to an end. I challenged everyone to take at least five minutes a day and do something creative. I personally had been doing this for a while but I wanted to add increased blogging on my personal blog. So I blogged every day during the challenge and I do have to say it was a challenge especially when I was traveling. I don’t own a “smart” phone and I don’t seem to be very mobile when it comes to online stuff. But I got a lot of creative stuff done and creating every day has been fun. Many times when I didn’t really feel like doing anything, I made myself get started because I had to do my 5 minutes a day. Once I got started, I ended up spending much more than 5 minutes because I quickly became involved in what I was doing.

Beaded Book
Beaded Book

So what did I accomplish with at least 5 minutes a day? In January, I spent the first half of the month completing my beaded book and making a beaded tassel for it. I also made three felt appliques, two turned edge appliques, two shadow appliques and a felt applique book. I researched broderie perse, the Bronze age, Kyrgyz design and reverse applique. I made a couple of pieces of flat felt, painted some commercial felt and finished the slipper bottoms for my husband’s slippers.

Applique Felt Book with Hand Stitching

February was my travel month so I wasn’t quite as productive since I had to go to the Buyers Market for the store and attend my last stitch class. But I did manage to frame some of my work for a mini exhibition, do a little machine applique, learn some new types of bindings for books including hand stitching and machine stitching, make a machine stitched book page, felt some cat toys, work in my sketchbook/studio journal, do a little Kantha stitching while traveling, finish up the last of the felt appliques, make a shadow applique card for hubbie for Valentine’s Day, try out a new painting technique, carve some linoleum stamps and make some stitched greeting cards.

Felt Applique with Couched Cording

In March I have been finishing up the last of my stitch class homework. I have almost completed two machine stitched cut back applique pieces, I practiced some new hand stitches, I completed my 5 page machine stitched book, I went and picked up 200# of wool and took it to the processing mill, I started reading up on yurt building, I did very tiny blanket stitch around one of the book pages mentioned above, had a painting party at my house, learned new insertion stitches for small book bindings, laced my Kantha bird in preparation for mounting, matted several of my print to stitch pieces and made some grey scale croppers.

MINOLTA DIGITAL CAMERA

Whew… I think I need to take a nap!

Wool Gathering

Wool Gathering

This past weekend, my husband and I went to pick up 200# of wool and took it to the processing plant. This is the wool that I will be using to build a yurt this summer. It was really exciting to get started on this project.

MINOLTA DIGITAL CAMERAWe got up early on Saturday morning and drove to Florence, MT which is about 3 hours from our house. We arrived and the little white trailer is where the wool we were buying was stored. We loaded it on to our trailer and strapped it all down.

MINOLTA DIGITAL CAMERAHere are a few of the sheep that were on Suzanne’s farm.

MINOLTA DIGITAL CAMERAMost of the wool is this dark color. This is either a Targee or Black Welsh breed of sheep.

MINOLTA DIGITAL CAMERAThe dogs wanted to get in on the act, so here is Suzanne trying to calm them down a bit.

MINOLTA DIGITAL CAMERA

All of the bags of wool were labeled with the sheep name for the fleece. This is Sophie and there was also Elmo and Ernie and a few others I have forgotten.

MINOLTA DIGITAL CAMERA

Here’s some of the darker wool. I got a mix of Targee, Black Welsh, Romney and BFL.

MINOLTA DIGITAL CAMERAThen we took off for Hall, MT. We had to make a stop for a cargo net to go over the tarp as we were afraid all the wool was going to blow away. Once it was strapped down more tightly, we were back on the road to Hall. After another one and half hours of driving we arrived at Sugar Loaf Wool Mill.

MINOLTA DIGITAL CAMERA

Here I am helping to unload the wool from the trailer. It was cold and windy.

MINOLTA DIGITAL CAMERA

Once we got inside, Ed weighed all the bags of wool. We had 206#.

MINOLTA DIGITAL CAMERA

Here’s Sue and her assistant adding up the wool amounts.

MINOLTA DIGITAL CAMERA

Here is the carder and it is really huge. Ed was really nice and turned on the carder to make a batt that will be similar to the ones I will be getting back. The videos below show the carder at work. I wasn’t able to edit the videos because I need a better editing program but I think they are worth watching if you haven’t seen a big carder running before. The videos are fairly short and the last one shows Ed cutting the batt off the carder.

MINOLTA DIGITAL CAMERA

This is a rolling felting machine that Ed built himself. I need one of these 🙂

My Beaded Book

My Beaded Book

One of the things I wanted to start doing was adding more video tutorials to the site. So I thought I would give making a video a try. My husband is running the camera and I am turning the pages of my beaded book. This is very primitive and we obviously have a long way to go. But it’s a start and I learned the very basics about how to edit and upload a video. I hope you’ll be able to see a few details on my beaded book.

MINOLTA DIGITAL CAMERA

The front page has a beaded cabochon and a single “zipper” beaded edge.

MINOLTA DIGITAL CAMERA

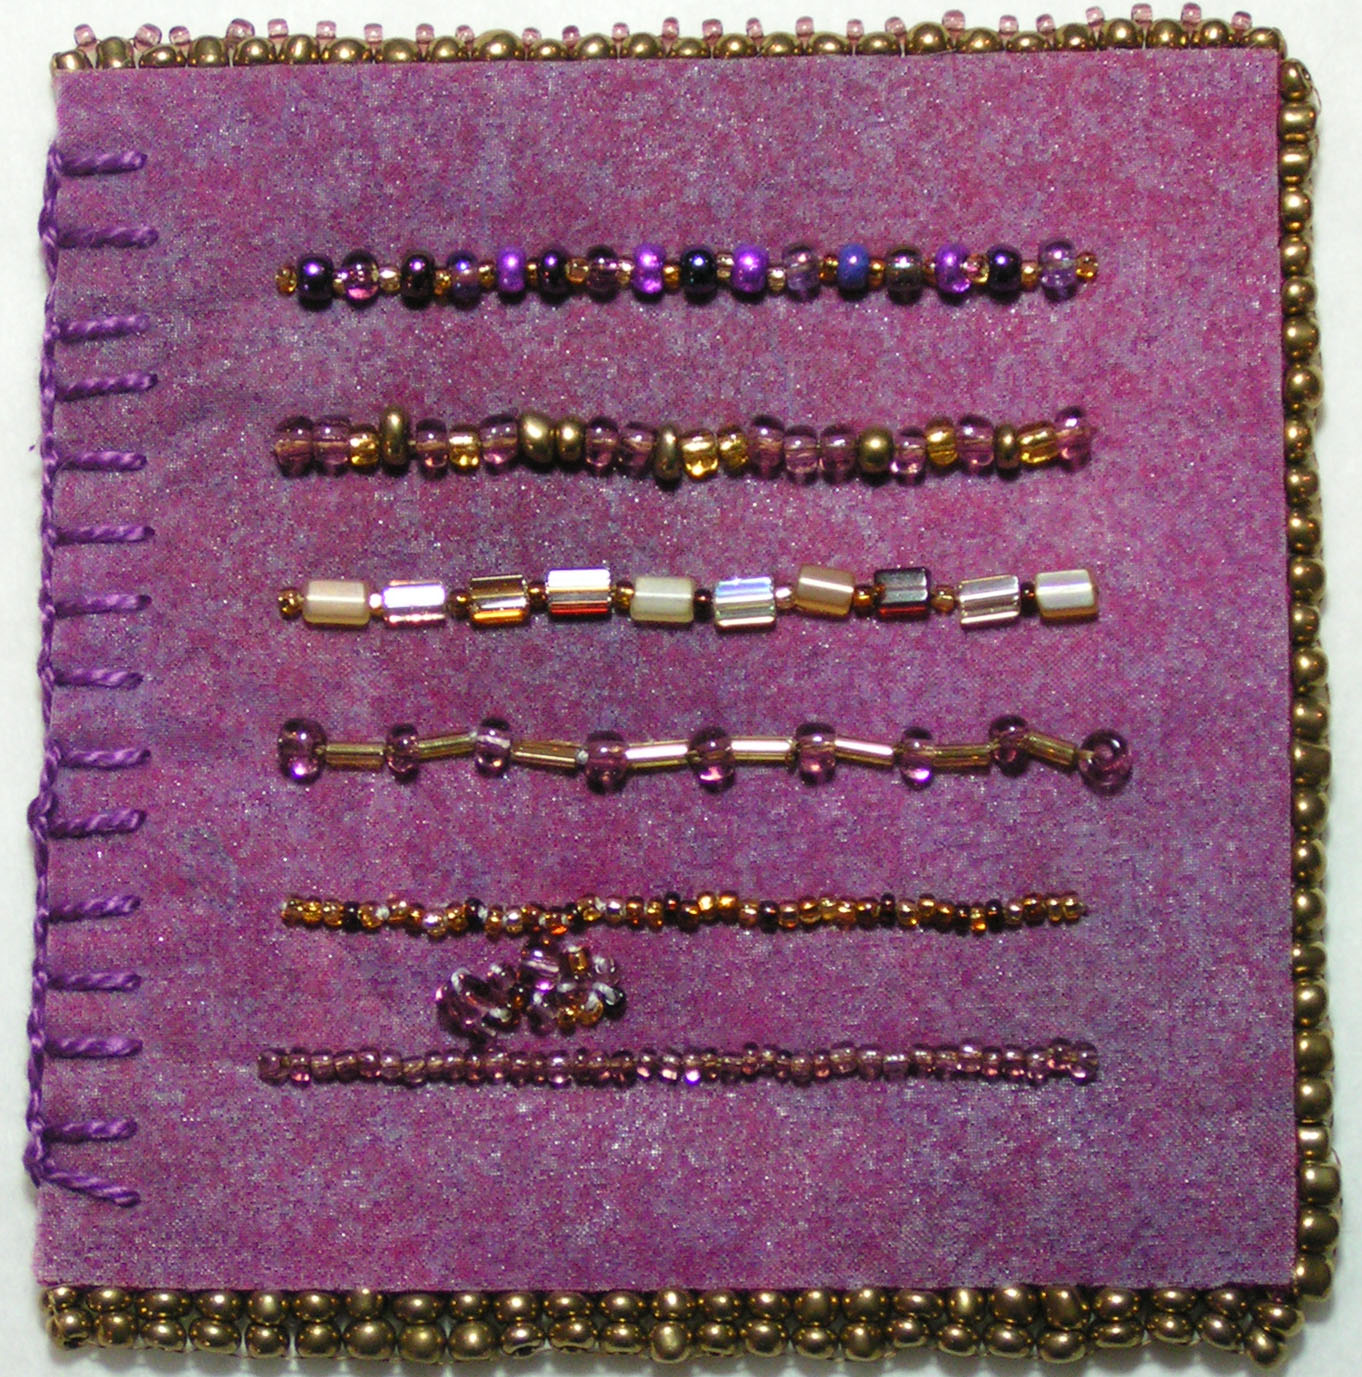
This page shows various ways of attaching rows of beads singly. The top edge is another “zippered” edge, the side is a single bead and the bottom is two stacked beads.

MINOLTA DIGITAL CAMERA

This page has various ways of stacking beads on top of each other. I have already forgotten what this edge is called but it makes a kind of diamond or vee shaped pattern.

MINOLTA DIGITAL CAMERA

This page is covered with brass washers. The ones on top are covered with buttonhole stitch and one is even beaded. The edge is a rope edge.

MINOLTA DIGITAL CAMERA

This page is various pieces of metal couched down with beads. The top and middle rows are couched down using raised chain band stitch. The edge is one I made up with two stacked beads and then connecting them with three smaller beads to make a “dome”.

MINOLTA DIGITAL CAMERA

This page I designed myself and is supposed to be an iris. It is a solid layer of beads. The edge is another one I have forgotten the name. I would definitely need to reread the instructions to remember how to do these all again.

MINOLTA DIGITAL CAMERA

This is the sequin page. A bit hard to get a good photo due to the shininess. The edge is a “wave” edge.

MINOLTA DIGITAL CAMERA

This is another page I designed myself. I wanted to use another cabochon and the long bugle beads. It looks like an Egyptian eye but the original design was from a birch tree if you can imagine that! The edge is two chains interlaced.

MINOLTA DIGITAL CAMERA

This is the scattered beads page. This is a “lacey” edging.

MINOLTA DIGITAL CAMERA

This page is making patterns with bugle beads. Again, a poor photo due to the reflection of the glass beads. The edge is a connecting type of short fringe.

MINOLTA DIGITAL CAMERA

This is the first fringe page. It shows a variety of ways to make fringe. The edge is a branched fringe edge. This edging took nearly a full tube of seed beads.

MINOLTA DIGITAL CAMERA

This is the last page and is another showing different fringes. The edge is made up of all different kinds of fringe and is a bit extravagant.

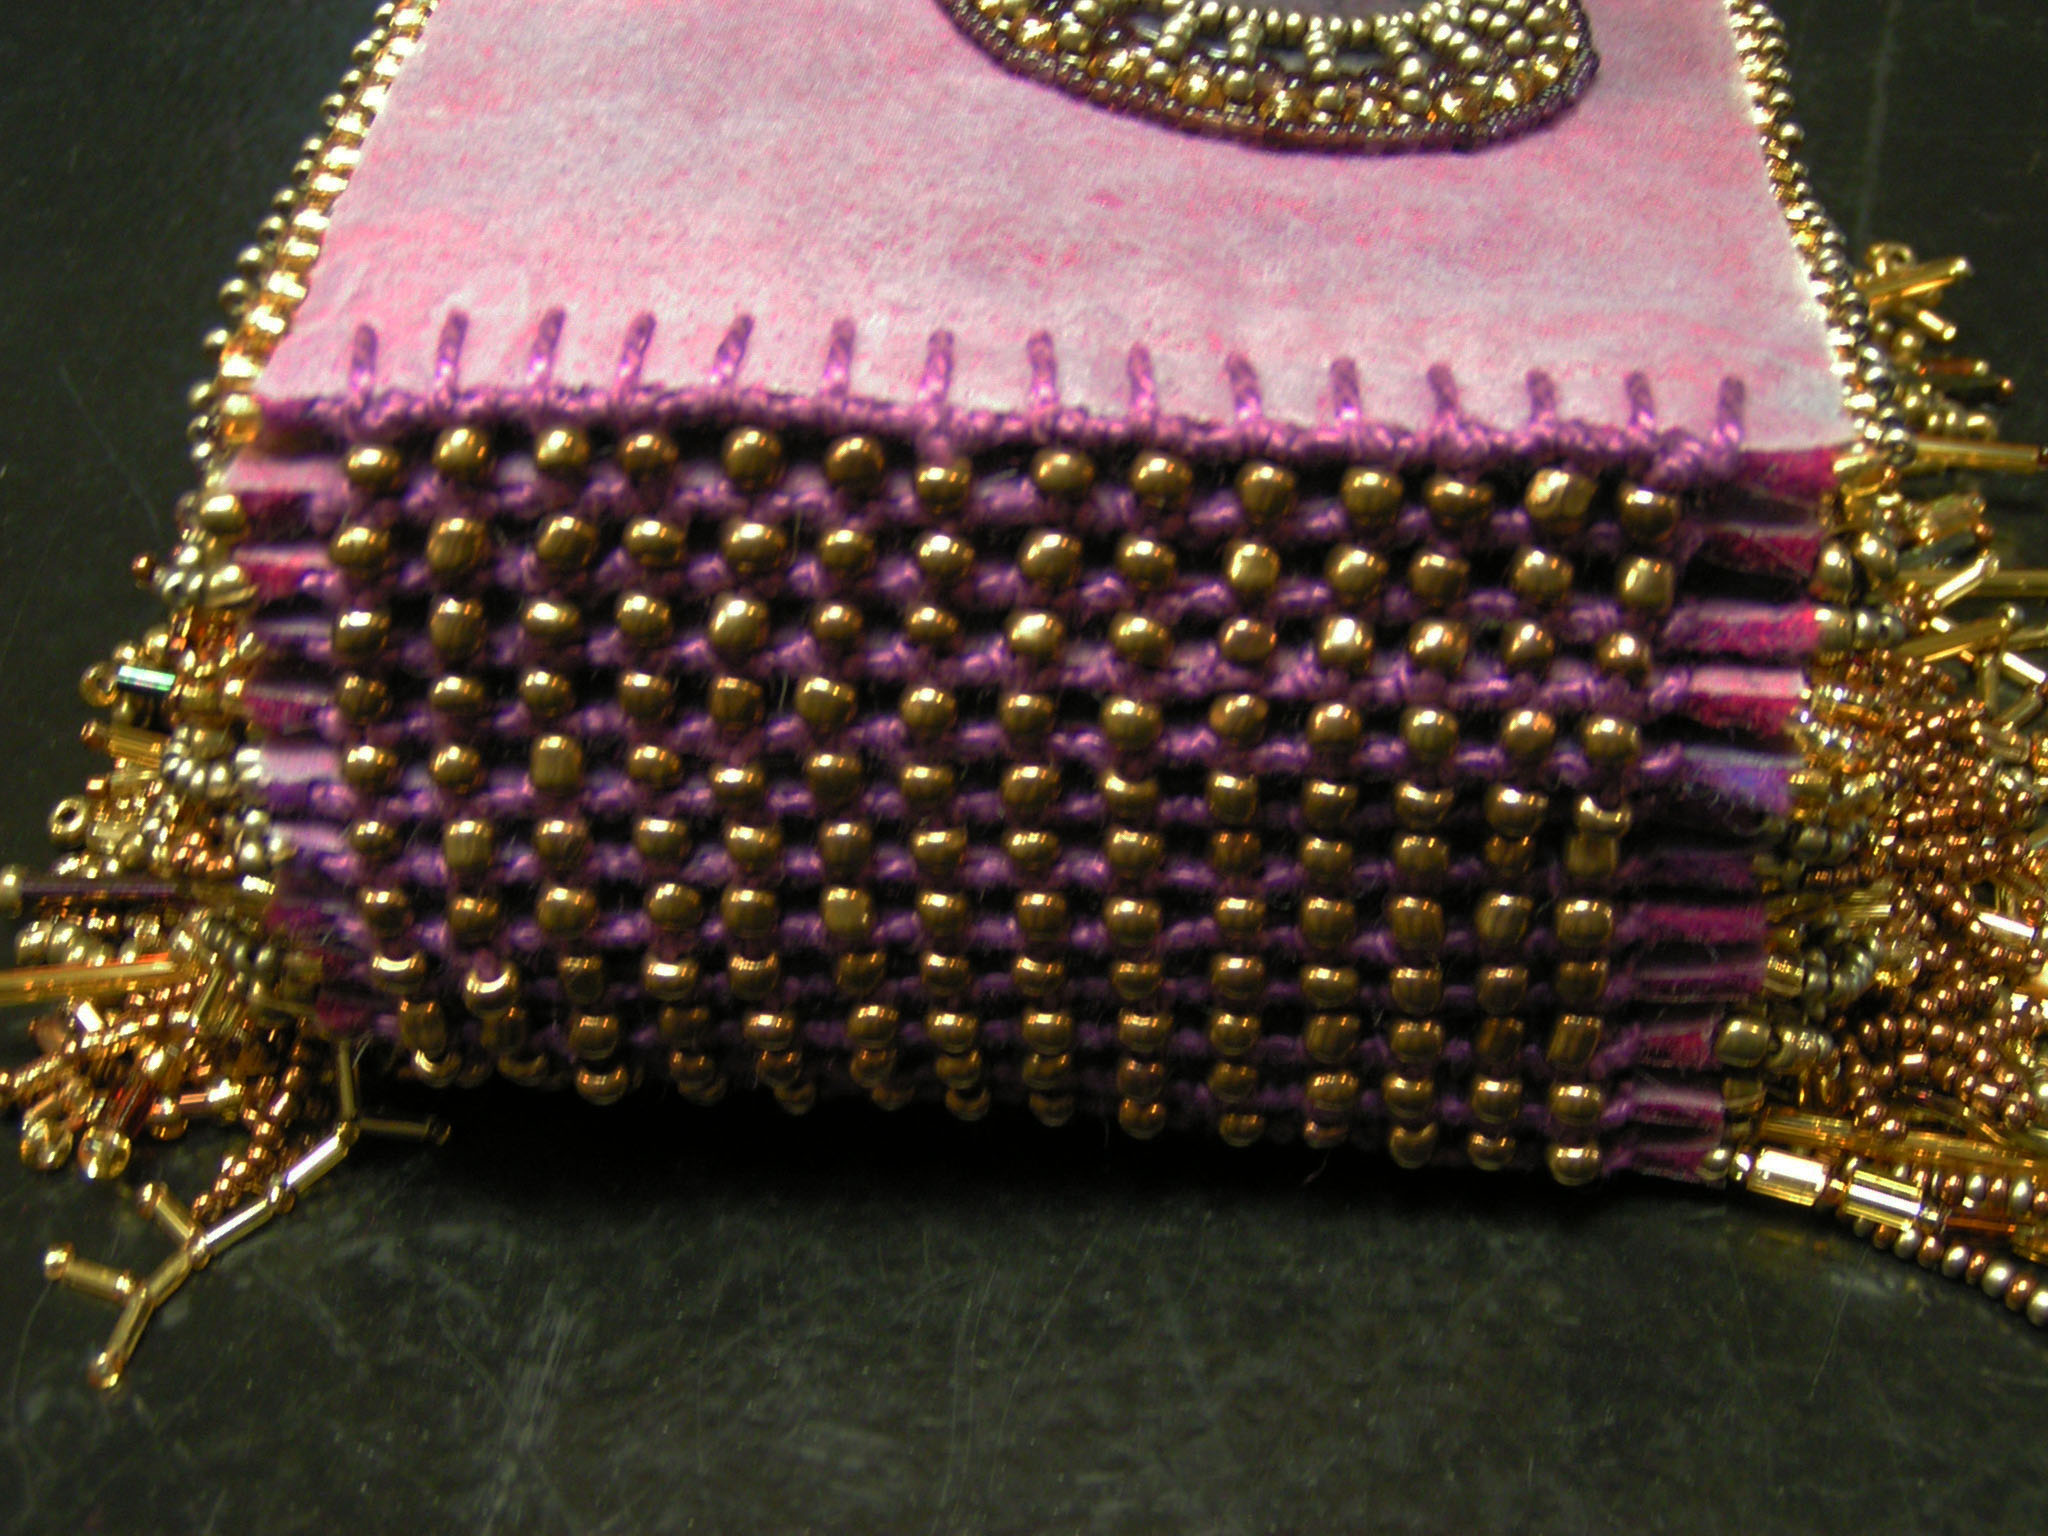
MINOLTA DIGITAL CAMERAAnd here is the binding which is done with raised chain band and I added a bead between each stitch for spacing. The book weighs over a pound and I did add a beaded tassel after this photo was taken. You can see it in the video above. I enjoyed making this book but it is probably the only one I will ever make. I hope you enjoyed seeing it closer. It was part of my homework for my Level 2 Stitch Class at the Gail Harker Creative Studies Center.

The History of Felt

The History of Felt

I was actually supposed to present my first video today but after staying up half the night and still not getting the video completed, I decided that the video debut will have to wait. Hopefully, I will get it uploaded and posted next week. So instead, a little felt history.

My local group has been doing a little historical art study each time we meet. This month we were studying the iron age. I remembered that the first pieces of felt were found around or before this age so I decided to research further into the history of felt. I found a very interesting article by Berthold Laufer in American Anthropologist called The Early History of Felt. Here is the link. The article is about where the earliest felt making was found and the possible area where felt was first made. It is interesting that felting was commonly practiced in Asia and Europe but was absent in Africa and aboriginal Americas.

Felt Boots from Pazyryk Tomb

Some of the earliest felt pieces were found in Siberia, in the Altai mountain region, in what’s called the Pazyrk Tomb. These pieces are all dated in the era from 300 – 238 BCE. The University of Washington in Seattle has a project called the “Silk Road Seattle” with a very informative website. I found all of these photos of felt items from their site although these are items from the State Hermitage Museum in St. Petersburg, Russia. I haven’t had time to explore the site fully but it looks very interesting as it talks about various textiles and practices along the silk road.

Felt Boots, another view.

As you can see, these boots are very highly decorated, stitched and beaded. These were boots that were in a tomb and were probably made specifically for the funeral and burial process.

Felt Hat

What amazes me is the amount of intricacy in the felt and the styles. I see hat shapes similar to this in Montana all the time.

Felt Swan

I have photos of this felted swan in my book so you might have seen this before. I am again so impressed with the artistry and technique involved in the making of this piece.

Saddle Blanket with Gryphon Attacking a Mountain Goat

This is a saddle blanket. Look at the intricacy of the designs and the bright colors of the wool. I love how the weather in Siberia has allowed the pieces to survive so we can see what the people in the Iron age were capable of producing in felt.

Portion of a Saddle Blanket

Look at the wonderful inlay work in this piece. Think how long ago this and the other pieces were made. Felt has a very rich history and I love that the process is nearly the same as it was many years ago.


Road Trip Inspiration

Road Trip Inspiration

On my way home from Washington, I was working in my studio journal and thinking about all the inspiration you can get from a road trip. Even when the scenery isn’t all that exciting, there is always something that peaks my interest.

MINOLTA DIGITAL CAMERA

These were my notes on what was popping into my brain as we were driving along. Luckily, my husband likes to drive and will drive for most of the trip. One of the things I really noticed when driving over to Washington this past 18 months for stitch class was the change in seasons. Since we were going once a quarter, we got a different perspective every time we drove over. The difference in the colors is amazing. Even in winter, there are a variety of colors because many of the deciduous trees have different colored branches ranging from red, orange, yellow to gray and white.

Another thing I noticed this trip was the different shapes of road signs. We had just been working on geometric patterns in our machine stitched books and I thought it might be fun to use the road signs shapes to create a design.

MINOLTA DIGITAL CAMERA

Here’s a not so good photo of us driving along. You can see a bridge coming up. The bridge connecting bits reminded me of the insertion stitches we did for binding small books. I need to get a better photo of the different bridge shapes because I thought it would be really cool to make a piece with insertion stitches based on the shapes in the bridges.

MINOLTA DIGITAL CAMERA

I then started noticing other geometrical elements such as the supports for power lines and   telephone poles. I never pay much attention to those things but they have some interesting shapes. You can also find many types of circles as you drive along such as rolls of hay stacked together, tires, hub caps and farming irrigation devices. When the vents on the car start intriguing you, you know you’ve lost it! 🙂

MINOLTA DIGITAL CAMERA

So next time you’re on a road trip, take along a notebook and jot down what you see that you might could use for inspiration in your work. The more you look, the more you see.

Using Your Studio Journal – Part Two

Using Your Studio Journal – Part Two

Have you been using your journal? Have you tried anything new? Here are a few more ideas.

MINOLTA DIGITAL CAMERA

Paste inspirational paintings beside your to do lists.

MINOLTA DIGITAL CAMERA

Sketch a rock or shell. Try out black gesso and cover with colored pencil.

MINOLTA DIGITAL CAMERA

Cut up strips of black paper and make a design. Paste it in the journal.

MINOLTA DIGITAL CAMERA

If you use paper towels when you’re dying, save them and paste them into your journal. Add more paint as desired.

MINOLTA DIGITAL CAMERA

Make a collage with various paper or even strips of fabric , add writing, stamps or stencils or paint.

MINOLTA DIGITAL CAMERA

Paste in inspirational photos and consider how you can use these in your work. Here I was thinking about three-dimensional shapes with machine embroidery.

MINOLTA DIGITAL CAMERA

Paste in photos from nature and use those to sketch ideas for further design.

MINOLTA DIGITAL CAMERAHere I made a stamp from the butterfly wings inspiration. Add quotes that are meaningful to you.

MINOLTA DIGITAL CAMERA

Visit a museum and “copy” a master’s work. Or find a photo of the master’s work online. Here is a watercolor sketch based on Van Gogh’s painting.

MINOLTA DIGITAL CAMERA

Find different colors in pages of magazines and tear them out. Use those colors to transition from one color to another. Paste them into your journal. I did blue to yellow but choose anywhere on the color wheel.

MINOLTA DIGITAL CAMERA

If you’re traveling, save brochures, tickets and other ephemera to paste into your journal. Add your thoughts or small sketches. The sketch/doodle in the top left corner was inspired by the tattoo on the neck of the woman in front of me.

MINOLTA DIGITAL CAMERA

Make rough sketches of ideas for creating. I was thinking about what different shapes could be made from one resist.

MINOLTA DIGITAL CAMERA

Look closely at items around you and sketch their shapes. These are pieces of bark I found on a walk one day.

MINOLTA DIGITAL CAMERA

Occasionally a technique you try from a book really turns out better than you had ever expected.  I hope you’ll try some of these ideas in your journal. I really enjoy using mine and then I love to look back and get ideas from years past. All of the photos from these journals were from 3-4 years ago. But they are ideas that I could still use now. Some will develop and others won’t but it’s an excellent way to encourage your creativity.

Using Your Studio Journal – Part One

Using Your Studio Journal – Part One

I use my studio journal for lots of different things and I thought some of you might be interested in seeing how I use it. I discussed some of the different uses in my last post so I thought I’d show you a bunch of different examples.

MINOLTA DIGITAL CAMERA

Practice your lettering and fonts.

MINOLTA DIGITAL CAMERA

Make a color wheel with paint, colored pencils or markers.

MINOLTA DIGITAL CAMERA

Here’s another example of when I got new markers and pencils.

MINOLTA DIGITAL CAMERA

This was a fun exercise. I used walnut ink and then tried marking with a variety of things such as a twig, a feather, a sharp rock and whatever else I could find around the house. It makes you realize that you can make marks with anything, it doesn’t necessarily have to be a pencil or paint brush.

MINOLTA DIGITAL CAMERA

Document useful information that you find online. This is about using a value scale.

MINOLTA DIGITAL CAMERA

Make little squares and then fill them up. The ones on the left are just doodles. the ones on the right are a study of values.

MINOLTA DIGITAL CAMERA

Record useful information you find in library books. This is more information about design and value studies.

MINOLTA DIGITAL CAMERA

Play with left over paint or dye. Whenever I have any color left over, I put it in my journal. Sometimes I just paint the page and then use that as a background. Other times, I leave the paint as a color study.

MINOLTA DIGITAL CAMERA

Glue down rice paper in a different size pieces, let dry and then paint.

There are more ideas coming next week. Do you know of any fun “exercises” to try in your journal? I hope you have a wonderful Valentine’s Day!

Do You Use a Studio Journal?

Do You Use a Studio Journal?

I have been using a studio journal for many years now. When I first started dabbling in fiber arts, I just wrote ideas down on scraps of paper or printed out pages from the internet and had them all around the house. This turned out to be a very poor system! So I took an online course about using a studio journal from Sharon B. of Pintangle and have used a journal ever since. The classes that I take from Gail Harker also have me use a studio journal so I have lots of different ones now.

MINOLTA DIGITAL CAMERA

Choosing a journal is a personal thing. I have found that I like different sizes depending on how the journal is being used. If you have never used one before, don’t go out and buy the most expensive and prettiest journal you can find. Try using a notebook that you already have around the house. Many people get a brand new journal and then they are afraid “to mess it up”. Don’t treat your journal as an “art” journal. Every page doesn’t need to be beautiful. Use your journal as a tool. You may just use it to list what you want to accomplish each day, use it for sketching ideas or pasting in pages torn from magazines that catch your attention.

MINOLTA DIGITAL CAMERA

The type of paper in a journal will make a difference if you are planning on painting the pages or doing a lot of mixed media in the journal. I have found that either heavy weight drawing paper or paper that is made for a variety of media, work best for me. I do use a lot of paint in my journals as well as glue and sometimes even stitch. However, I do use a journal that has fairly thin paper and it actually still works OK as long as you aren’t distressed by paint bleeding through to the back side of the paper.

MINOLTA DIGITAL CAMERA

One of the best things I like about keeping a studio journal is being able to look back through my old journals. Many times, I have written down an idea that at the time either wasn’t deemed worth trying or just got forgotten. By looking back, I might find new inspiration from an old idea. The other neat thing is what I call the compost effect. You put all your ideas down in the journal, you add some things you saw online, you write down a quote or two and all of these kind of mix together, compost and bring forth an idea that might never have happened any other way.

MINOLTA DIGITAL CAMERA

So, do you use a studio journal? If you do, I’d love to hear how you use it, what’s your favorite type of journal, do you make a special cover for your journal or do you just leave it plain? Leave a comment or come join us over on the forum.

A Month of Fiber

A Month of Fiber

It’s been a month now since I offered the Daily Dose of Fiber challenge to our readers. I have managed to get in at least five minutes of creative activity every day even on the day I cut my finger and had to get six stitches. I thought I’d do a quick review of what I’ve accomplished this month.

MINOLTA DIGITAL CAMERA

The majority of the month was spent on the beaded book. I spent my allotted fiber time for 18 days working on the beaded book but it is finished. I also made seven different applique samples for my stitch class and an applique book cover and binding. In other spare moments I learned a little crochet, did some research on the art of the early Bronze age, wrote a book report about applique, did a small study of reverse applique, painted some acrylic felt and finally finished the soles of my husband’s felt slippers. I have also been working on obtaining enough local wool for my yurt. I need 200# and I’m up to 150#.  I have also found a wool mill that will process the wool into big batts. Another fiber related activity was filling out the paperwork for teaching a felting class at the local community college.

MINOLTA DIGITAL CAMERA

What did you accomplish this month? Are you using your spare moments in being creative.  Once you get in the habit, you can really get a lot done.