
Felting Machines, from Ukraine and China
I was surprised at Christmas with a single needle hand-held felting machine from Ukraine. (Glenn said he had been told by the seller on Etsy that there is a Russian rip-off, which had horrible reviews. It either seized or flings parts of itself off as you try to use it.) The Ukrainian one he gave me, seems to want to keep all its parts together.
 1) Ukrainian-made single needle felting machine. Speed control is on the power supply.
 2) Ann liked it and suspects it will work with sculptural projects.
 3) It came with a thank you card from the maker

 4-5) and instructions.
Glenn had seen me waffling about a 4-needle hand-held felting machine out of china. That one required the needles to have the crank end cut off. I was not too excited by the idea of cutting needles, so was waffling. I spent a long time chatting with different customer representatives asking lots of questions about needle gauges and shapes. They listed 3 unspecified sizes. I put on my teacher hat and went into education mode and explanations of needles (you may remember my meandering through the topic of needles in a previous blog.) I passed all the info I had gleaned from them to Ann, who did order one which arrived in early January. She will, I am sure, tell you more about how she is finding it. We will also likely do a comparison of the two types we have acquired. After seeing Ann’s I decided it looked like it will probably work well for Picture Felting.
Today a mysterious package arrived from China, well a few little parcels also arrived including the metal thimbles I was waiting for. It was covered in a layer of clear tape with layers of skid rap under that! (Skid wrap is like cling wrap but extra clingy!! It holds boxes or other things on a shipping skid.)
 6) tape over skid wrapped cardboard box sitting on a clear box of tiny colourful elastics.
 7) protective waterproofing covering removed from a small cardboard box
I carefully extracted the box from the wrapping with the help of some scissors. There were multiple layers of Skid wrap so the scissors were the best solution.
Now to get into the box without damaging the contents….
 8) Bring on the Norway pewter Heilag Olav letter opener!! (small cardboard box balancing on a small clear plastic box of tiny elastics balancing on a mettle box that use to hold quality street candy
Hum what is this? Wow, this is well-wrapped!! There is something loose underneath it!
 9) Surprise! A bubble-wrapped object, 3 small canisters and a cloth rose.
 9-10) Surprise! OH MY!!! That was unexpected! A rose as well as 3 tubes of extra needles!
 11) Opening the end of the bubble wrap bag I found More sealed plastic in the next layer!!!
I am starting to wonder if they were expecting horrific weather in Canada or if there will actually be an end to the protective wrapping!! (it may be all packaging and nothing inside?)
 12) Aha!! A fancy white box with writing I can’t read and a sticker with some sort of cool pattern on it.
It may be one of those boxes other people’s phones can read. (I did mention my phone only claims to be smarty….but it is mostly out of power and is just a phone. It doesn’t even text. Which is good since it’s a phone so friends should just call me.)
 13) Gold text on the white box, any idea what it says?
Removing the outer layer and lifting the lid I found helpful instructions, including some English!!
 14) the instructions in multiple languages
Oh no more packing, this is very well-packed!
 15) Now we are getting to the heart of the matter! lifting the thin foam layer I can see a silver solid mettle with a plastic sliding needle guard and the nob for the speed control and another bottle of needles all nestled securely in more packing foam.
 16) Digging a bit further I found the power cords with speed control and a white plug adapter that I would need on this side of the ocean.
 17) all the parts extracted from the packing, plus the 3 viles of needles and the cloth rose.
The needle canister with the machine has three sets of four needles, I did not ever get any of the otherwise very helpful company reps to tell me what gauges these are. It may be 32, 36 and 40 gauge but I’m not sure. I may investigate more Sunday.
 18) Allen Key inserted to add the first needle.
Referring back to the instructions, yes it is best to actually read them and not just guess. I loosened the needle-holding screw with the Allen key provided. (I got extra screws and Allen keys since I don’t want tiny parts to go missing.)
Each of the four needles has a tiny screw that needs to be backed off to insert the cut needle and then tighten. You can run it with one needle or up to all four.
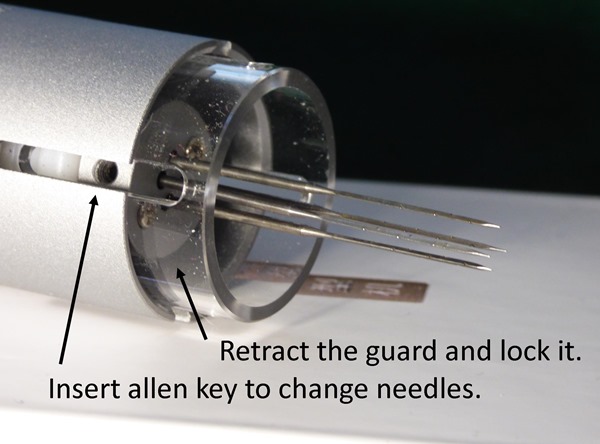
 19-20) When the needle(s) have been added you can twist the guard and release it. showing the guard retracted and extended.
This is what it looks like with the guard extended. It slides up and down like the Clover and fake clover tools do.
I have to get back to getting ready for tomorrow, which will be the Spin in, in Chesterville, a small town south of Ottawa. I hopefully will have photos for you of the fun and shopping, in an upcoming post.
there are a number of other hand-held felting machines (tools) have you tried either of these or one of the other ones? once I have given these a good test run we can evaluate the ergonomics and get a better idea of their effectiveness.
9 thoughts on “Felting Machines, from Ukraine and China”
Wow, what a cool gadget, really curious to see how it will work in practice! I have seen the single needle versions like the one Ann is using but not with multiple needles, I’m struggling to see how it will work with the guard (with the clover tool that act of pushing the needles into the fibre moves the guard up but I imagine the needles on this tool move back and forth with the motor?)
I googled the image of your box, curiously Google thinks it is in Japanese and translated the gold text to Rice Daifuku but when I told it to use Chinese it came back with Sendaifuku (I assume this is the name of the company that made it?). The remaining text reads Fiber moulding machine.
Wow Christmas again! Your struggle to get inside that box reminds me of being given an enormous package from under the Christmas tree. Naturally thinking it was something big, I lost no time in tearing off what felt like 100 different papers to find I can’t remember what. I hope your machine turns out better Jan.
I do have a Baby Lock embellishing machine which is in effect a 12 needle (though you can use fewer) felting machine. The needles it uses do have a straight shank and the spares cost an arm and a leg. But I’m lucky having an engineer for a husband, so he doctors my bulk buy needles so that they fit.
I look forward to seeing what you make of the Chinese one.
Ann
Not seen that neat silver gadget but have seen the orange one. There is an amazing needlefelter in the Uk called Stephanie Lester who needlefelts incredible animals (look out for her pangolin). She uses the orange one to great effect.
I didn’t know such machines existed. I was curious to see one working and found this interesting youtube video showing a needle felter trialling the orange one:
https://www.youtube.com/watch?v=qtN2iqD5M8s
Thank you Nancy – I looked up Stephanie Lester and was fascinated by her work.
That was an educational read Jan. I didn’t know these machines existed. On reflection it makes sense, given the sewing machine like ones for flat needle felting. I tried both traditional and simplified Chinese on Google translate, same as Teri. Zendaifuku fibre moulding machine.
Looking forward to hearing how it works for you.
Hélène
Certainly well wrapped. Look forward to hearing how it works.
Looks like you are in for some experimentations! I had a Janome needle felting machine but I never used it so I gave mine away. I have to stick with wet felting and embellishing with different techniques as that seems to be my forte. But I’m sure you will find interesting ways to use these.
I’ve heard of the existence of those machines, and ever read about a couple of sculptors using them to save their hands, but have yet to see them in action. Very curious to find out what you’ll think of each one once you’ve taken them for a spin 🙂