
Using My Prefelt
Having made the prefelt without needles or water it was time to try using it. here’s the post about doing that: trying-out-a-new-way-of-making-prefelt/ I cut a small square ( 2.25 by 3.75 inches) and added some cut bits to the top.
Even though as a whole piece, it had been very sturdy, The cut pieces seemed fragile. I wondered if it was because they were small. I decided to try a bigger piece( 3.5 x4 inches). I folded a smaller piece to cut a flower shape and popped it onto the prefelt square


I thought I should try it on a loose wool layout. I laid out 2 good layers of wool and added some prefelt to the top (4.5×7.5 inches).

I put them on some plastic on a rubbery rolling mat. I did some rubbing but not a lot as I prefer rolling. I had started to wet it when I remembered to take a picture.

This is after one set of rolls, you can see they already look integrated. the small piece looks like the shapes have really blurred.

I rolled it twice more, no more than 50 rolled back and forth each time.

I don’t think it looks very different. The prefelt defiantly incorporated into the prefelt backing and loose wool backing.
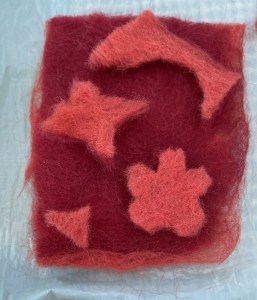
Here are the prefelt on prefelt samples after drying

the small pieces lost all semblance of shape. I think they were just too small. the bigger piece faired much better. There was almost no visible migration of fibres on these, even on the back.
The loos wool worked well the shapes stayed better even the smaller ones. They are visibly thicker, a little puffy. I don’t see any migration of the background up through prefelt.

On the back, you can see the outlines of the shapes. the shorter cut fibres of the edge migrating. I have noticed this with regular needled or wet felted prefelt too.

None of these pieces were properly fulled. They have just begun to shrink. The migration may have been more on both sides and with both backgrounds if they were properly fulled but I ran out of time to do that if they were going to be dry for final pictures.
All in all, I would say it’s a faster and easier way to make prefelt than needling or wet felting. I don’t think it would work for cutting intricate designs but they just maybe my bad cutting. I don’t think the commercial stuff works well for intricate things either.
I did try peeling the layers like you can with the thicker prefelt. It worked ok in the thicker parts but wouldn’t come apart at the thinner edge. A more consistent layout might solve that problem.


