Browsed by
Tag: acid dyes

Dyeing for Special Projects

Dyeing for Special Projects

On the Felting and Fiber Forum, I had mentioned doing some dyeing for projects and Zed encouraged me to write about it.

I’ve had a couple projects in mind that I needed specific colors in silk and wool and needed to mix colors to get the shades I needed.

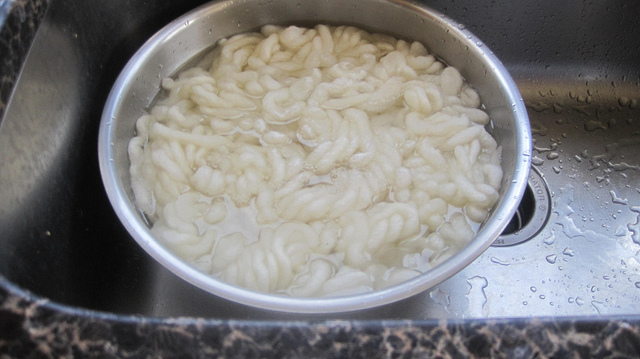
The first one was for my daughter in law for a wall hanging.  More about this next week. This one I used a dye bath for silk gauze, silk roving and merino.  I also threw in some Corriedale to have on hand. I washed the silk gauze in synthropol an soaked it and the silk roving overnight in a vinegar bath.  I soaked the wools in a vinegar bath for about a half hour before dyeing.  I didn’t need too mix colors for this job. It was an Idye mix I had made a couple of years ago.  I wasn’t sure if it would still be ok, but it worked well.

I was pleased with the results and got the exact shade I needed.

20150609_152850

20150609_093921


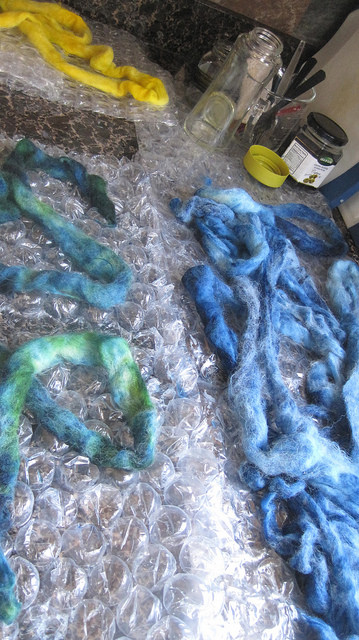
The second project I wanted to try mixing browns,  greys and a green with acid dyes for another project. Here are a couple of my color tests.  I’m not sure where the rest went I had quite a few formulas I tried.

20150926_130628


I used saran wrap, a squirt bottle and a sponge brush to apply the mixed dyes to the pre-soaked silk pieces.

20150729_160902 2015-07-28 16.16.57


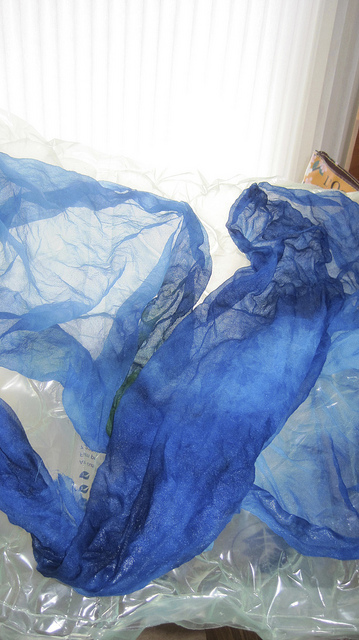
I used merino pre-soaked in vinegar in baggies and steam for this one.  I thought I had saturated the fibers enough and rubbed the acid dye into the fiber.  However, while it was in the steamer and left overnight the dye settled in spots.  I expected the mottling on the silk which was fine.

20150801_162918 20150801_162622 20150731_124308

However, all was not lost.  After running the grays through the drum carder the colors were perfect.

20150926_123929

Stay tuned for more on this project later.  I ended up only using the gray wools, then making prefelt for the project.  I will have to think of another project to use the silks and the browns.  I did use some of the green wool as well which was fine as it was.

I find it interesting to mix colors to get a specific colors, some times it works well, others not so much.  How has your experience been mixing dye colors?


Dyed Wool and Fibres

Dyed Wool and Fibres

Last week I decided to dye some wool and fibres. I used up quite a lot of my dyed texturey wools when making batts recently, so I wanted to to restock those and thought I’d do a few fibres while i was making a mess. I ended up having to do it over three days, and it made a right mess, but it was worth it in the end 🙂 I bought some white Kent Romney lambswool to try for adding texture, I had a little bit of scoured Falkland fleece left over too so added that:

OLYMPUS DIGITAL CAMERAI’ve bought commercially dyed silk noil before, but it really isn’t good compared to the small amount I dyed once, so I thought I’d give that another go:

OLYMPUS DIGITAL CAMERAI also dyed some Tussah Silk tops – a good tip for anyone wanting to dye small amounts of fibre tops is to separate the amount you want to dye while the tops are dry, and soak them separately, it isn’t easy when they’re wet!

OLYMPUS DIGITAL CAMERAI used the same shades to dye some Soy top as I had on the Silk, and though they look similar, they soy definitely looks a lot shinier:

OLYMPUS DIGITAL CAMERANeither of them come close to the colours and shine of the Milk though, but I did do these on a separate day and they weren’t the same lot of dyes:

OLYMPUS DIGITAL CAMERAAt the last minute I decided I wanted to dye some Gotland, Teeswater and Wensleydale locks. These were all raw, unwashed, so the night before my last lot of dyeing I gave some locks a shampoo and rinse. From top to bottom: Gotland, Teeswater and Wensleydale.

OLYMPUS DIGITAL CAMERA

Teeswater locks
OLYMPUS DIGITAL CAMERAI do have some more stuff waiting to be photographed, some Bluefaced Leicester wool and locks, soy staple fibre and carded lambswool, I’ll add those to my ‘supplies’ album on flickr when I get good enough light. The last one I’ve got for now is Trilobal Nylon (sometimes labelled as ‘Firestar’ and sold at exorbitant prices) cheap nylon tops. The photo hasn’t really picked it up, but it has a lot of sparkle and these dyed really well:

OLYMPUS DIGITAL CAMERAIf anyone is interested in dyeing smallish amounts of fibres, I did a small tutorial on it a while ago: http://feltingandfiberstudio.com/wp-content/uploads/2011/12/direct-dyeing1.pdf  luckily this time, I had my fold out table for a larger work area! I used acid dyes which are good for protein fibres (animal fibres, soy, milk, silk, and nylon too as it is a synthetic version of silk).  I have tried it on bamboo before too and got some nice, pale results, so it’s worth trying a sample or two 🙂

Dyeing Fabric and Fibres – Guest Post

Dyeing Fabric and Fibres – Guest Post

Today we have another guest post from Cathy Wycliff (luvswool) who has recently been experimenting with different dyes.

***

Dyeing is one of the popular topics on the Felt & Fiber Forum, but I admit I was very reluctant to give it a try.  I read about the chemicals involved, the need for rubber gloves and a face mask, and I admit that scared me away.  But after I ordered 10 pounds of white wool (Domestic 56s), I realized I needed to do something, so–being the chicken that I am when it concerns “dangerous chemicals,” I opted for food colors, which are non-toxic and “easy to use.”  The Wilson icing gels I used met both of those criteria, so I happily dyed my wool in the microwave.  However, once I started wet-felting with the wool, I realized the colors bleed, even though I had followed the instructions (vinegar rinse).
That’s what led me to acid dyes, as I witnessed the beautiful results Forum members achieved through their use of acid dyes.  I went ahead and ordered Dharma yellow and blue (figuring I could make my own green), and began my dyeing journey.  I gathered my materials using Ruth Lane’s book “Complete Photo Guide to Felting,” even though Dharma offers instructions on their website.  I just do better with photos. Not pictured are the rubber gloves and mask I wore throughout the process.

5549Preparing to dye, I soaked the wool and silk according to the instructions.

5550While the wool was soaking I laid out the plastic as protection for my kitchen countertops.

5551I mixed the acid dyes according to Dharma instructions on the labels, double-checking with Ruth’s instructions.  I used glass jars, which are fine, but I have since ordered those squirt bottles for easier and more direct application of the liquid dyes.

5554 Here you see the wet wool and silk, ready to be dyed and steamed.

5555I poured the dyes on the wool and silk, first batch, and then repeated for two other colors, mixing the blue and yellow to make green).

5556Each different color of wool was wrapped separately in plastic wrap and stacked in a stainless steel vegetable steamer. Here you see my designated stainless steel large pot, never to be used again for pasta!  I put in an inch of water in the pot and covered.

5557I steamed according to instructions, used a soaking solution again …

5559… and rinsed well — and there you see my first packet of wool (green) laid out on plastic to cool.

5561bI continued the process with the blue and yellow packets of wool.

5563bHere you see all of the dyed, wet wool laid out to dry.

5564Here you see the beautiful blue habotai silk scarf stretched to dry…

5569… and the larger green silk habotai shawl as well.

5570bI now have a good supply of green, blue and yellow standard wool roving and pencil roving, along with a couple of silk pieces ready to be nuno-felted.  Would I do this again?  Absolutely!
Just received my new colors of Dharma dyes, ready to go again!

Dyeing for Class

Dyeing for Class

This weekend and next I am teaching nuno felt scarves. I had to dye silk for bases and wool so there would be a good variety to work with.

For the scarves I used the scrunch method in mason jars. To do this you use fiber reactive dyes. You have to pack you scarf blanks tightly into a container. Next use 2 colours, pouring one then the other over the silk so that it is covered. After 10 min to an hour you pour the sodium carbonate over the whole thing.  Then leave it for at least an hour but really can leave it till tomorrow if you need to. When you rinse you get great mixed patterns. For complete instructions go to Paula Burch’s amazing dye site. http://www.pburch.net/dyeing/lowwaterimmersion.shtml

scarves 1 scarves 2 scarves 3

I also renewed dyed wool supply. I spent 2 days with a large pot dying in 100 gram lots.  this is two thirds. of the wool I split one third off each ball and fluffed them out for the students to use.

dyed wool

There are a couple of colours that are from using up the dye left in the pot after doing a colour. I hope my student like the colours I picked.

Fiber Reactive vs Acid Dyes

Fiber Reactive vs Acid Dyes

I have always used acid dyes for wool and silk because the results are good, the colors are strong and the dye is fairly light and wash fast. Since I need to use fiber reactive dyes for my stitch class, I decided to see if fiber reactive dyes (Procion MX) would work on wool.

In class, while we were dyeing cotton threads, I decided to try some wool thread. With fiber reactive dye, you use soda ash as a fixative. So that’s what I used on the wool thread. The results were very disappointing. The colors didn’t hold at all and the resultant thread was not the color expected at all especially with blue dye.

Ann then suggested that I try using an acid as the fixative with the fiber reactive dyes. So my next trial was wool thread soaked in vinegar water and then dyed. These results were much better. Still not as strong as the acid dyes but the colors held much better, even the blue.

I discussed my findings with Gail Harker (my stitch class instructor) and she questioned whether these results would be light and wash fast. So more experiments to try. I decided to take the thread I had already dyed and put it outside in the sun and rain for a month and see what happened. The photo above shows the results. The threads on the left are the control threads which I did not put outside. The threads on the right were exposed to rain, weather and sunlight for one month. I just attached them to a card and stapled them to my picnic table outside which is in full sun all day.

The top three threads are wool dyed with Procion Mx and vinegar. The second set of three are wool dyed with acid dyes and vinegar. The third set of threads (only two) were wool dyed with Procion MX and soda ash. The last set of threads is cotton dyed with Procion MX and soda ash.

I’m not sure you can see this in the photo but the wool threads dyed with Procion and vinegar faded a moderate amount. The acid dyed wool held very well and had little fading. The wool dyed with Procion and soda ash faded significantly from the color that was already really off from the original dye color. The cotton threads faded slightly.

I also sent an e-mail to the good people at Dharma Trading to see if they had some input about the use of fiber reactive dyes with wool. I learned a lot from Sharon’s (Dharma) response. She said that fiber reactive dyes were originally developed to dye wool fabric in the 1950’s. The manufacturers were disappointed with the results but accidentally discovered how well they dyed plant fibers and happily marketed the fiber reactive dyes for that use.

Sharon also said that the blue fiber reactive dyes do not strike well on wool or silk and tends to come out half strength or less. Therefore, any mixtures with blue dye will have a shift in color for example, purple may come out magenta and black shifts to brown or maroon. Blue is also the slowest dye to strike on cotton or other plant based fibers.

Sharon recommended to treat the fiber reactive dyes just like acid dyes when dying wool Therefore, use acid as your fixative such as vinegar or acetic acid and steam the fiber for 30 minutes to help fix the dyes. She also states that rinsing with higher temperature water will rinse more of the dye out so you will always need to wash/rinse the dyed wool with cool water or dry clean it. She also reports that the fiber reactive dyes will not exhaust like the acid dyes so there will be more fiber reactive dye rinsed out at the end of the dyeing process than with acid dyes.

My next experiment will be with fiber reactive dyes, acid and heat. I’ll see if that helps set the dyes in the wool better than just the acid. The nice thing about fiber reactive dyes is that you don’t have to set the dye with heat in plant fibers. But if I only had to have one type of dye, that would be better so I’ll let you know the results the next time I dye.

I’d love to hear about any experiments you’ve done using fiber reactive dyes and wool and see photos of your results. Feel free to post them on Flickr or join us on the forum and start a discussion about dyeing results.

Direct Dyeing Felt Samples

Direct Dyeing Felt Samples

A few days ago, on the Direct Dyeing post, Shana was asking whether the same method could be used to dye felt pieces. I hadn’t tried it, but I had a couple of white sample pieces of felt that I thought would be good to try it with, so I did that yesterday. The first piece I tried it with was a sample made from two layers of 23 micron merino with wisps of egyptian cotton top between the layers and on the top. It started out roughly 9 x 12.5 inches, and after steaming for 30 minutes, it was 7.5 x 11.5 inches. The interesting thing with this piece was how the cotton took the dye, in some parts where I’d used a colour made from two shades of dye, the cotton took just ones of the shades

The second sample piece was made from two layers of 18.5 micron merino with milk protein fibre tops between the layers and on top. This piece started out 7 x 14.5 inches and ended up 6.5 x 13 inches. Both pieces were soaked in water and vinegar before dyeing.

I probably should have rolled the pieces instead of folding, from the photos of the backs, it’s easy to see where they have been folded. They didn’t take the dyes as well as wool tops or silk does, and there was still dye in both pieces that had to be rinsed out. The results were interesting though, both pieces felt the same afterwards, they didn’t feel extra fulled or less soft. Thanks for the idea, Shana 🙂

Click ‘Permalink’ under each photo in the carousel to see larger pictures.

%d bloggers like this: