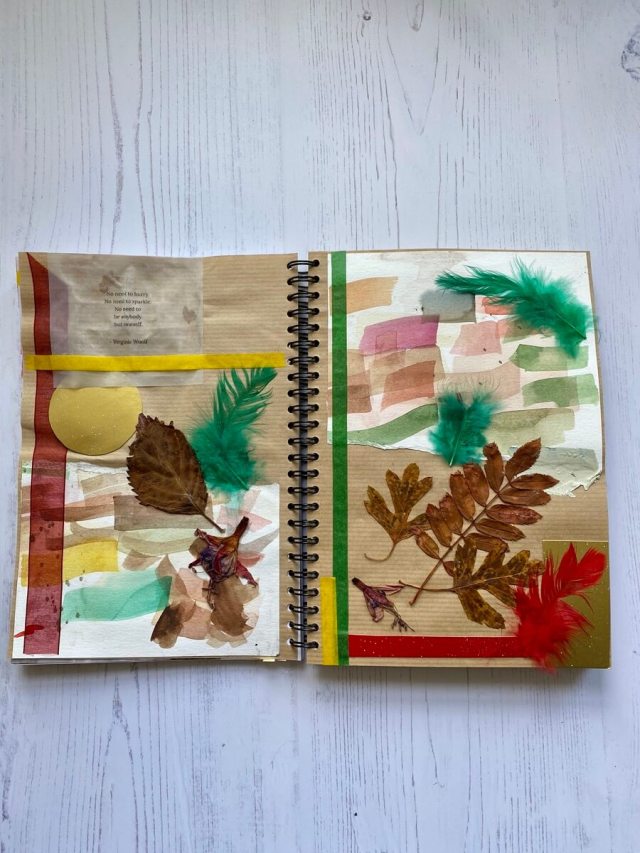
My local art group has been playing with collage for our last several meetings. We usually find an interesting online video to “follow” and then take off with the basic ideas from the video.
The first attempt was with small squares on a page and using a limited palette in all the squares. Then add some markmaking with different tools, small pieces of paper glued in place; then more mark making on top. This is my attempt at the technique. I wasn’t able to attend our meeting so I didn’t get any photos of my friends work.
The next video suggest starting with an old gelli plate print glued into the sketchbook. Then to “randomly” add collage, printing and painting on top “without thinking too much”. I never seem to do well with this type of activity as it gets way too jumbled and nothing ends up looking good to me.
Here’s where we were working and you can see my hideous collage results in the foreground of the photo. There are many layers and thinking a bit more about my choices might have improved this mess.
Here’s the final outcome of my collage. Still pretty hideous to me.
Sally created two collages using up a lot of her eco printed papers that she had in her stash.
Louise was still working on hers but had a great start.
And here’s Paula’s effort. She was working on two pages in a spread. I don’t think she was finished with these yet.
The nice thing about this project was using up painted and printed paper from our stash and just allowing ourselves to play a bit. Even though I wasn’t happy with my outcome, I had fun messing around 😉
When you look at this, what is missing? More shadows. So I needed to add the cast shadows from the trees.
So I added more blue sheer fabric to cast the shadows from the trees. Suddenly, there’s another glaring ommission (Antje pointed this out in her comment on my last post). The rocks on the left need to have shadows cast on them by the trees. So more dark blue sheer fabric is needed.
Ah, that’s better. You can really see the sun shining through the trees now.
Next up is leaves. The leaves on the left need to be in the shade, thus darker and more grey blue. The pieces of felt scrap that I originally found was not going to be enough.
So I searched for more felt and found a neutralized green that should work. Here you can see my messy workspace while I’m working. Other projects that are in process are on the back of the work table.
Here’s as far as I have gotten. I need to change out the leaves on the upper right as those are too bright in the shade of the tree. I may use some ink or paint to tone them down or I may just cut out more leaves in the neutralized green I used on the left. Then on to the flowers. I will need to find some light grey for the flowers on the left and brighter white for the flowers in the sunshine. Getting close to the finish now!
And just for entertainment purposes, here’s my dog Edgar in the big snow we had last week. The snow is almost as tall as he is and he’s decided that he doesn’t need to go wading!
Having just read Kiki’s tutorial https://feltingandfiberstudio.com/2023/11/19/left-overs-yessss/ on using up prefelt scraps, it occurs to me that I may not have mentioned something we used to do at our Guild (Dorset Guild of Weavers Spinners & Dyers) mainly to raise funds for the Guild but also for fun.
When I attended the Stitch and Creative Crafts Show at the Bath and West Showground in Shepton Mallet (Somerset, UK) back in 2010 – I saw a stand selling (for £8.00 each) bags containing 35gr of silk fibres, yarns, fabrics scraps, carrier rods and cocoons in various colours, left over from old projects which, when put together, made a fascinating collection for future projects. So fascinating that I bought three of them.
They must have made quite a bit of profit on them because they appeared mainly to be the “waste” from artwork.
At that time (when I was part of the sub-committee organising the Guild’s Exhibition and Sale of Work) we were looking for a Guild Project which could be part of the exhibition or something hopefully to help raise some funds. Well, I thought, our weavers must have lots of off-cuts of hand woven fabric, not to mention warp ends. Then there were the spinners who would have odd bits of spun and unspun fibres of all types and colours. We also had members who were dressmakers, beaders and embroiderers, and a soft furnisher, who were bound to have the odd bits and pieces that they didn’t really need. So, with the blessing of the committee, I put it to the members in the next newsletter that if they would donate to the Guild any odd bits of fibres, yarns, threads, warp ends, bits of fabric, beads, button, feathers, felt, cords, braids, tassels, sequins, sequin waste, ribbons, silk flowers and any other bits and pieces they could think of, we could make up some “Bags of Inspiration” and sell them to members of the public at our open days and outside demonstrations. (I don’t know about in the rest of the world, but in the UK the word “bags” means “lots of” as well as “containers”, so the punning name “Bags of Inspiration” seemed apt.)
We used A4 sized polythene bags (which I was able to buy quite cheaply from our local green grocer) with an A4 sheet of card inside for stiffening, and I made up some stickers with the Guild’s logo on and a brief description of the contents, and posters also giving details of the contents.
Bag of Inspiration Poster
We arranged a few bag making days at a pub in the village where our then President lived. She had persuaded them to let us use their skittle alley at no charge, and we had a great deal of fun making up the bags and tucking in to “refreshments” from the bar and kitchen.
The members who came to these, brought with them all sorts of goodies which we spread out on tables, so that we could make collections of pieces which seemed to go with each other. Those who didn’t think that their colour theory was good enough, could pick out a picture from a selection of magazines and have a go at matching colours from this It was amazing how compulsive making the bags became. You could pick up a piece of fabric that looked so dull and dreary and be amazed how it perked up and positively shone with life when paired with different fabrics, yarns, trimmings etc. You just couldn’t stop picking up likely bits. The difficulty was keeping the weight of each bag between 80gr and 100gr, so we quite often ended up making up at least 2 bags with similar contents.
Equipment & Extra “Bits” for making up BagsProspective contents of at least one Bag of Inspiration
We put a price of £3.50 on each bag and they went like hot cakes – we sold out on their first appearance at our exhibition and sale of work. Embroiderers and mixed media artists in particular liked them.
After a couple of years, we didn’t get so many volunteers to make up bags but we still had mountains of “stuff”. So we added another string for our open days – Pick and Mix Your Own. I had remembered that Woolworths (now there’s a blast from the past) used to have a counter full of different sweets and you could take a bowl and pick and mix what you wanted, and in the process buying a lot more than you would have if just buying a ready filled bag.
Pick and Mix Sweets.
It worked with our stuff too. We gave the visitors the polythene bags and they could wade through all the bits and pieces picking what they needed, and we weighed them when they’d finished, charging £3.50 for 100gr.
We had had a lot of fibres donated so we started making up what are now called Art Batts and selling them as “Batts of Inspirations”, but because we were mainly selling these to Guild spinners and felt makers, they didn’t do quite so well as they were mainly able to make their own.
In all we made around £1000.00 for the Guild in the four years we were doing this. Eventually though the members got fed up with spending time on making up the bags and the whole thing was shelved, as the Guild seemed to be relatively well off at the time.
Some time after that I took the idea back to myself and I was making up Batts to sell at Guild meetings, using luxury fibres as well as merino and synthetic fibres. I made up some bands to fix around the Batts detailing the various fibres included in each.
This slideshow requires JavaScript.
I was also making up and selling Bags, mainly at a Needlework Festival in Dorset where most of the vendors were selling materials and equipment for crafters, as well as various craft fairs and so on.
This slideshow requires JavaScript.
I was getting the odd question like “they’re lovely but what do you do with them?” and “can you make a bag out of what’s in here?” So I made a sign from images of items that I’d made myself over the years and that helped.
Some of the things I’ve made with the contents of BoI over the years
However, once Covid started causing problems, my selling opportunities dried up. I had been intending to try selling Bags and Batts via my website, but it was very difficult and too time consuming to photograph the Bags so that the contents were visible, because of reflections on the polythene bags. So that sort of died a death too and I’ve now shelved that project, and am using the bits and pieces I’ve collected over the years on theatrical costumes and props.
Perhaps some of our readers’ organisations, like Ann & Jan’s OVWSG, might use this idea to raise funds?
I thought I would update you on my progress in my junk journal Tree Specimen book. I use up left over paint to paint pages after I have worked on another project. So most of these are plaster pages that I have added to.
This shows the progression of one of the pages. I had painted the background with walnut ink (I think, but it was a while ago). The ink didn’t stain a portion of what I think was a medium that was mixed into the plaster. I don’t have a picture of just the white but it is the lichen portion. I decided to add a variety of blue green paints to represent lichen on bark.
This page was using leftover yellow paint. That was way too bright for me! So I added a variety of oil pastels and rubbed them in. I think this page needs more added to the layers. It doesn’t feel finished yet.
This page I had already painted the plaster background. I had made a few rubbings on tissue paper of my California poppy foliage. It looked very tree like so I used matte medium to put the tissue paper on to the background. Does it need more?
I have shown you the pine cone page before but I am thinking of adding the bit of machine stitched moss on the bottom left and the label at the top left. The page feels more balanced with the additions.
This is another plaster page where I added walnut ink. That’s the first layer. Who knows what will go on top.
Here’s a photo of the book open. It’s such fun to page through now. I only have a few more completely white pages that need some color. I always have fun getting the book out and adding a bit here and a bit there.
I haven’t shown my tree specimen book since March. The main reason for this is because I got a bit discouraged. The book has plaster coated pages on canvas that were meant for sketches. But the pages are very rough so I needed to get more gesso to apply on top. I also decided to get some charcoal to use for a bit more “rough” sketching. I got my supplies, painted all the canvas pages with gesso, let that dry for a while and then tried a sketch.
The pages are still very rough and are difficult to sketch on. I was disappointed with my sketch and really didn’t enjoy the process. So that discouraged doing any more sketches. The book sat for quite a while with nothing added.
Then when I was painting other things, I had leftover paint. I hate to waste paint so I decided I would start painting the canvas pages. Then I could add more on top and there wouldn’t be that intimidating white page (that I didn’t like the feel when sketching).
I showed you this one before but I added the definition of tree to the bottom. The fun thing about this book, is that you can keep adding as you go.
Here’s another print of a thicket of trees that I added.
And this one is a print of a tree stump and some little blue leaves that I got from one of my friends. Thanks Christa!
So I haven’t given up on my book. I’m not sure it will ever be “finished”, but that’s OK. I will continue to add bits and bobs as time goes by.
If you’re anything like me, you’ll find it very hard to stick to one hobby alone. After all, there are too many temptations out there, and each creative endeavour fuels the brain differently – it’s fun to discover new materials to play and interact with, and see what comes out of the experimentations.
I rediscovered the love of journaling last October, and have since then filled two notebooks of ramblings, ideas, memories and opinions. As I progressed in my writing however, I noticed I was also very attracted by the notion of doing something visually creative with paper and stationery.
Now, I must add a disclaimer here: I don’t think the pages I filled are special. They’re not particularly beautiful or unusual, and that’s definitely not a negative thing – I started doing collages simply for the joy of playing with images and colours, and these were the space for me to have some non-commercial, creative fun. It was my way of relaxing and letting go of expectations, of “what will others think of this,” of any idea that one’s creative endeavours must always be amazing. I just wanted to get messy with glue and glitter.
This is the cover of my A5 size notebook. It’s decorated with some leftover fabric (featuring cats, obviously) and the artwork from a tin of… Sardines? Cod? I might add more stuff to it as I go along, since I don’t consider any of the pages here “finished.”
This notebook came with different types of paper, so I play with it depending on the “canvas” I want. As you can see, the middle pages have been used the most, and apparently I’ve not much love for plain white paper.
I tend to go by colour and texture, more than whether the things make sense together. My brain seems to enjoy adding stuff to paper until it looks filled enough and has things to make the eye wander.
Fabric scraps and teabags are game. See the eye on the lower left corner? I stole that from my husband’s studio, he’d removed it from one of his paintings – does this count as artistic appropriation?
If you can’t read the weird Balzac quote above, it is as follows: “No man should marry until he has studied anatomy and dissected at least one woman.” What a weird fellow he was (and I hope no one followed his advice!)
I say this again proudly: none of these collages are groundbreaking or particularly good. What they are, is FUN. I loved making them with no end game in mind, no agenda and, until I decided to share them here, I was perfectly convinced none would ever see the light of day. It’s very liberating to create with full freedom from our inner critic and, if you’ve never tried, I urge you to give it a go. It might even fuel your creativity for the more “serious” stuff you make.
How many hobbies do you have? Are they all fibre- or textile-related? Let me know what’s tickling your crafty mojo lately in the comments section.
I have been continuing to slowly add bits and pieces to my tree ‘specimen’ book. You can see most of the ‘blank’ pages of the book in this post and some pages that have had ‘specimens’ added to them here.
This is definitely a ‘slow’ project that I am working on very intermittently. It’s been fun to pick it up again and just add a few things here and there without pressure to finish it or make it look perfect.
I added some more machine stitched moss to the first page and a definition of mossy.
On this page spread on the left, I had one of my plaster coated pages but it had cracked significantly. I need to get some gesso to paint over these pages but since I haven’t ordered it yet, I decided to try something different. I layered different colors of paint on the cracked surface. You can click on the photo to enlarge it. The page on the right is a torn piece from one of my small sketchbooks. It kind of reminds me of pine needles. It was originally screen printed and I added colored pencil to enhance the look of the pine needles. Torn and messy is the point of this book so I ripped the sketchbook page and glued it down to a lightly painted background page. You can see the dark edges of the next page which is next up.
The page on the right is an eco print on paper that my friend Paula created. She has a big stash of these papers and kindly let me use a few.
This is the back side of the eco print above. I cut a window out of the painted background so you could see more of the backside of the eco print. I added a machine stitched tea bag leaf as well. The right side is another plaster coated canvas pages that needs to be gessoed and then drawn or painted on.
This pine cone on the right was stenciled ages ago. I pushed some kind of thicker medium through the stencil to give a relief effect. It didn’t work all that well and got a bunch of bubbles in it. I painted it green at some point but didn’t like that either. I got it out of my paper stash and decided I needed to finish it. I added walnut ink, sepia marker and matte medium to get it to a point that I was satisfied with it looking like a pine cone. It also needed more strategic cutting out than I had done previously. I glued it down to the painted background letting a little bit of the pine cone stick out over the edge of the page. This is a testament to never giving up on a piece of artwork!
Next to the feathers that I had shown you in my last post, I glued another one of Paula’s eco prints down on to the dictionary page. I can’t decide if this page needs something else but I will just leave it for now. I do want to leave more simplified areas where the eye can rest.
This one on the right is the last page that I worked on this time. It was originally a deconstructed screen print on paper all in the brighter green. When I was looking through the book, this page caught my eye as I saw a leaf in the middle of the page. I used Inktense pencils and then water on a brush to make the darker leaf appear more strongly on the page. I hope you can tell I am having fun with this. It is a very freeing process not worrying about the final outcome.
My local art group doesn’t meet over the summer but we decided to do a collage challenge. The challenge was to create a collage every day using at most 3 pieces of paper and to only take 12 minutes to create the collage. I started the challenge on May 24th and reached my goal of 100 days on September 5th. The hardest issue I had with the challenge was the time restraint. Even with choosing my paper in advance, I had a hard time completing a collage in 12 minutes. So I ignored the time limit but tried to keep it under 30 minutes. No waffling around on how it went together.
Today, I’m showing you some of my favorite collages. There were some that turned out good and others, not so good. But it was a great way to work on color studies, composition and to do something creative to start out my day. If you would like to see all 100 collages, you can check them out on my Instagram account here:
In case you’re wondering, I have a huge plastic tub filled with paper that has been gelli printed, screen printed, hand painted, printed with block prints and whatever other techniques I have done in the past. So I have a wonderful source of papers to use for collage. If you are thinking of trying this challenge, you can use whatever paper sources you have. Many artists use magazine photos, open source online photos, wrapping papers, or whatever they have on hand.
So here are a few of my favorites. You can click on the photos to enlarge if you’d like to see them closer. I had a great time searching through my papers and creating a different collage every day.
Have you tried this type of daily challenge? We’d love to see your results and hear about the challenge. Let me know if you’d like to write a post about a challenge you have participated in.
And speaking of challenges, our third quarter challenge using botanicals as a theme is over at the end of this month. I think a few of my collages meet the guidelines! If you have something botanical to share for the challenge, please submit your photo here.