Browsed by
Author: ruthlane

When I discovered felting in 2007, I finally found the creative outlet for which I had been searching. I love that the versatility of fiber allows me to “play” with a wide variety of materials including wool, silk, fabrics, yarns and threads. Creating one of a kind fiber art pieces to share with the world fulfills my creative passion.
Fiber Reactive vs Acid Dyes

Fiber Reactive vs Acid Dyes

I have always used acid dyes for wool and silk because the results are good, the colors are strong and the dye is fairly light and wash fast. Since I need to use fiber reactive dyes for my stitch class, I decided to see if fiber reactive dyes (Procion MX) would work on wool.

In class, while we were dyeing cotton threads, I decided to try some wool thread. With fiber reactive dye, you use soda ash as a fixative. So that’s what I used on the wool thread. The results were very disappointing. The colors didn’t hold at all and the resultant thread was not the color expected at all especially with blue dye.

Ann then suggested that I try using an acid as the fixative with the fiber reactive dyes. So my next trial was wool thread soaked in vinegar water and then dyed. These results were much better. Still not as strong as the acid dyes but the colors held much better, even the blue.

I discussed my findings with Gail Harker (my stitch class instructor) and she questioned whether these results would be light and wash fast. So more experiments to try. I decided to take the thread I had already dyed and put it outside in the sun and rain for a month and see what happened. The photo above shows the results. The threads on the left are the control threads which I did not put outside. The threads on the right were exposed to rain, weather and sunlight for one month. I just attached them to a card and stapled them to my picnic table outside which is in full sun all day.

The top three threads are wool dyed with Procion Mx and vinegar. The second set of three are wool dyed with acid dyes and vinegar. The third set of threads (only two) were wool dyed with Procion MX and soda ash. The last set of threads is cotton dyed with Procion MX and soda ash.

I’m not sure you can see this in the photo but the wool threads dyed with Procion and vinegar faded a moderate amount. The acid dyed wool held very well and had little fading. The wool dyed with Procion and soda ash faded significantly from the color that was already really off from the original dye color. The cotton threads faded slightly.

I also sent an e-mail to the good people at Dharma Trading to see if they had some input about the use of fiber reactive dyes with wool. I learned a lot from Sharon’s (Dharma) response. She said that fiber reactive dyes were originally developed to dye wool fabric in the 1950’s. The manufacturers were disappointed with the results but accidentally discovered how well they dyed plant fibers and happily marketed the fiber reactive dyes for that use.

Sharon also said that the blue fiber reactive dyes do not strike well on wool or silk and tends to come out half strength or less. Therefore, any mixtures with blue dye will have a shift in color for example, purple may come out magenta and black shifts to brown or maroon. Blue is also the slowest dye to strike on cotton or other plant based fibers.

Sharon recommended to treat the fiber reactive dyes just like acid dyes when dying wool Therefore, use acid as your fixative such as vinegar or acetic acid and steam the fiber for 30 minutes to help fix the dyes. She also states that rinsing with higher temperature water will rinse more of the dye out so you will always need to wash/rinse the dyed wool with cool water or dry clean it. She also reports that the fiber reactive dyes will not exhaust like the acid dyes so there will be more fiber reactive dye rinsed out at the end of the dyeing process than with acid dyes.

My next experiment will be with fiber reactive dyes, acid and heat. I’ll see if that helps set the dyes in the wool better than just the acid. The nice thing about fiber reactive dyes is that you don’t have to set the dye with heat in plant fibers. But if I only had to have one type of dye, that would be better so I’ll let you know the results the next time I dye.

I’d love to hear about any experiments you’ve done using fiber reactive dyes and wool and see photos of your results. Feel free to post them on Flickr or join us on the forum and start a discussion about dyeing results.

Second Quarter Abstract Challenge

Second Quarter Abstract Challenge

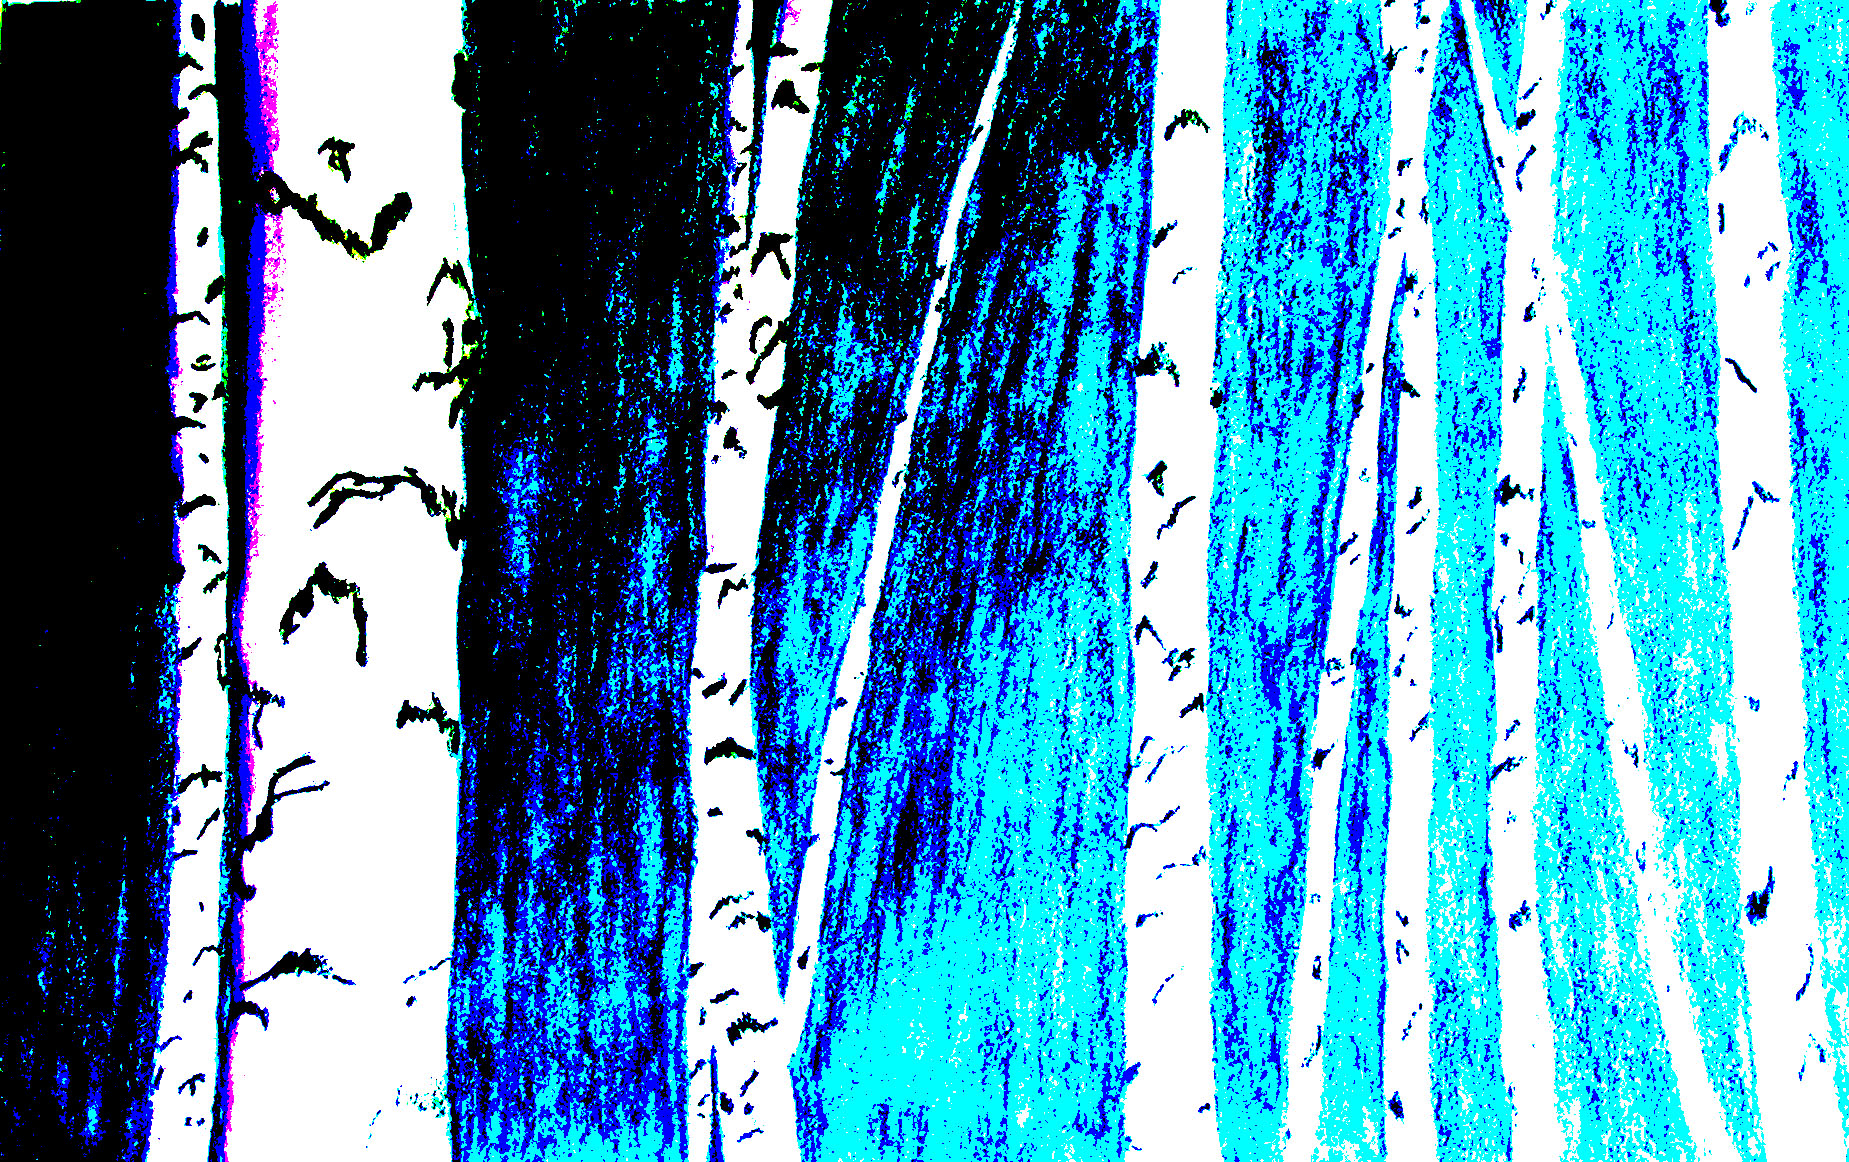
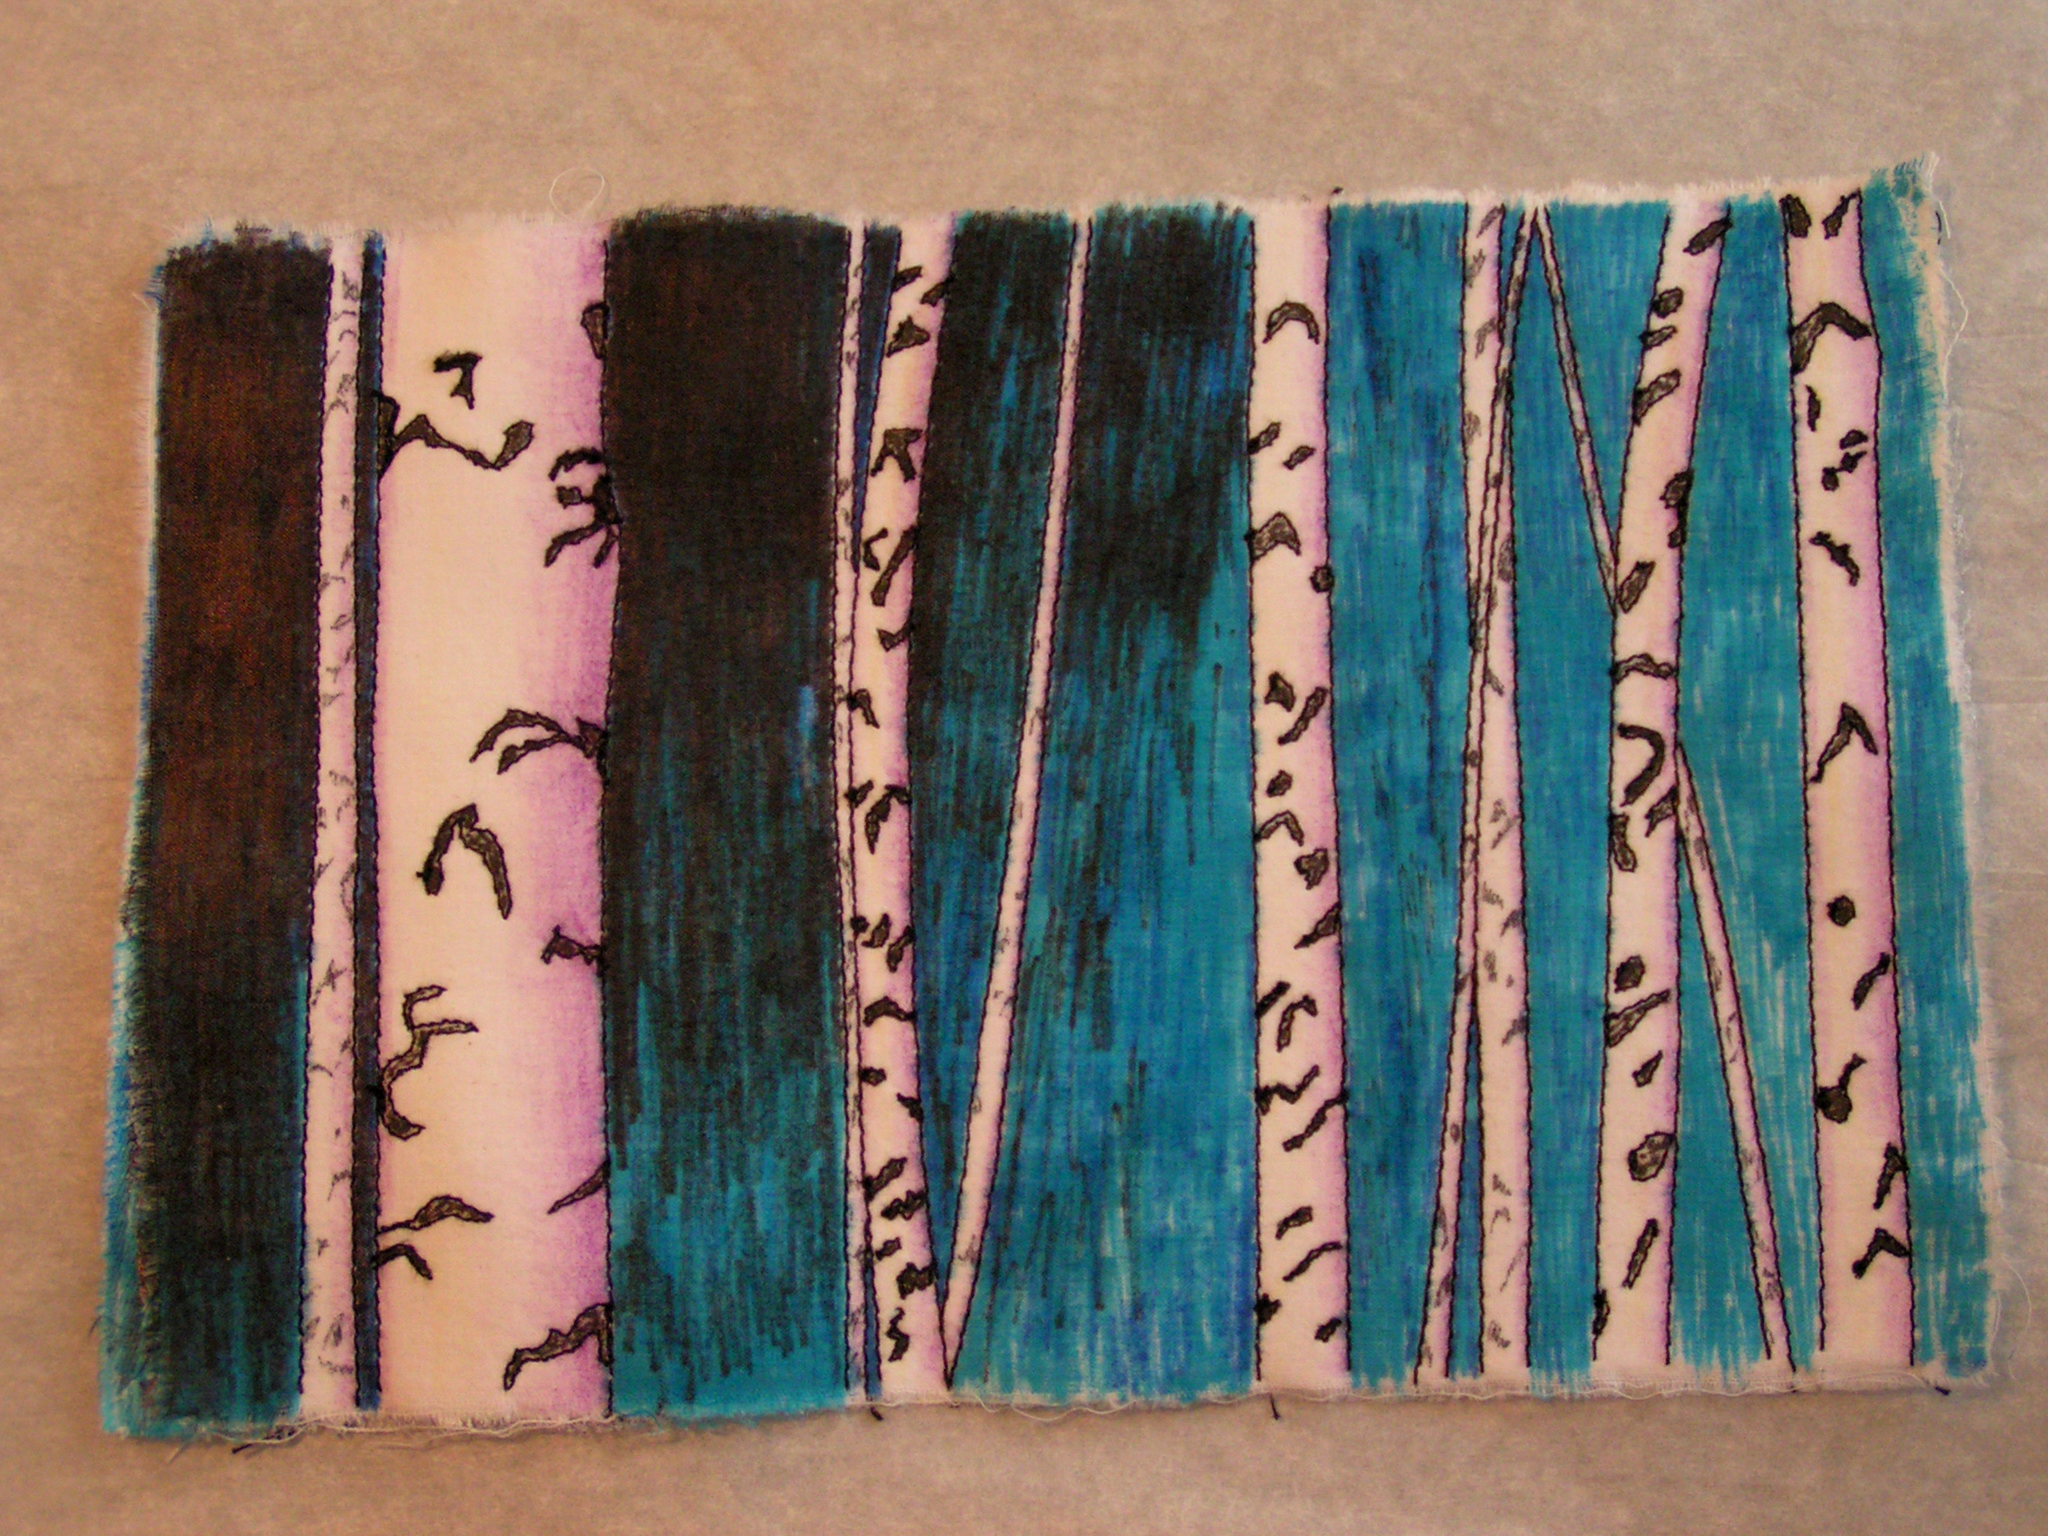
I have been working on Ann’s abstract challenge throughout the quarter but haven’t had that much time to put into it. If you didn’t see my earlier posts, here is the first one and the second post. Basically, I took one of my sketches and then “abstracted” it in Photoshop Elements. I’m not sure it is really that abstracted but it is certainly a change from the original sketch. I was planning on felting a piece but just didn’t have the time. Instead, I machine stitched a piece and can use it for my stitch class homework too.

This is the original sketch in my studio journal done with watercolor pencils.

Here is the photo after being “abstracted” in Photoshop.

Here is my interpretation on fabric. The colors are off as this was taken indoors. I fused a lightweight cotton to heavy Kona cotton and then stitched the outlines of the trees. On the foreground trees, I stitched outlines of the black marks on the trunks. I then colored in the piece with permanent markers and added the shadowing with colored pencil. I forgot to take any photos just showing the stitching.

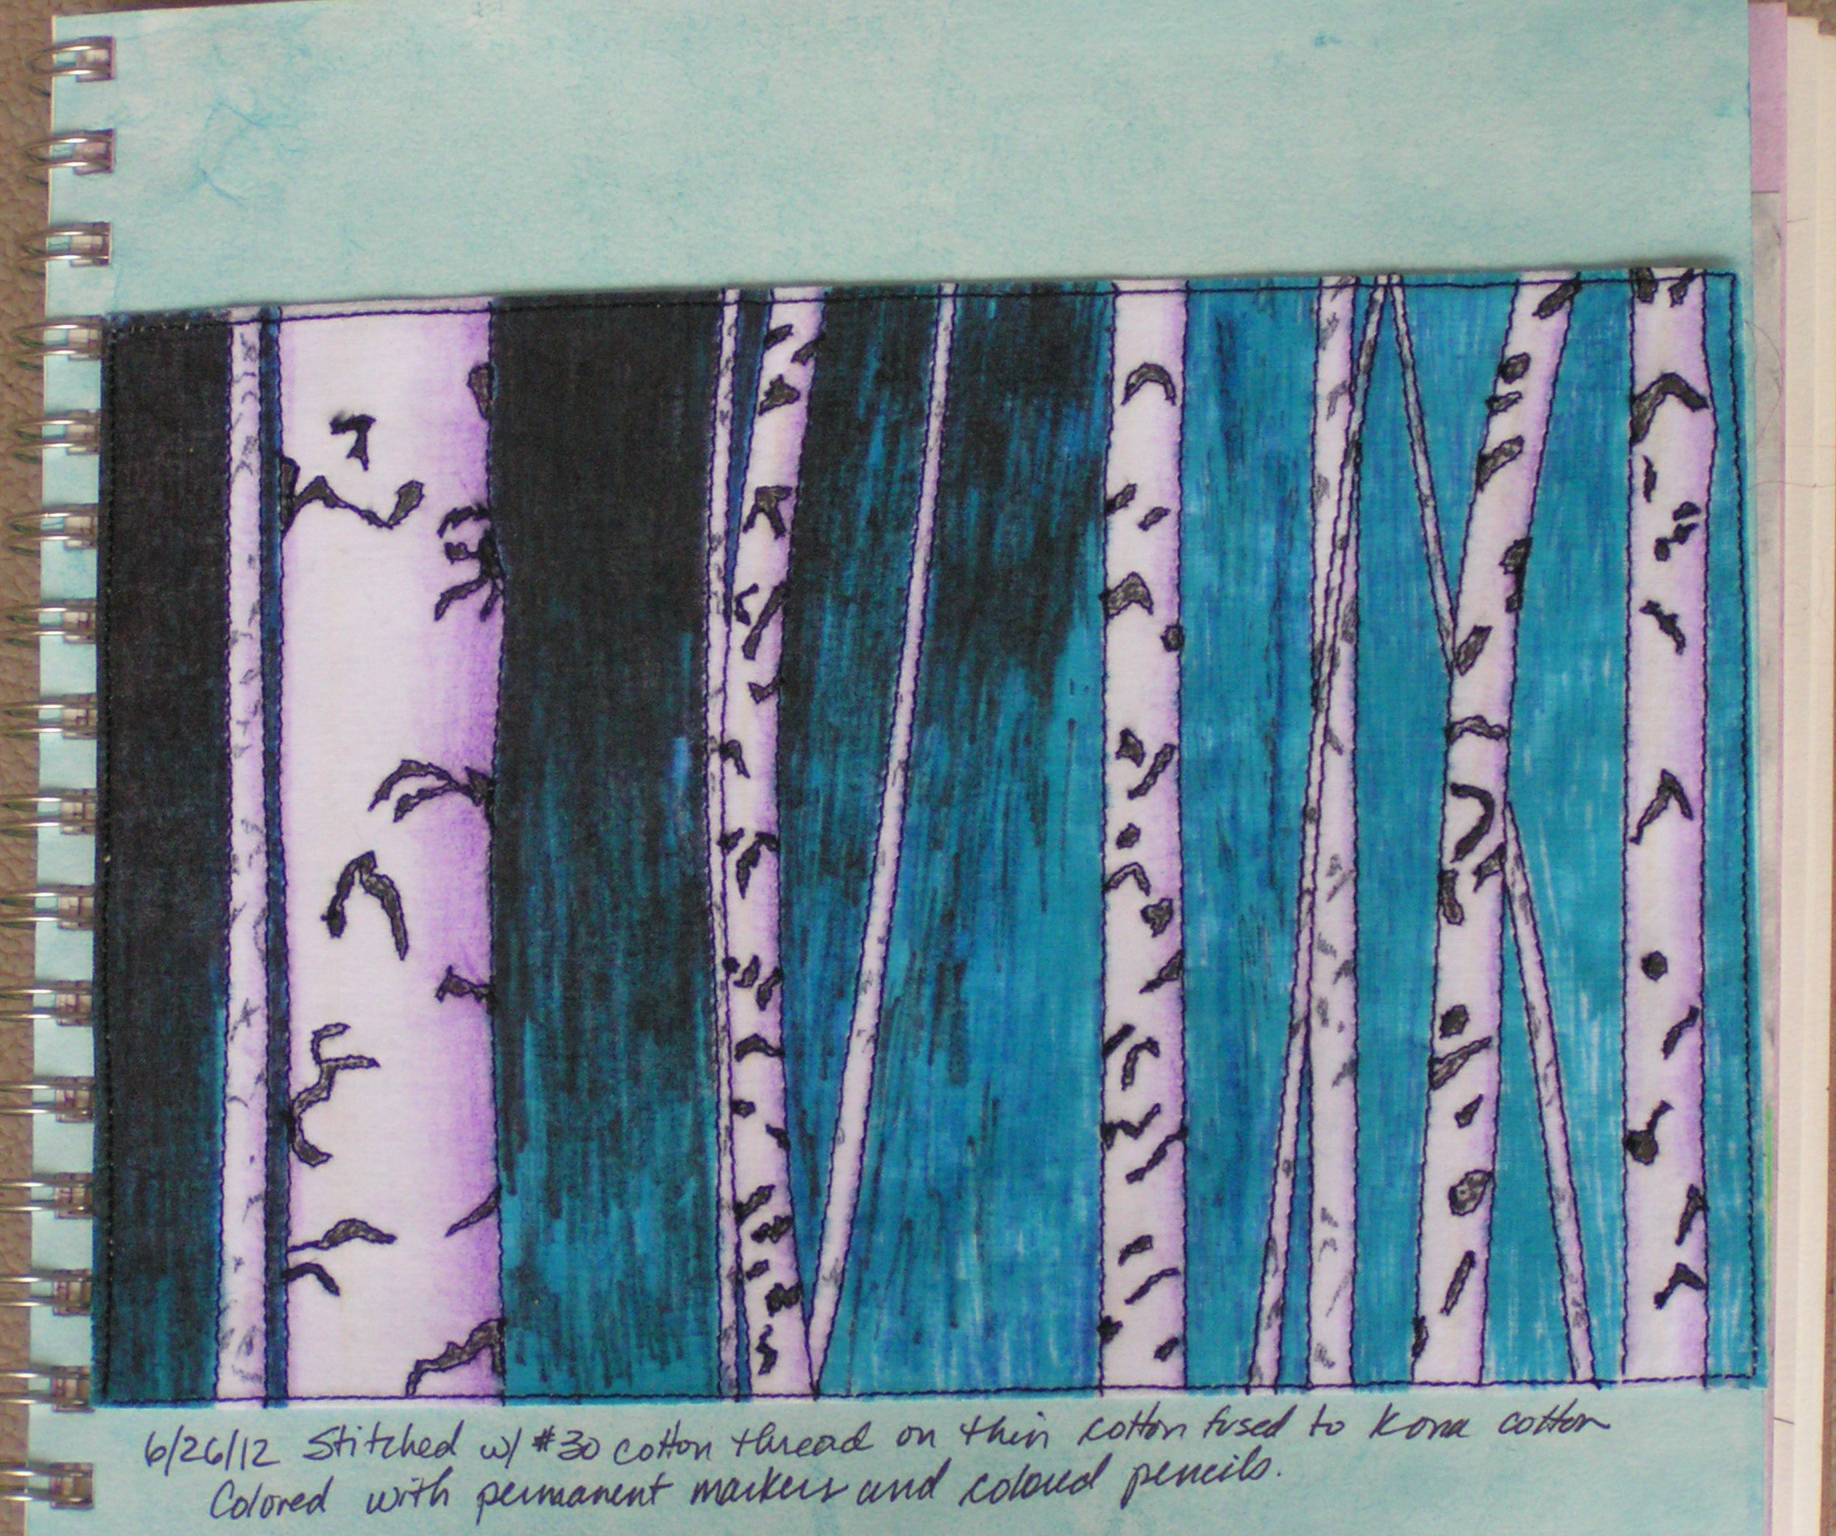
Here it is in my sketchbook. I stitched around the edge and trimmed it. This is closer to the true colors of the piece. I like how it turned out but it isn’t really that abstract.

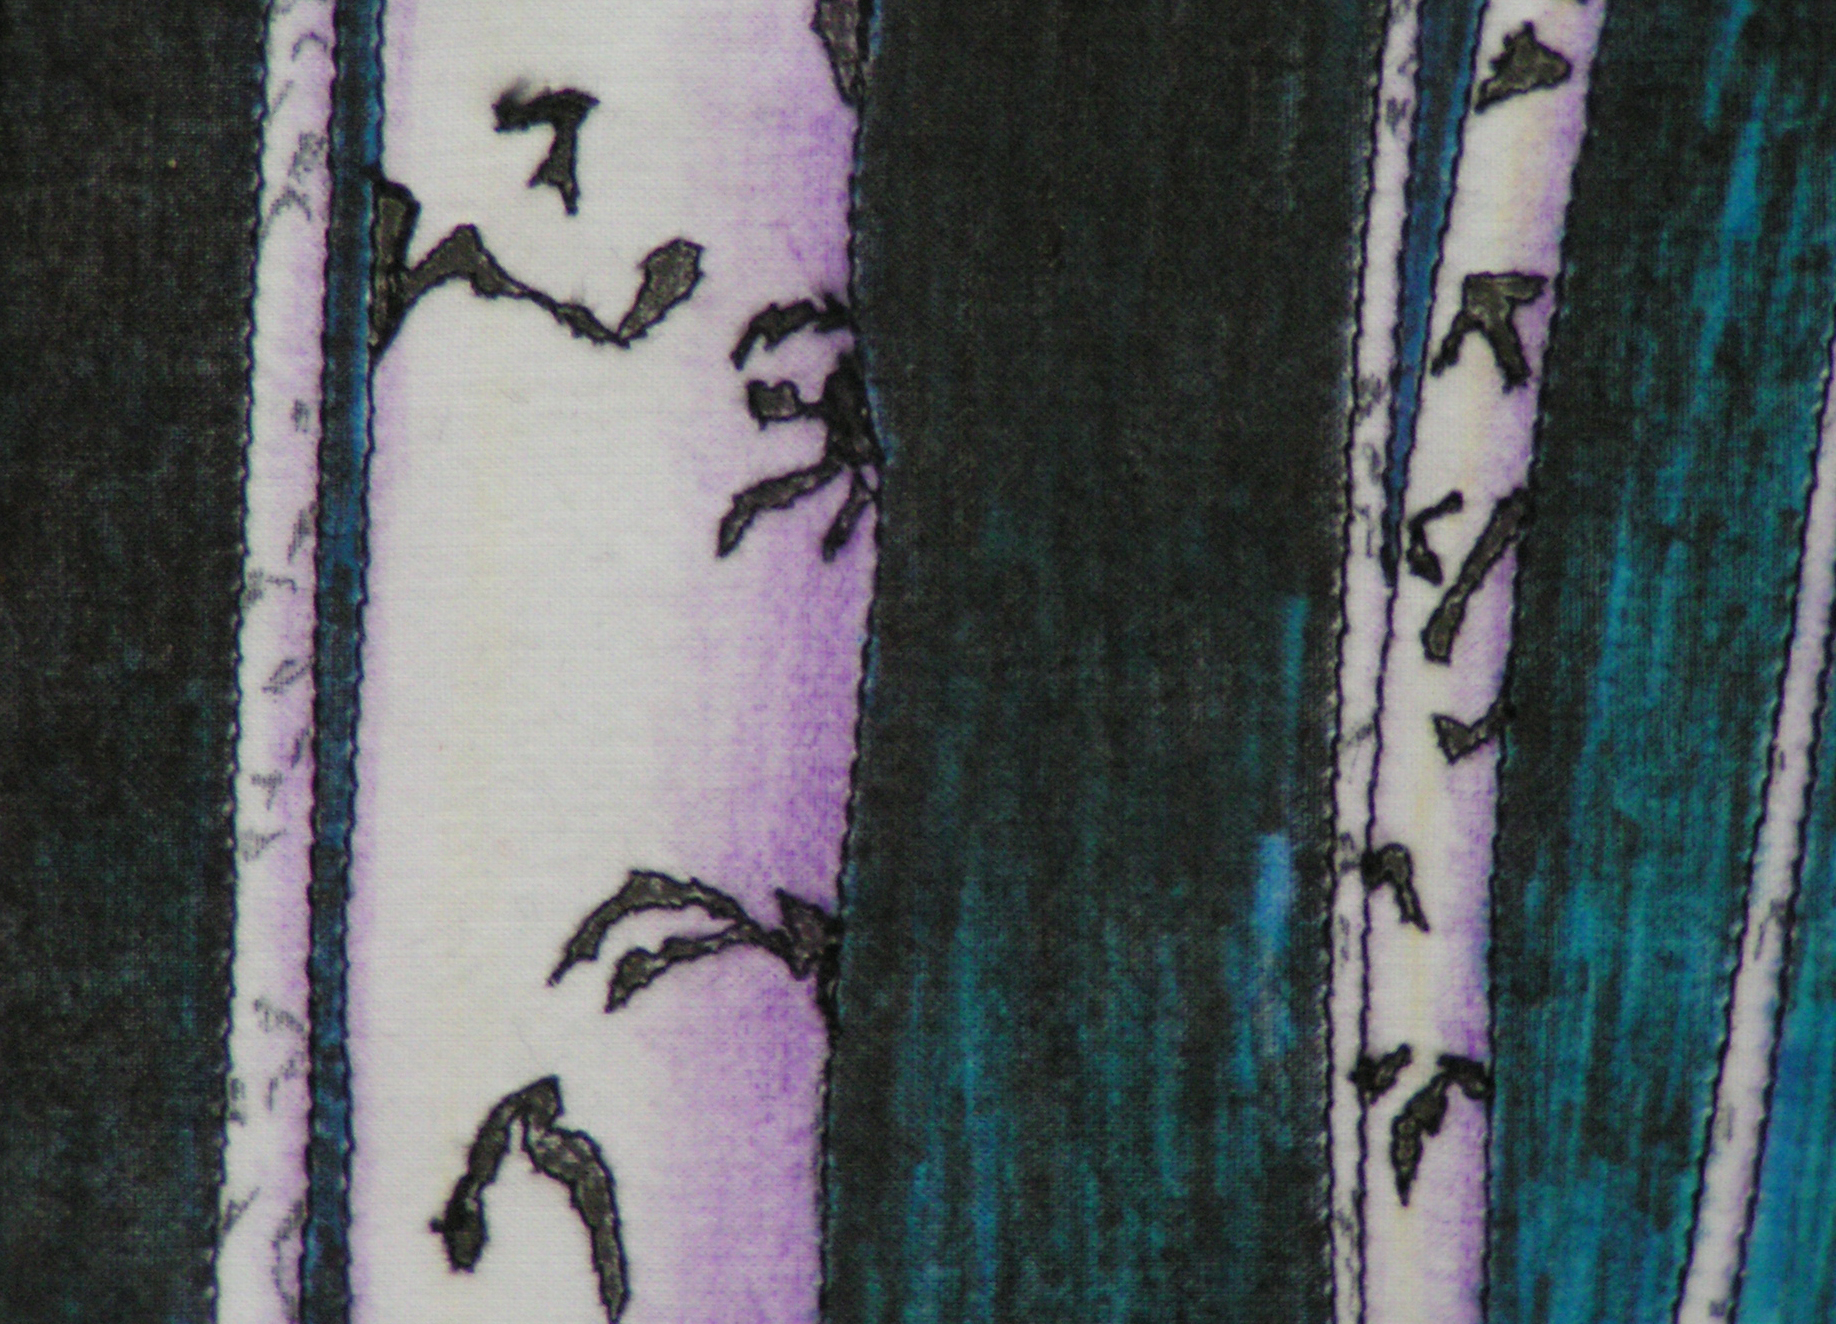
Here’s closer view so perhaps you can see the stitching. You can click on any of the photos to see a bigger view. I really enjoyed this challenge and for me, it was a challenge. As I said in my prior posts, I don’t feel comfortable doing abstract work. And I’m not sure that this piece would be really classified as abstract but it is certainly different from what I would normally do. So thanks Ann for the challenge!


Pricing – The Formula

Pricing – The Formula

There is no perfect formula for pricing. What works for one person might not work for another. The formula presented today is in standard use and even if you don’t end up using this method exactly, figuring out your prices this way will give you a baseline from which to start.

Here is a basic pricing formula:

Materials + Labor + Overhead + Profit = Wholesale Price

Wholesale Price x 2 = Retail Price

To have a complete understanding of the formulas, you need to understand what each of the items in the formula above include. Materials are the raw supplies that you use to make a product. Fiber art materials might include wool, fabric, silk, dye, textile detergent, thread, resist materials, paint, embellishment fibers etc. If you are making work in a different media, whatever raw materials that you use to create your piece should be included. A nuno felted scarf might cost $3.00 for wool, $10.00 for the silk fabric and dyeing costs of $2.00 for a total of $15.00 material costs.

Labor is the value of the time needed to make an item. Many newbies do not include a labor cost in their pricing structure. I think this is a big mistake. What would it cost you if you had to hire someone else to make the item? When estimating labor costs, the lowest you should choose is minimum wage. Estimate an hourly wage and then determine how long it takes to make each separate item. For example, if your labor cost was $10 per hour and it takes you three hours to make a scarf, then the labor cost you use in the formula above for the scarf would be $30.

Overhead is costs that do not directly relate to a specific product. Many people who work at home tend not to include overhead costs. However, if you use water, electricity or other utilities, overhead expenses are necessary to include in the formula. Overhead could include rent, utilities, repair and maintenance on any equipment, telephone, computer use, credit card fees, bank charges, legal and accounting fees, subscriptions, memberships, continuing education, advertising, print media, packaging and shipping supplies, insurance and selling expenses. Selling expenses are things like show fees, display costs, travel, photography, samples and sales commissions. You can figure out these numbers by looking at your bills for one year’s time. Then figure out how many hours you work in a year and divide the total overhead by that many hours. This will give you an hourly overhead cost. This can be added to your hourly labor wage or you can apply it proportionately to each product.

Profit is not a bad word. Everyone should be making a profit from what they make. If you leave this out of the formula, you will never be doing more than breaking even. Your profit might be as low as $1-2 on each item but it still needs to be calculated into the formula.

Once you’ve figured out your labor and overhead costs, you’ve got the bulk of the work done. You only need to review these on a yearly basis to see if they need to be changed. For example, if you stay with the $10 per hour labor charge and come up with a $7 per hour overhead charge, the formula for a scarf that takes three hours to make would look like this.

$15.00 + $30.00 + $21.00 + $4.00 = $70.00 wholesale price

$70.00 x 2 = $140.00 retail price

Go ahead and work out the pricing for all of your items that you make. Compare these prices to what you currently have your items marked? Is there a big difference? Can you see items that don’t really make sense to make in that they take an inordinate amount of time? Are there certain items that you think you can increase your profit margin?

A quick word about the wholesale versus retail price. Many people sell their items at the wholesale price in retail venues. They skip the last part of the formula. This is a real pet peeve of mine, when artists come in and tell me they sell work at local shows at a certain price but that is the same price “they need” from me before I mark it up in the store. It will be impossible to sell these items in a gallery because the customer will just wait until the artist is selling at a local show and the customer will get the item for half the price they would pay in a gallery. Galleries will be unwilling to work with you if you price this way.

Next time, I’ll discuss other pricing methods and some general tips for pricing. If you have any questions, please feel free to ask. I’d love to hear your comments about how you figure pricing and what seems to work best for you.

NYC Travel Journal Update

NYC Travel Journal Update

This is an update about my trip to NYC and filling out my travel journal that I made. Everyone else was happy with their books but only my brother-in-law (besides me) filled his in. My sister and husband just saved things to paste in later. We were busy for the entire time we were there and I only had a few moments each day to work in my journal. I would collect lots of paper bits during the day to paste in the journal. I then would paste in a few things and write about the day with a permanent pen. The extra sketches and embellishments were done on the trip home. I used Inktense pencils and a water brush to do the “watercolor” portions. This works great if you used a permanent pen but won’t do well if your pen will run with water. You are welcome to click on the photos for a larger view and you can read what we did in NYC if you’re interested.

I still have a few blanks spots for photos and the last three pages to fill in with some photos and subway maps. We were in the studio audience for The Chew which is on ABC while we were in NYC. The show airs on August 2nd. We might be visible in the studio audience.

I really enjoyed filling the journal out and since I can never keep things straight about where we went and what we did, this will be an excellent reminder of our trip. Have you used a travel journal? Do you take any art supplies with you when you travel? I’d love to hear about it or see your journals if you have any.


Making a Small Travel Journal

Making a Small Travel Journal

By the time you read this post, I will be in New York City. My mom and dad kindly let us use their timeshare condo in downtown Manhattan. My sister and her husband are joining us there and we’ll be there for a week. In preparation for our trip, I thought it would be fun to make a small travel journal to keep memories of the trip in. Since I was making one for me, I thought I’d make one for each of us. I thought it would be interesting to see what each person chose to remember in their book. I’ve made a mini-tutorial of how I put the books together.

The covers were made with some hand-made paper that I made about a month ago with my local surface design group. I didn’t really have plans for the paper when I made it but it was the perfect size for a small book cover. It’s about half the size of an 8 1/2″ x 11” sheet of paper. You could use a piece of hand-made felt, a couple of layers of heavier cotton fused together or a piece of cotton canvas to use as a cover. It needs to have a little weight to it but not be completely stiff.

I then painted some paper with a light wash of acrylic paint and cut the sheets in half. This paper is slightly heavier than computer paper but not by much. I painted some in green, blue and orange. You can choose any color scheme to match your cover.

I painted enough sheets so that I would have 12 half pages per book. I then took three sheets and folded them in half, one inside the other to make the signatures for the book. That’s just a fancy word for the sheets of paper that go together in a group to be sewn into the book. Oops, I forgot one step. Before I folded the signature, I made a fancy center page of the New York City sky line.

Here is the pattern that I drew. I found a photo of the NYC sky line and sketched it out. I then used a ruler to make the lines a little straighter and then used a felt tip marker to make the lines a little darker.

I then traced the pattern on to a piece of freezer paper and ironed the freezer paper to one of the blue pages to use as a stencil. I then sprayed the paper with black spray paint. This is the stencil after it’s been used several times. It worked to use the same stencil four times. The last use didn’t give as clear an edge so if you want a really clear edge each time, make a new freezer paper stencil each time. But I was being lazy and it really didn’t make that much difference in the end result.

Here’s the painted sky line. I did draw in the pointy part of the top of the Empire State Building later with a black Sharpie. Looks more like a castle to me but I guess it looks somewhat like a city skyline.

I just got this new Pfaff sewing machine. My old machine was a cheap Brother machine and it just wasn’t working like I needed for machine embroidery. This machine is really fancy but I really like how it sews so far. I used it to sew my little books.

Previously, I had searched online for maps and photos to use in the books. I thought it would be good to get everyone started and give the books a feeling of being in New York City. I used Google maps for the front covers.

I used a piece of double stick tape to apply the map to the front cover to hold it in place while I was stitching. When you stitch through paper with a sewing machine, you should increase your stitch length. If you put your stitches too close together it tends to tear the paper. I used orange thread and stitched around the outside of the map. This book is put together with all straight seams so you only need basic sewing machine skills. Remember to put the map in the correct position so that when the book is closed, that the map ends up on the front of your book and right side up.

This is the trickiest part. Open one of your signatures and place it on the inside of your book cover. You can see the seam where you stitched the map on the front. Line up the fold with that inside seam about 1/2″ to the right of it. Carefully stitch along the folded line. You can tie the ends of the thread either on the inside or outside. You could leave them long to tie beads or other decorative fibers on the outside if so desired. I tied mine on the inside and cut them short. Keep lining up your signatures alongside the previous one about 1/4″ apart and stitching them into place.

This photo shows the outside cover of the book after two signatures had been sewn. I tried to take a photo of the spine of the book after all the signatures had been sewn but couldn’t get a photo in focus. Sorry.

Here are the four books after having all four signatures sewn in place. I really had fun with these books. I’m not sure if it was because I like making books or if it was finishing a project. I’ve been making so many samples for my class that I never feel like I’ve really made a project. It was nice to have a finished piece.

I then found some painted paper that kind of matched and glued it into the front cover to hide the stitching from the map on the front. I also glued in some of the photos I had found online. This is graffiti on the right hand page.

I also sewed two pieces of paper together to make a pocket. I then glued it into the back cover. We can put tickets or other memorabilia in the pocket.

This photo shows the hosts of The Chew. It’s a cooking show that’s filmed in NYC. My sister got us tickets to be in the studio audience. I’ve never even seen the show but I like cooking shows so it should be fun. I’ll let you know if we’ll be on TV!

A friend of ours got us tickets to go to a Mets baseball game while we’re there. My husband is excited about this. So now we’ll all have a little book that we can journal in, draw sketches, paste photos, tickets and other ephemera about our trip. I’ll post some photos of the completed journal when I get back.

Do you use a journal? Have you made a travel journal before? I’d love to see yours if you have any samples.

Everyone’s Least Favorite Subject – Pricing

Everyone’s Least Favorite Subject – Pricing

I have owned a craft gallery now for over 14 years and I haven’t met one artist or crafts person who likes pricing their work. Many have no understanding at all at how to price their items and many artists, especially newer ones, under price their work significantly. I’ve never had anyone say that they thought pricing was easy even if they’d been doing it for a long time. I’ll be taking several of the next few Marketplace Monday posts to talk about various aspects of pricing. I hope that you’ll be able to glean some information to help you in your pricing strategies.

For these articles, I have consulted several books and I’m also drawing on my years of working with hundreds of different artists. I would check out your local library to see what books they have available about selling your “crafts”. The two that have been the most helpful for me are Handmade for Profit by Barbara Brabec and Crafting for Dollars by Sylvia Landman. These are both older books and I’m sure that there are many more out there.

‘Price is the figure something sells for. Value is what that item is worth to a buyer. Quite often the two have nothing to do with one another.’  (Excerpt from Handmade for Profit) There is no perfect formula for pricing and what the marketplace will pay is a very large factor. There are many aspects that will affect what a customer will pay and the value that they see in your work. My point here is that if you continue to work on your pricing and tweak your system as you learn what works and what doesn’t, you’ll become more profitable in your business.

You should always research and study your marketplace before beginning to tackle pricing.  Check out how other work similar to yours is priced. I’m sure you’ll find a wide range of prices, but you’ll be able to find an average price for a similar product. Make sure that you are comparing the same markets. What someone will pay in a small rural town will be completely different from a customer in a pricey boutique in a city like New York City. The internet makes the world a small place but not all markets are the same. Keep a notebook of various prices that you see at art fairs, online and in galleries.

Another thing to think about before starting your pricing system is whether or not you are really paying wholesale prices for your supplies. It is impossible to make a business profitable when you buy your supplies at retail price. The more you can cut your expenses and your labor in making a product, the higher your profit margin will be. Streamlining your production is very important and if you are truly a business and are planning on producing multiples of the same type of item, the time required to make an item will determine its profitability.

Next time I will be discussing the cost of labor, raw materials, overhead, selling expenses and profit. I’ll give you a formula for basic pricing and how to use it. So get your research done, cut your expenses down and next time we’ll get into the nitty-gritty of pricing.

Tutorial – Using a Handheld Sander for Wet Felting

Tutorial – Using a Handheld Sander for Wet Felting

This is a tutorial that I did for my personal blog and because it is so popular, I thought I would re-post it here in case some of you don’t follow my blog. If you already know how to wet felt and would like to speed up the process, you should try out the sander method. If you are just learning to wet felt, I would suggest holding off using the sander until you have practiced felting by hand. It’s better to learn the basics first before you try to go faster. If you don’t like loud noise, this method won’t be for you. But you can use ear plugs and it really does speed up the felting. (Warning – This is a very long post with lots of photos.)

I have had numerous requests to make a tutorial for using a hand-held palm sander to wet felt. This is the way that I do it. There are many ways to felt and I’m sure there are many ways to use a sander while felting. I will give some other options as I go along. You should try following the tutorial and see how you like using the sander. If you don’t have the specific type of plastic or equipment that I use, don’t let that stop you. Use what you have and give it a go. This is the equipment that I use. I will talk about each piece of equipment as it comes into use in the tutorial.

 This is the sander that I use. Any palm type sander will work or you can use a bigger sander as long as it doesn’t have rotating or spinning parts that do the sanding.

You don’t need to use any sandpaper. I have heard that some people have a plastic piece that they put on the bottom of their sander. I haven’t tried that. I have tried using a plastic bag wrapped around the sander but the bag keeps moving and has a tendency to rip. Also, it covers the exhaust on the sander and the sander then gets too hot if you’re not careful.

 Just a word about water and electricity. You need to be careful. Plug into a grounded plug when you’re using your sander. This is what ours look like. They are usually found in the kitchen and the bathroom in the USA. My sander never touches water but you should still be careful.

I work on the kitchen table usually. I put down a piece of plastic just to keep any water off the table. You can see that I have painted etc. on this plastic. But it never touches the wool so it doesn’t matter.

I then put down this small braided rug. It is made with a natural fiber but I don’t remember exactly what it was called. Anything with some texture would do. I haven’t tried bubble wrap but it might work if it is the really stiff kind with thick plastic.

This is the foam layer that I use. It is a type of packing foam and I recycle it from my store as some things I receive are packed in it. It is very thin. You could use any kind of plastic that you wanted to use. (This was written several years ago, I now just use a thin layer of painter’s plastic.)

o I put down a layer of foam on the rug. Today I am making a flat piece of felt that I will use to make some book covers. I will be cutting the felt out of the flat piece but I still need to make sure that I make enough felt to be the right size for two book covers. I need at least 6 inches wide by 18″ long. I usually  make much more than I need and I can always use the leftovers for something else. I am planning on making a piece almost as big as my foam so the layout will be 19″ wide by 26″ long. This will assure that I have plenty of felt with a shrinkage rate of about 40% with the Falkland wool I am using. I tested a sample of my wool before to figure out the shrinkage rate.

 This is how you pull pieces of wool off for layout. Make sure that you have your hands far enough apart so that you’re not trying to pull on the same fibers. Notice how I have my right hand? That is the easiest way to hold the wool you are pulling away from the roving. If you use prefelt or batting, you would just lay out the wool as usually do.

 Here is a piece of wool pulled off. You then lay the wool down on the foam. You can see a row I’ve already laid out. To get an even piece of felt, you need to be careful with your layout and take time to place your wool evenly. Try to pull off about the same amount each time.

 Here is my first layer of wool laid out. I am using natural wool but will dye this later for my book covers. Notice how all the fibers are going in the same direction?

 Now, take your hand and put it down on the wool. Move your hand from place to place. Close your eyes and feel the thickness. If you feel thin spots, put a little more wool on that area.

 Next, layout another layer of wool going in the opposite direction as your first layer. Here, I have laid about half of the second layer.

Keep in mind the size you need for layout. I just keep my yardstick handy so I know what size I am laying out.

 Here’s the two layers. If you were doing a thicker piece you may need to add more layers. Most people do three layers of wool at least. I am only doing two layers as I need it to be thin enough to put under the sewing machine and to add a backing for stiffness. So I am only doing two layers. But you can do as many layers as you would like. The more layers, the stiffer and thicker your finished felt will be.

Again, take your hand and feel for the thin spots. This is the easiest way to prevent holes and thin spots. Check all over your wool and add where it feels thin. I also like to get a little bit of air out at this point. I take both hands and gently press down on the wool to try to flatten it a bit and get rid of some of the air. This helps later when you’re adding water.Just press down all over the laid out wool.

I am adding silk noil to the top of my felt. It is to give more texture for my book cover. If you were adding a design or extra embellishments to your felt, this is the step that you would add those.

This silk noil has a lot of vegetable matter (VM) in it. I am going to leave it in. Normally I would take it out but these book covers are supposed to resemble bark so I don’t think it will matter if the VM stays. It will just add more texture. I split apart the silk noil like the photo above shows.

 Then I lay it out over the top of the laid out wool.

Here I am finished laying out the silk noil. If you use a lot of silk or any other embellishment that doesn’t felt, you’ll need to add another very thin layer of wool over top.

Just little wisps of wool is all it takes.

This is about how much I put down in one spot. I spread it very thin and just lay it on the silk noil all over the piece. I then press out the air again.

 When I finished laying out, I noticed that my wool was going over the edge of the bottom layer of foam, so I added a bit more to prevent my felt touching the rug directly.

Fill a spray bottle or ball brauser sprayer with cool water and soap. I usually use dish soap but you can use any kind of soap. Olive oil soap is good as it isn’t so hard on your hands. Now, take your spray bottle and spray down the wool. I actually no longer use this kind of sprayer as it tends to shift the wool layout. An empty vitamin bottle with holes cut in the lid works really well.

Here is the wool after being sprayed. See the soap bubbles?

 I then spray a little soapy water on my hand and then start pressing down. Many people use a baggy over their hand or netting over the wool to do this part. It just bugs me so I just use my hand. If you press with one hand and spray water with the other, I find that works well. Just keep moving along your wool, spraying and pressing to get all the air out and get the wool wet.

If water is starting to run off the edge, just use a towel to mop it up. You really don’t need a whole lot of water when you felt. You can lift the edge of the foam/plastic to let the water drain on down further into the wool. You can keep doing this as you move along wetting down your felt.

 I also take my hands and work from the wetted down side towards the dry to force water over to the dry side.

Sometimes, if you move your hands into different directions when pressing down the wool, you’ll get a wrinkle. Just use your fingers to smooth it out. If you go in one direction, this isn’t as much of an issue.

Here is the wool after is has been wet down completely.

 At this point, you need to assess your edges. If you want a smooth edge, this is the time to work on that.  You can fold under a tiny bit to get a straight edge.  Since I will be cutting out my book covers, the edges don’t matter. I also like the look of a natural edge so you can make a straight edge or not, it’s your choice.

At this point, I try to soak up a bit of the water in the felt. You will find that it is already starting to felt. Carefully place your towel on the felt and push down to soak up some water. Move over the felt soaking up water, just lift your towel and place down carefully each time you move it. If the upper layer starts pulling up then stop.

Now put another piece of foam on top of the felt. Or if you’re using plastic, put another piece of plastic on top. You should have a sandwich of foam/plastic, felt and foam/plastic.

Now plug your sander into a grounded plug, turn it on and place it gently on one corner of your sandwich over the felt. You don’t need to push down to start. Just move the sander from place to place by picking it up each time.

 See? I have it picked all the way up off the foam. You don’t have to lift this high but don’t drag it across the foam.

Then put it back down and hold it there for a few seconds. I usually work in rows starting from one end of the felt and moving to the other end systematically so that I don’t miss “sanding” any portion. Keep lifting and placing it down each time. This keeps your design from moving and migrating. Once you’ve finished the bottom row, move the sander up a bit but overlap the row you were one and do the same along the next row. Keep doing each row, overlapping the last row so you cover all your felt. I usually do this several times over the whole felt.

Here it is after I’ve sanded over it several passes. you can see the grooves from the foam.  When you pull back the foam/plastic, use your towel to get excess water off the foam/plastic.

Now grip all layers of the sandwich with both hands (one at each end) and turn your sandwich over.
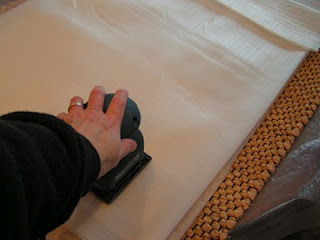
Now sand the other side just as you did the first. Remember to pick up and move the sander, placing it back down each time. After you have sanded this side going over it at least twice, you can start moving your sander over the foam/plastic as you would if you were sanding wood. I usually turn the piece two more times and sand for a total of about 15-20 minutes. Or until I get tired.

Then you need to do the pinch test. Pinch your felt and see if the fibers pull apart. If they hold together, you are finished sanding. If they pull apart, sand some more.

Here is the felt after sanding. This is pre-felt. Now you can full the felt however you would like. I will show you how I full mine.

The first thing I do is get more dish soap and get the felt a bit wetter with warm water. Your felt is fragile at this stage so don’t be too rough with it. Then I do what is called palming. I put the felt between my hands and vibrate and push my hands together. I do this over the entire surface of the felt.

After I finished palming, I put it under very hot water and “knead” it in my hands. I keep going with the hot water until it is too hot on my hands and then I switch to cold water. This shocks the wool and causes it to really start shrinking down. You can feel it happening. I keep switching between the cold and hot water. If you have water conservation issues, use two buckets to hold your hot and cold water.

 Then I throw the felt into the sink. You’ll want to get a little of the water out first unless you like a face full of water.

Here it is after I’ve thrown it. Just pick it back up and throw it again. Throw it hard! Get out all your frustrations. You can also keep putting it in cold and hot water as you’d like.

Another way to full is to use a washboard. This is an old glass one that I have. I don’t usually use it for flat pieces of felt. Usually I use it for slippers, bags or vases. It helps with the shaping process. If you have embellishments, be careful that you don’t catch an edge and pull anything off.  You just push it back and forth across the ridges. If you want to shrink it one way more than the other, than rub in the direction you want to shrink.

Your felt is finished when it starts to get nubby looking on the surface. You don’t have to felt it this hard but pieces that will be used such as bags or shoes should be fulled to a very hard felt. So how did I do on my shrinkage? The piece now measures 13″ x 19″ (if you’ve already forgotten, it started out as 19″ x 26″

Next you need to get some white vinegar.  Put some water in the sink or a bucket. Add some vinegar. I don’t measure, I just pour some in. Put in your felt and let it soak for about 5 minutes. This is bringing the wool back to a more natural acidic pH. The soap changed the pH of the wool so this returns it to normal. Then rinse it out. Wring out the water or roll it in a dry towel.

 I pop mine into a lingerie bag. Throw it in the washing machine. Put the washer on Drain/Spin. This takes nearly all the water out of the felt and it dries much more quickly. If it’s a small piece you can use a salad spinner for the same effect.

Here’s the finished piece of felt. If you wanted it completely flat and even, you could block it. That means to stretch it and pin it into place in the shape that you want. If you try using your sander, let me know how it goes. I’d love to hear how you did and see your felt. You can use a sander for almost any type of wet felting. I have used it with nuno felting, using a resist, thicker felt etc. When you nuno felt with a sander, sand first from the silk side as opposed to the wool side. That helps the wool to migrate through the silk instead of felting to itself. Once the wool starts to migrate through, then you can turn over and sand the wool side. Any questions, please feel free to leave a comment and I’ll answer your question.

Book Review

Book Review

Here’s another review of a book I have in my fiber art library. The book is called Freestyle Machine Embroidery by Carol Shinn. (I can’t seem to copy the photo from Amazon so you’ll need to follow the link to see the book.) This book is about machine embroidery and is a combination of specific step by step photos as well as wonderful selections from artists around the world doing free motion machine embroidery.

The piece above is a machine stitched fabric page of an old castle ruin that I did using Carol Shinn’s method of machine embroidery. The book is very informative and has beautiful photos of Carol’s work and work of other artists. The chapters are:

  1. Understanding the Process of Machine Embroidery – This chapter covers all the basics including what “freestyle” means, supplies needed, adjusting thread tension, stitch direction and distortion, caring for your machine and trouble shooting.
  2. Color Mixing – The second chapter includes several different exercises to help you learn about mixing colors with thread including layering thread colors, understanding gradation, and planning and stitching a complete design. Carol shows a variety of samples that really illustrate color mixing well.
  3. My Process for Making an Embroidery – Chapter three shows a step by step process with lots of photos of how Carol stitches her pieces. There is an excellent troubleshooting section at the end that teaches you how to correct any possible errors.
  4. Adding Variety – The fourth chapter reviews all the different types of stitches that can change the look of a machine embroidered piece. Again, there are many close up photos to show the different variations. Carol also talks about combining hand and machine stitching, attaching decorative elements, edge considerations, dissolvable films and fabrics and using different background surfaces. There is also a small section about painting the surface and mixed media techniques.
  5. Freestyle Machine Embroidery as an Artistic Medium – The last chapter is a gallery of other artist’s work and brief description of their working methods. It is amazing the variety of work that can be done on the sewing machine and each has their own style. If you’re interested in machine embroidery, this chapter is very inspiring.
The last part of the book has further information in different appendices including your work space and equipment, basic color information, three ways to re-proportion artwork for embroidery and distortion. I really enjoyed this book and experimented with several pieces using her method. I think the book was the most helpful to me in what I learned about distortion and how to control it when adding dense layers of thread.

How To Approach a Gallery – Part Two

How To Approach a Gallery – Part Two

Now that you’ve done the leg work, researched the gallery and gotten an appointment to present your work as I discussed in Part One of Approaching a Gallery article, what are the important things that you need to discuss at your meeting and what should you bring?

The most important thing of course is to bring your work that you wish to sell. If the gallery has requested specific items, make sure to bring in a good selection. You need to have at least five to seven of each item to make a nice display. You can also bring more with you and leave it in your car. Then if you are asked for more pieces, you will have them readily available. You should have an inventory sheet listing all of the items, how many of each you will leave with the gallery and the retail price of each item.

Each of your items should have a hang tag that tells your story but it should not have any of your contact information on the tag. Galleries do not want customers reading the tag and then trying to contact you directly. The tag should have room for pricing but you’ll need to work with the gallery on whether you should price the items or whether the gallery will price the work. Bring a few extra hang tags just in case one gets lost. Also bring business cards and any other information cards that need to go with your products.

If your items need to be displayed in a certain manner to sell well, you might consider bringing a display rack that the gallery will use to show your work. Again, you will need to discuss this with them but many galleries will appreciate the offer. Think about ways to make it easier for the gallery to sell your products. Do you have signage that will help sell your work? Bring that along and see if they want to use your signage. Some galleries will make all their own signage but many don’t.

Bring any other written information that you have such as an artist statement, brochures, postcards or resume. You may not need any of these items but it will be useful to have them in case the gallery does want the information. You might also check to see if they need any digital photos for adding to their website. You can bring those on a CD or offer to e-mail them to the gallery after the meeting. You should also bring your own consignment form just in case the gallery doesn’t have one. Most will but if they don’t, bring your own already filled out and ready to sign. If they won’t sign it, I would not put my work in that gallery. You have will have little recourse at all to get your work back if you don’t have a signed agreement. You can find consignment agreements online. Here is one I found at Law For Art.

Once you’ve shown your work and the gallery has decided to take all or a portion of your items, you need to ask questions about how they handle consignment. What is the percentage that the gallery takes? When do they pay for items that have sold? The standard is to pay for items sold in the following first week of the month. So if your items were sold in June, then you should be paid no later than end of the first week in July. What happens if a customer damages an item or if one of your pieces is stolen? The gallery should be responsible for any damage or shoplifting and should pay you the amount that would have been due if the item was sold. All this information should be in the consignment agreement. Take the time to read it and make sure you understand it before you sign.

Where in the store will your work be displayed? If items sell, how often do they want you to bring in new work? Check to see if it is OK to come in periodically to rearrange or switch out work that isn’t selling with other pieces. I think it is important to stay in contact with the gallery. If you live nearby, check in occasionally to see how your work is selling. Get to know the gallery staff. The more they know about you and your work, the better they will be at selling it. Developing a good relation with the gallery is key to selling more of your work.

Ann had asked about why a gallery/store takes your work on consignment versus buying it wholesale. Some galleries only take work on consignment. Others do both. Many times it is in the way you approach the gallery. If you are tentative and don’t specifically say that you sell on a wholesale basis, the gallery will often tell you that they will take your work on consignment. This is less of a risk to the gallery because if the work doesn’t sell, they can give it back to you without any investment lost. If you want to sell you work on a wholesale basis, then your approach to the gallery should be made in a professional wholesale manner. You should contact them and give them information about your work with a wholesale price list and make it clear that you want to sell your work to them wholesale. If the artist tells me that they only sell their work wholesale and I want their work, I will buy it wholesale. If I am not sure that the work will sell well, I will either not order it or I will offer to carry it on a consignment basis.

I would love to hear any of your experiences in approaching a gallery and if you have any questions, I’d love to find an answer for you. Also, if you have any specific topics you would like to hear about in future Marketplace Mondays, let me know.

Book Review

Book Review

I thought it would be fun to go through my library of fiber art books and do a review of some of my favorites. I don’t have any other books by Jan Beaney and Jean Littlejohn but I have seen some of their other books. I have to say that I would recommend anything written by them. They are a great team and pack a lot of useful information in their books.

If you click on the photo above it will take you to Amazon. I think the book is out of print because the new copies are really pricey but you can buy them used for less. Or look in your local library, maybe you’ll be lucky enough to find this book. I love this book. I refer back to it frequently and have read it cover to cover at least three times.

The book has two sections the first is “Design to Embroider” and the second is “Stitched Images”.  The first section is about how to develop designs on paper and mixed media, where to look to find ideas and exploring those ideas. It is a good start to basic design and how to relate it to embroidery. The photos and examples are wonderful and inspiring. They show their own work as well as work of other artists.

Section two of the book is about taking your designs and making them into an embroidery. There is information about fabric paints and various methods of using them, working with applique’, stitch themes, machine embroidery and selecting a theme. This book is not a step by step instruction book. It does give basic information about how to use various fabric paint products but it doesn’t contain any projects to follow. The book is geared towards getting you to think about your own designs and how to develop backgrounds and then add stitch to make a complex experimental stitch piece.

The book talks a bit about using different stitches but it is not a stitch dictionary and limited directions for individual hand or machine stitches. What it does is give you lots of ideas about how to interpret designs and various approaches to use to achieve the desired effects. Every time I read the book, I find something new to consider. If you only do traditional embroidery from a kit and don’t want to learn how to design, this book isn’t for you. If you’d like to take a more experimental approach and learn how to design your work, you’ll love this book. All the reviews on Amazon are 5 stars!

If you have a favorite fiber art book, I’d love to hear about it. Hop on over to the forum and  tell us about your favorite book.