Browsed by
Author: ruthlane

When I discovered felting in 2007, I finally found the creative outlet for which I had been searching. I love that the versatility of fiber allows me to “play” with a wide variety of materials including wool, silk, fabrics, yarns and threads. Creating one of a kind fiber art pieces to share with the world fulfills my creative passion.
When Do You Give Up on a Design?

When Do You Give Up on a Design?

I have been taking an online class Designing with Circles 1 and 2 by Gail Harker and wrote a post a while ago showing some samples from my sketchbook. Of course, I just showed you the pages that I liked. As part of the course, I and other students had an online discussion with Gail going over questions we had sent in and showing pages from student work. It was a very interesting discussion and I learned that you shouldn’t give up on a design if you don’t like it, you should see if there are ways to change, crop or enhance your design to improve it.

Ugliest Doodle

One of the class assignments is to doodle. I have a very hard time doodling and the photo above shows what I called “The Ugliest Doodle Ever”. The background was done with breakdown screen printing and the doodle was done with colored markers. I sent a copy to Gail and said she could use it as an example of what not to do. But Gail saw something in the doodle that I hadn’t even noticed. She saw a prehistoric bird in a cave drawing. I never saw the bird before she pointed it out. During the class discussion, she showed how she had put the image into Photoshop and made some changes making the drawing a considerably better design. So I was inspired to take this really ugly design and improve it.

Ugliest Doodle 2

The first thing I did was erase the big “femur” in the middle of the design going over the bird’s legs. That made a huge difference for me because that part really bugged me. But the design was done in ink and I had given up because I didn’t know how I could make it any better unless I just painted over the whole page.

Ugliest Doodle 4

Then in Photoshop, I filled in the background pattern and redrew the green legs. Now I was ready to play with filters, lighting and color.

Ugliest Doodle 5

This is using the “posterize” filter. It highlights the edges with black. Another thing Gail pointed out was the “alligator” on the right side of the design. She suggested that the design could be cropped in different areas to take certain parts and use them as a separate design.

Ugliest Doodle 6

I don’t remember all the filters and steps I did in Photoshop but just played around and saved the ones that I thought had potential.

Ugliest Doodle 7

As you can see, it really changes the look of the design and gives you thoughts about how you could use the design differently.

Ugliest Doodle 8

I think this one is neon glow.

Ugliest Doodle 10

Or how about purple and black?

Ugliest Doodle 12Or orange anybody?

Ugliest Doodle 14

This is my favorite one. I can actually think of how I could use this in a textile context. It was really an eye opening experience. I think that we might all have a tendency to give up too soon on certain designs that don’t work out the way we intended. What do you think?


Finishing and Framing

Finishing and Framing

Many times after people begin felting and make several flat pieces that are to be wall hangings, they start wondering how to hang or frame their pieces. There are as many ways to hang and frame a piece as there are to felt a piece. So these are just a few ideas of how I have framed pieces in the past. I have found that if you are making a piece specifically to hang on the wall, that it is a good practice to think about how you are going to hang it before you start. That way, if you want a specific size or need an edge that is different in some way, you can plan that in advance. Of course, if I followed this advice more often, I wouldn’t be making up new ways to finish or frame a piece 🙂

One way to hang a piece without a frame is to use a stick or branch to hang the fiber art piece. I think this works best with pieces that are not square and have an organic edge to them. I usually just stitch around the branch and then stitch into the back of the felt piece, making sure that I am not stitching all the way through the felt.

MINOLTA DIGITAL CAMERAIn this piece which is quite large, I made a frame of sticks lashed together and then used leather cording to attach the felt to the frame.

Rhythm of AutumnThis is another large piece called the Rhythm of Autumn. It is also fairly heavy for felt as it is very wrinkled and multi-layered. Plus, I couldn’t decide whether I liked it to hang horizontally as it is shown or vertically.

Stitched Felt BackingSo I cut a piece of commercial felt to fit the back, stitched two sleeves on it and then hand stitched the entire piece by hand to the back of the felt. You can see that I added a label. This was a slightly heavier paper that I printed and then fused to the commercial felt before stitching it on. I use a dowel rod with two D rings on each end to hang this piece on the wall.

Two Quilt SleevesHere you can see the dowel rod and the D ring and that you can hang this in either direction because of the two sleeves.

Framed with Photo Matting

When I frame a piece, usually I use a matte board behind the felt piece, put a couple of holes in the matte board behind each corner of the felt so that the holes won’t show. Then I stitch the piece to the matte board making sure that I don’t stitch through the front of the felt. For this piece, I decided to use photos as the matte. I don’t particularly like the result because it seemed much too busy.

Framed Iris‘Iris’ was framed the same way with a white matte behind it. Much better in my opinion.

Small Stitched SampleIf you have a very small piece, this embroidery is only 2″ x 4″, you can make your own matte with a piece of card stock. You cut the hole out of the center (measuring carefully) and then this was sprayed with spray paints to match the thread colors. Then this could be framed to give it more presence.

Stitched BearTo have this grizzly “float” on the wall, I used a piece of board across the back at the top. I drilled holes in the board and stitched the felt to the board.

Wooden Bar with HangerIt hangs very well and the board helps to keep the piece flat without drooping.

Tree StoriesThis piece also “floats” on the wall but is hung with a quilt sleeve.

Quilt SleeveIf you have made many quilts to hang on the wall, you’ve probably made a quilt sleeve. There are lots of tutorials on the web as to how to make them. But it’s easy if you’re using felt. Just stitch the edges of a strip of felt to the back and you can run a rod through for hanging. You can cut a hole in the center of the felt sleeve so you only need to use one nail to hang or you can hang from both ends of the rod. Here I used a piece of heavy wire and bent the end into a ring.

Sixties QuiltAnother way to hang light pieces that won’t sag is to use little plastic rings on each top corner. I don’t particularly like this method but it works and it’s easy.

Plastic RingYou can find these little rings at craft stores and you just hand stitch them on. If the piece is wide you may need more than two and that makes it a little difficult to hang easily.

All of these pieces are embroidered either by hand or machine and they have been laced to matte board. This method would also work with a felt piece. But you need to remember to make the felt piece about 4″ bigger around so that there will be enough felt to stretch around the matte board and lace to hold tight. I find this method really effective for embroidery because it generally needs the stretching to keep it from sagging. Then once the piece has been laced, you can easily put a matte board behind it and frame it.

Needle Felted Yeti in FrameThis needle felted Yeti was actually laced to the background and then put in the frame. He is so exuberant you can barely see the frame.

Glued to BoardThese pieces I planned the finishing from the start. I wanted to make mixed media stitched work to adhere to the boards. After stitching, I painted gel medium on the fabric so it became stiff and then glued them on to the boards with more gel medium.

Canvas with Felt - Off Center

One way of “framing” that is fairly simple is to paint a canvas to complement the fiber art and stitch the fiber art to the painted canvas. You will need to poke holes in the canvas so you can stitch the piece to the canvas. Larger pieces will need more holes and more stitching to prevent sagging. As you can see in this felted river rock piece, you don’t have to place the artwork right in the center of the canvas.

Felt on CanvasI did a mottled paint on the background but even just plain black is great for a lot of artwork.

Ice FlowersAnother way to finish a piece is how I did Ice Flowers above. I stitched the red flower center to a background heavy fabric that has been dyed and then wrapped the green fabric around stretcher bars. Stretcher bars are not really expensive and come in a variety of sizes. But pre-planning helps to give you a nice border that looks like matting.

Stretcher Bars on Ice FlowersYou put the stretcher bars together. The center bars are extra support to keep the rectangle squared up.

Ice Flowers Stapled to Stretcher BarsThen you wrap the stretcher bars and staple the fabric down to the bars. I found several good tutorials on how to do this on YouTube. I am going to cover the back with a piece of commercial black felt and apply a hanging device like you use for most pictures.

Stitched LabelInstead of using a label, I just stitched my signature and the name of the piece on the lower right corner of the backing felt.

Book CoverAnd if nothing else comes to mind, you can always turn a flat piece of felt into a notebook cover, right Zed? 🙂

How do you finish your pieces? We’d love to hear your favorite way to frame or finish your fiber art.

Free Motion Machine Embroidery

Free Motion Machine Embroidery

We were having a discussion on the forum recently about using free motion machine embroidery on felt. I thought it would be interesting to show a variety of techniques that I have done recently (and not so recently) using my sewing machine and the darning foot. I love to stitch on felt as it gives such a nice texture with the tight machine stitching and the “puffiness” of the felt.

This slideshow requires JavaScript.

When I first started stitching on felt, I used a method where the design is drawn out first on soluble fabric and then stitched on to the felt. It is an easy way to start as you can get your design figured out and then just follow the lines on the soluble fabric. I did a tutorial on how to do this demonstrating the mountain goat stitched on felt. I use a clear darning foot when I’m doing free motion embroidery because it is easier to see where you’re going. I also did a tutorial on how to stitch a red felt scrap bowl. Free motion stitching does take a little practice but if you start with a simple pattern such as little circles to make a background pattern, it is fairly simple to try. Just put your feed dogs down on the sewing machine, attach a darning foot and set your stitch length to zero. I find it easiest to try a sample on heavy interfacing to start and then you won’t feel like you’re wasting “good felt”. Start stitching with a moderate speed and move your interfacing slowly under the needle. Think of your needle as the pencil and just doodle around on your interfacing. Try writing your name or drawing a leaf shape. The more you practice, the easier it is.

This slideshow requires JavaScript.

I have also done a lot of free motion stitching on other projects besides felt. One year, I was in a book page swap and used a lot of free motion stitching on the book pages that I traded with other people. You can use water-soluble fabric to stitch on and then make “thread lace” or three-dimensional effects with thread. I have used a variety of techniques, some in which the entire piece is thread, some the fabric is painted first and some the fabric painted or dyed afterwards. Have you done any free motion embroidery on your sewing machine? We’d love to see what you’ve done. Come join us on the forum and show us your work.

Felted Slipper Tutorial Using Ear Shaped Resist by Nada V.

Felted Slipper Tutorial Using Ear Shaped Resist by Nada V.

Our guest post today is by Nada V. She is a forum member and had showed us a different type of resist template to make shoes/slippers. It seemed almost magical so we asked her to do a tutorial to show how the template worked. She kindly agreed and here is her wonderful tutorial.

******

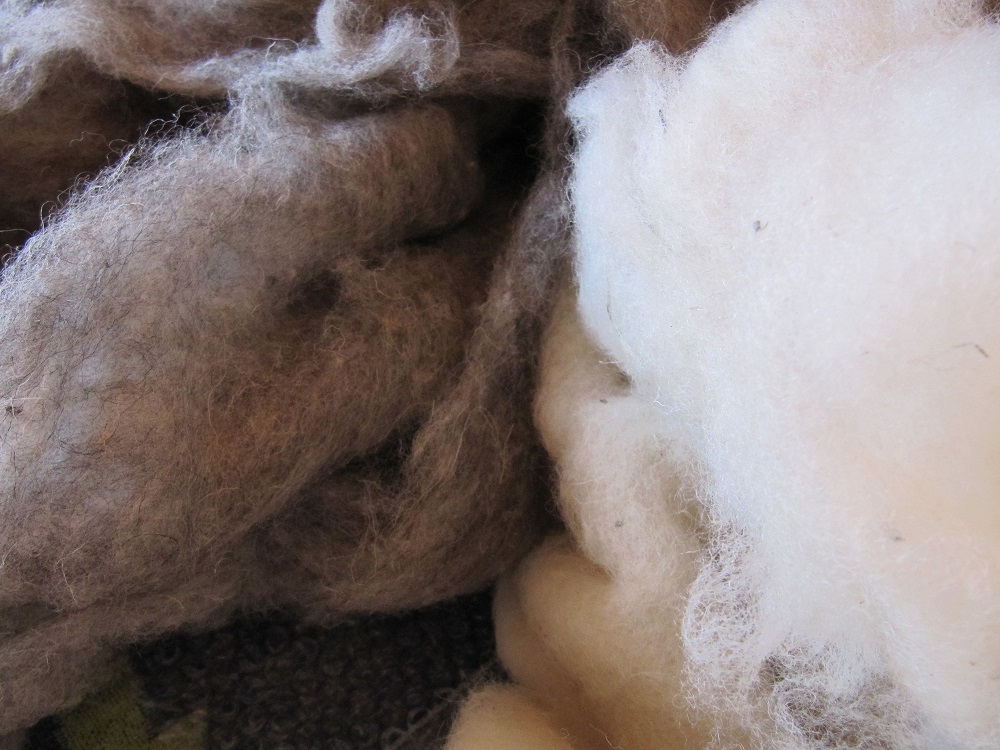
In this tutorial I would like to present a step-by step procedure for making felted slippers. For a pair of slippers you will need approx. 300 gr of wool (coarse wool 31 mic) and two templates.

fiber

I was using local wool. It is very coarse with some rather wiry fibres.

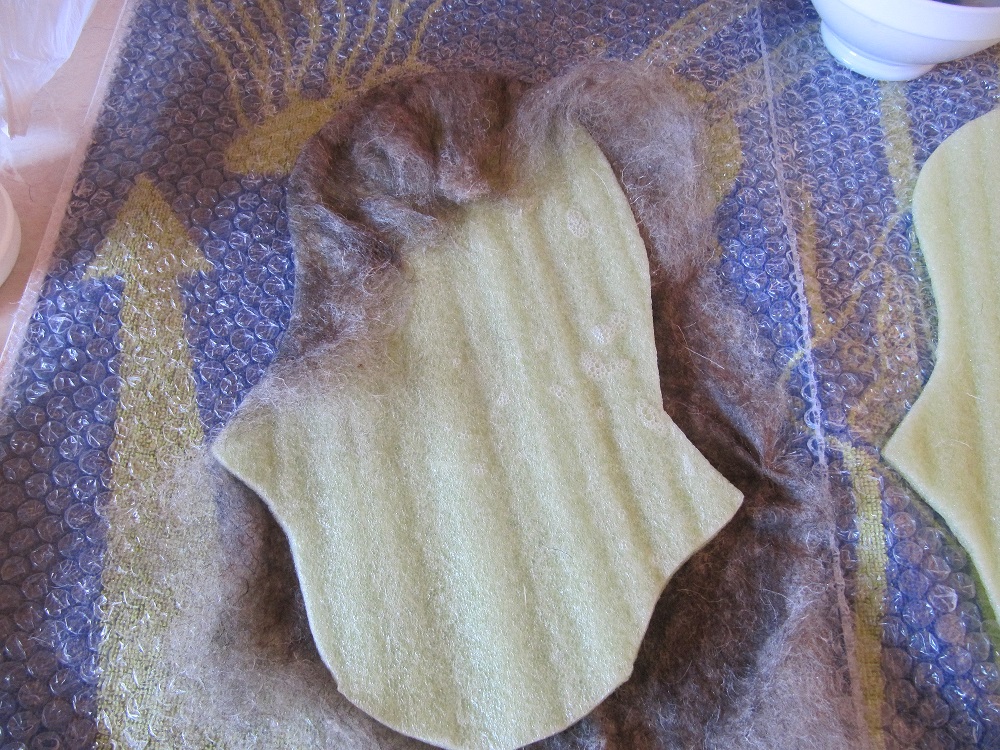
template


The picture of the template is shown above.  You need to adapt it to your feet. I wear size 40 and this template is 31 cm long and 15 cm wide. As you may notice there are two ears on the template: one is positioned higher than the other one. The ear which is positioned higher on the template represents the inner side of the foot facing the other slipper. The size of the template also depends on the shrinkage rate of your wool. You need to consider this factor before you draw your own template.

Prepare your workplace: a towel, bubble wrap, soapy water (quite hot) which you can put in a ball browser or squeeze bottle. In dealing with coarse fibers and thick layers like in this case. There are many ways of wetting your work. I prefer to use olive oil soap which I simply hold in one hand, and a kitchen sponge in the other. I keep a bowl with hot water on the side , dip the sponge in it and squeeze the water out so that it runs through my fingers while I am rubbing soap and let the water trickle down.

laying wool

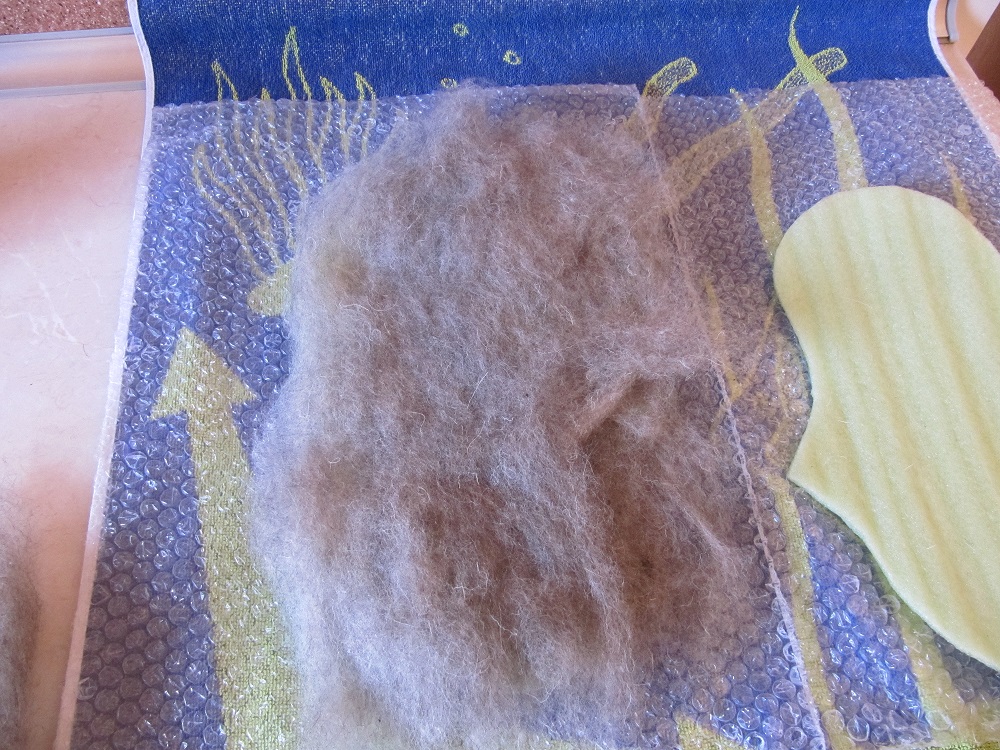
Start laying out wool: make sure that you make a total of minimum six layers, each placed in the opposite directions.

wetting


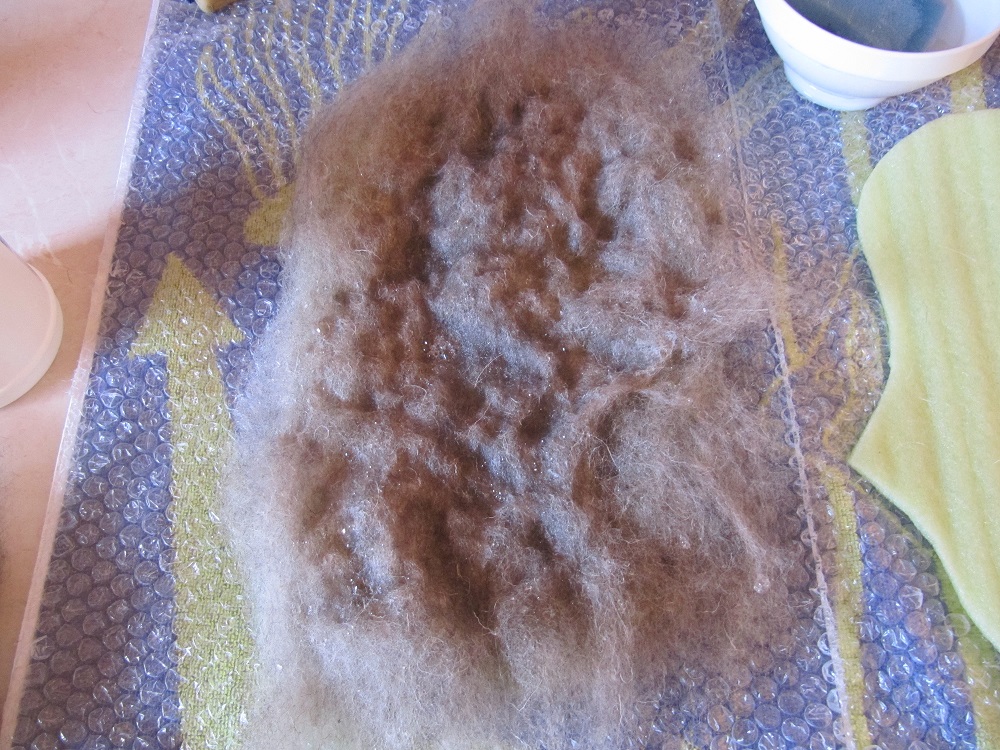
Place the first layer on the template and wet the wool well with soapy water.

pressing

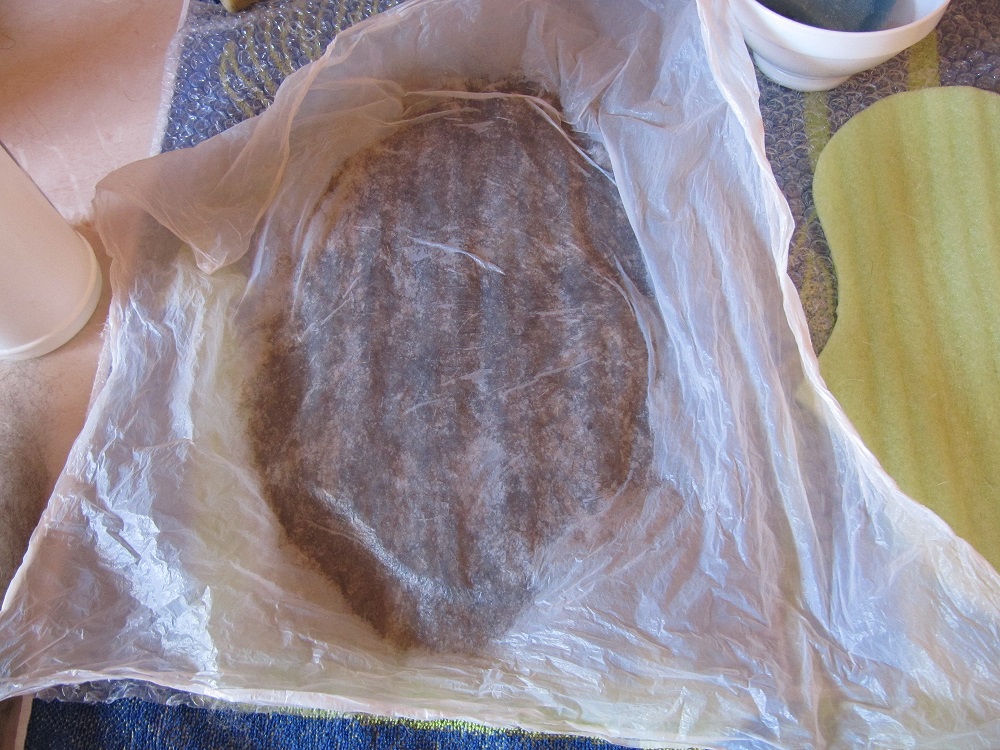
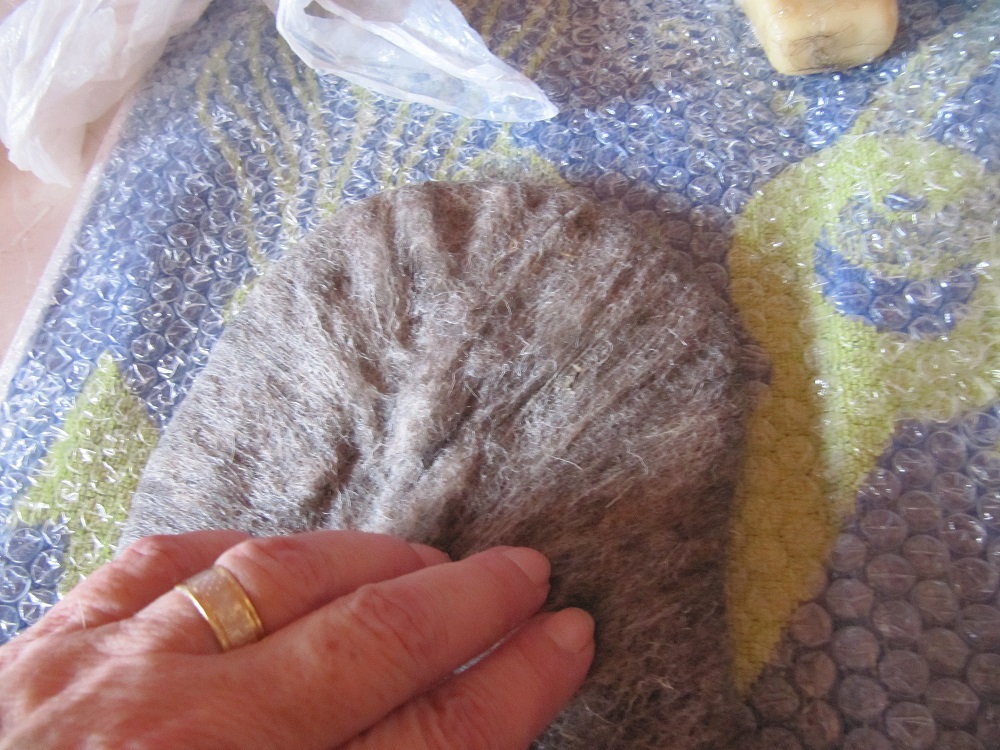
Cover your work with a plastic sheet and press down to spread the water evenly through the fiber. Do not rub, just press. This is important since some types of wool start felting quickly.

folding back1


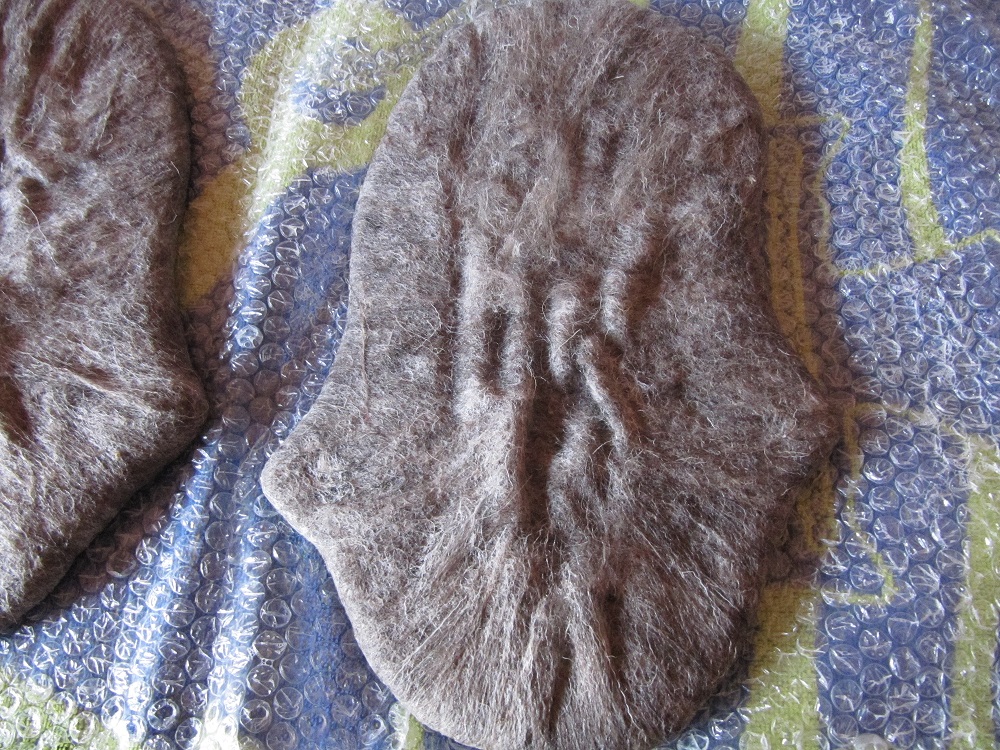
Flip the template carefully over and fold back excess wool (as seen in the picture).

folding back


Do the same with the other slipper and continue until you have formed six layers of wool. During the process of laying wool, do not rub and felt, just wet the fibers and press them down. I try to comb fibers with my fingers working from edges towards the middle and if some folds start forming I just gently rub and straighten them.

folds

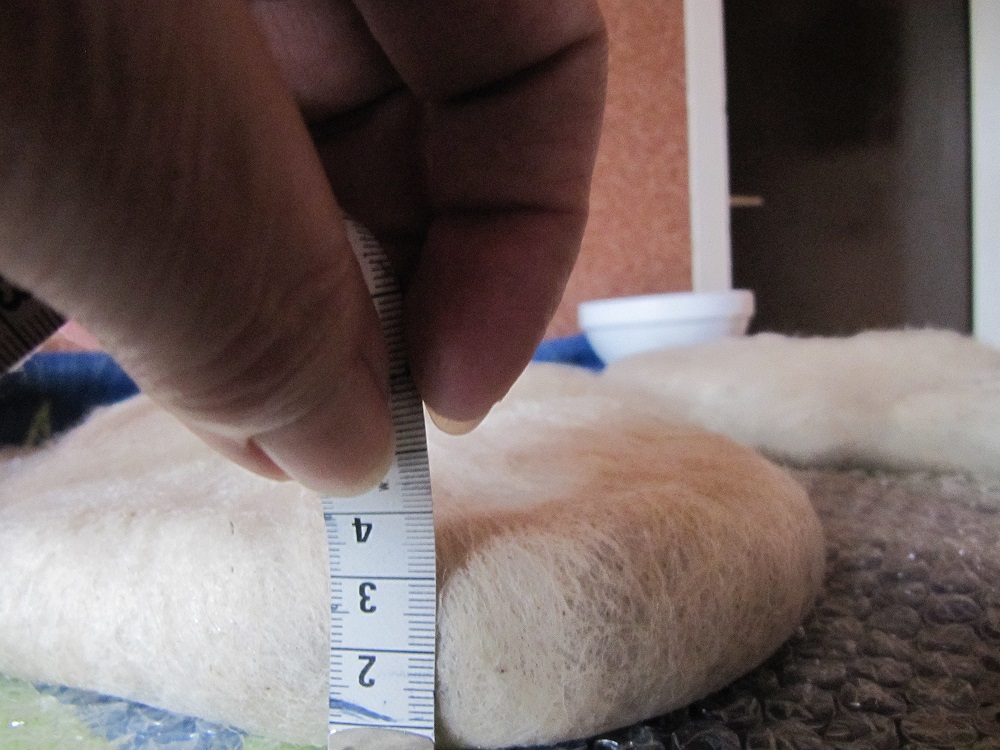
Thickness of layers is a relative thing. For this reason a good rule of thumb is that the final thickness of your work, after wetting and folding should be approx 3-4 cm ( i.e. 1.1 to 1.5 inches).

thickness


In my case I started laying grey wool (4 layers) and continued with white wool ( 2 layers)simply because I didn’t have enough white wool. After wetting you need to make sure that your templates are in the right position. Remember, the ear which is higher should be facing the left slipper from the inside like in the picture below.

embellish

Now you can start applying embellishments. Use your imagination as you wish. I used some black yarn to make branches and red pencil roving for flowers. I wanted to make sure that the flowers do not move and needle felted them into work.

cover net

After the stage of wetting the work you can start felting. During this phase I like to use a tray to catch excess water. Cover your work with a mesh and start rubbing gently the upper side where your embellishments are, making sure that they become fixed enough to the base and will not move when you turn your work over.

excess watter


Turn your work and start felting on the opposite side. I start pressing gently, increasing the pressure as I proceed. Be prepared for long felting. Even though my wool felts well, the total time I spent on felting was one hour which is because the layers are very thick. (Those of you who are using a sander may perhaps complete this stage in shorter time, I’m not sure). Always work from the sides towards the middle thus making sure that you don’t lose the shape. If folds start forming in the middle, rub them gently in circular motion and straighten them. During work it may happen that there is too much water, and of course, our slippers must not swim in water. From time to time I lift my work and drain excess water and continue adding hot soapy water for rubbing as necessary.

cutting


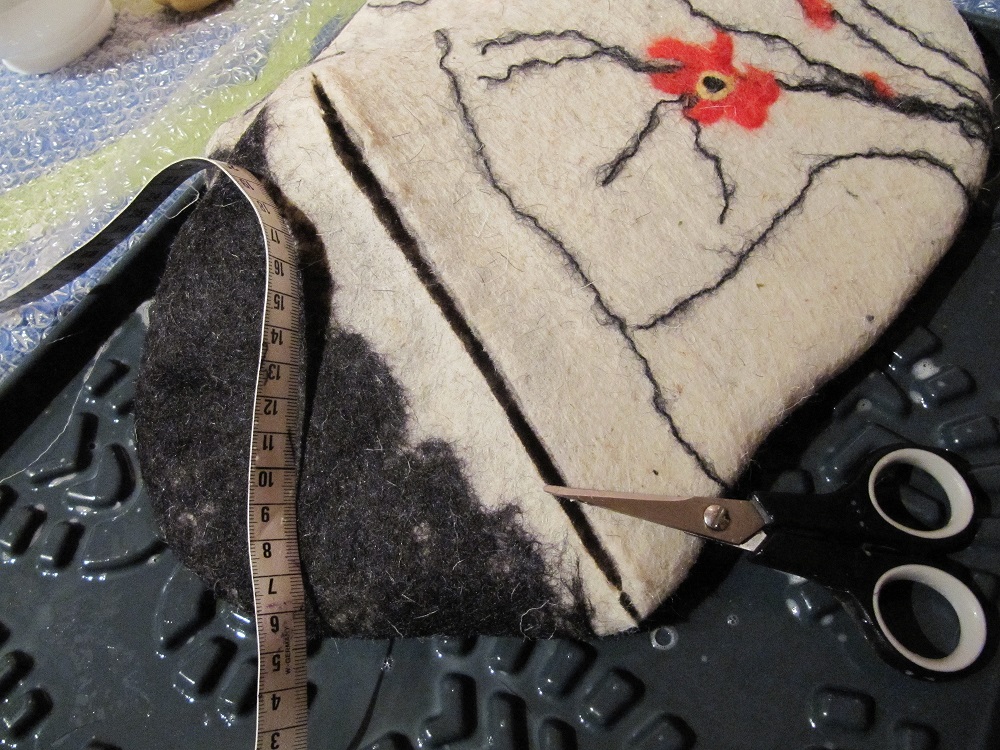
When you have a feeling that no more felting is needed and that your felt is stiff enough take sharp scissors and make a slit across the slipper – from the tip of the ear to the opposite corner, as shown in the picture.

remove resist


Remove the template.

yettishoe


Don’t be frightened when you see that you got a large shoe. In the following stage you need to work on shrinking the slippers.

rub edges


I like to rub the edges of the opening first so as to avoid separation of the layers on the edges.

wash sink


Transfer your work to the sink and soak it in hot water and squeeze the water out. Shock your felt with cold water and squeeze the water out again.

kneadroll


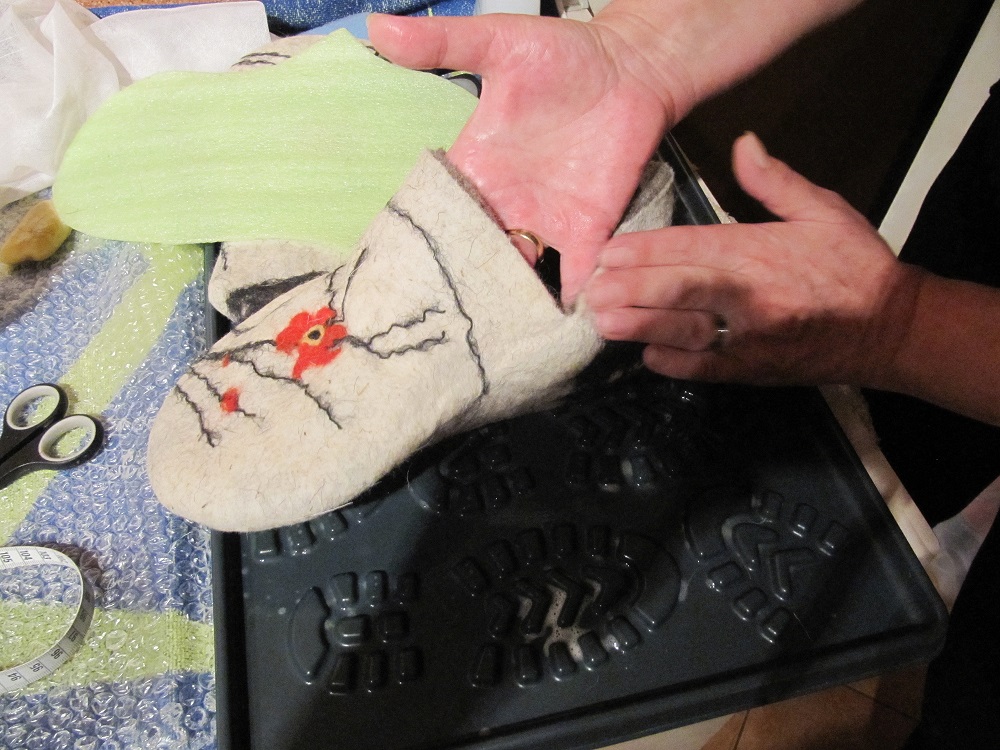
Move your work to your tray. Use more soapy water and start rolling and kneading your slippers so that they start forming a real shape. You don’t need to be gentle at all. Roll and knead them in all directions so that they shrink evenly. This may take you quite some time.

rubinside


Rub them inside and outside.

kneadroll2


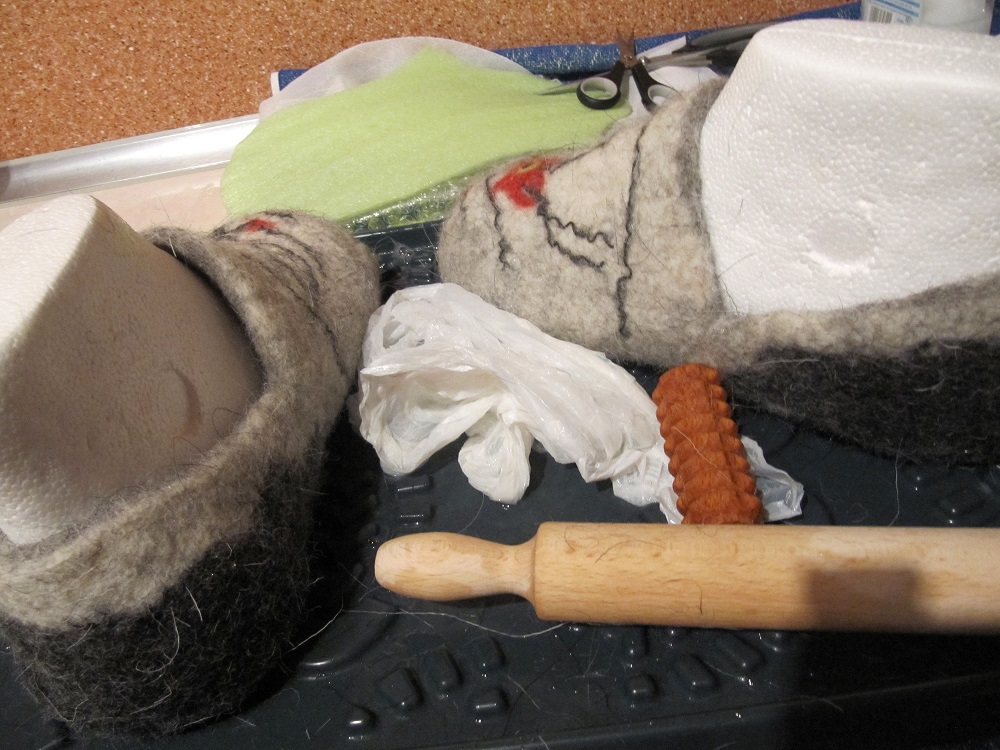
If you think that the felt is not shrinking enough, apply the shock treatment again (hot and cold water). In my case I applied this shock therapy three times. Use your hands for shaping a shoe-like form and only when you feel that you are close to the final shape and size, take a pair of plastic or styrofoam lasts if you have them, otherwise you need to complete the work with your hands.

fitting on last


I bought my lasts from Wollknoll Germany at a reasonable price (8 EUR) and think this was a good investment.

tools


Use any tools that you normally use for fulling. I was using a roller pin for pounding (spanking) and a small roller for rubbing and straightening the surface.

pull sock


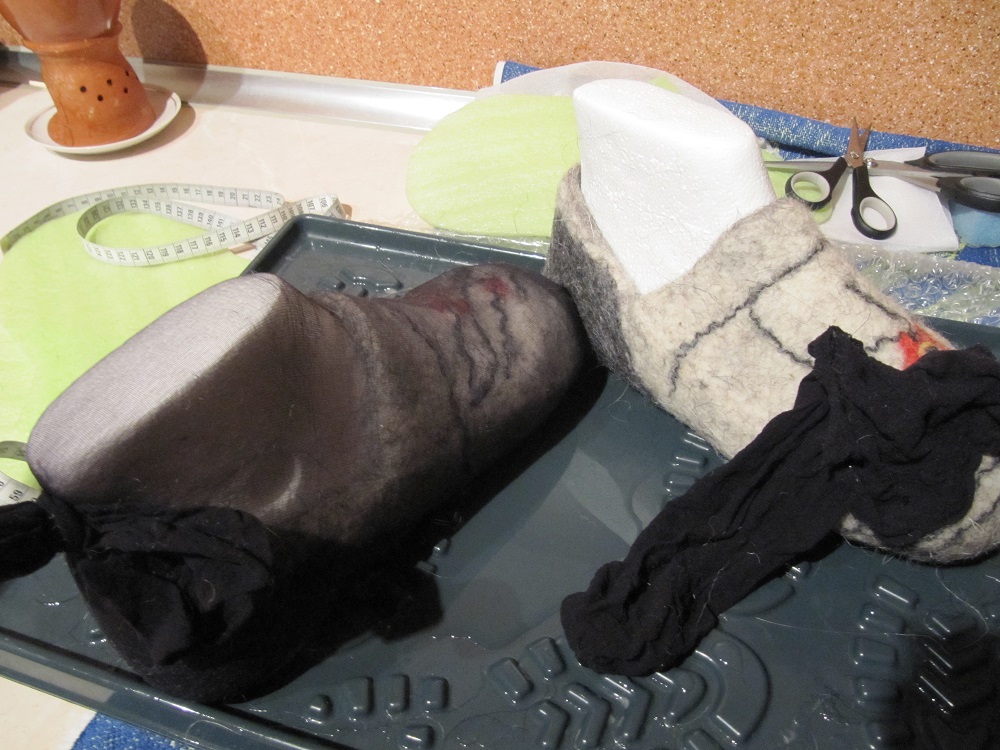
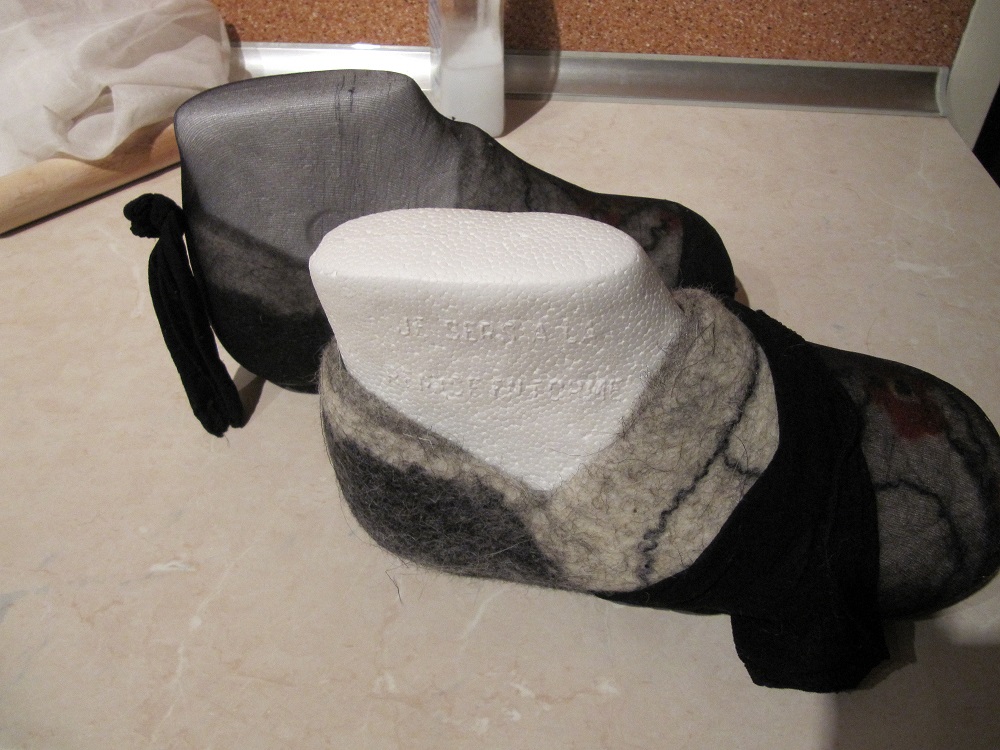
When your slippers completely fit the last, take an old pantyhose and pull it over your slipper and tie a knot so that the slippers cannot move during machine tumbling.

from the machine


Put the slippers into your washing machine (300C if little shrinkage is needed or 400C if you feel that more shrinkage is needed). I use the programme for delicate washing with short spinning. Remove the last and let your slippers dry.

final product


This is what you should get in the end.

final


If you look carefully you’ll see how hairy my slippers are. Our wool is really course and some sharp fibres are sticking out. When the slippers dry up, I’ll simply shave them. To completely finish the slippers, attach a sole (I like to use leather) and voila, your new slippers are ready. This project will take a whole afternoon to complete. It is a lot of work but you will enjoy the result. It took me five hours in total.

First Quarter Challenge – Inspired by Jackson Pollock

First Quarter Challenge – Inspired by Jackson Pollock

When I first announced the 1st quarter challenge, I knew which Jackson Pollock painting would be my inspiration – The Deep. I don’t particularly like his multi-colored paintings as I find it difficult to put all those different colors together and come up with a coherent design. So I was drawn to the neutral colors and nearly monotone color scheme in The Deep.

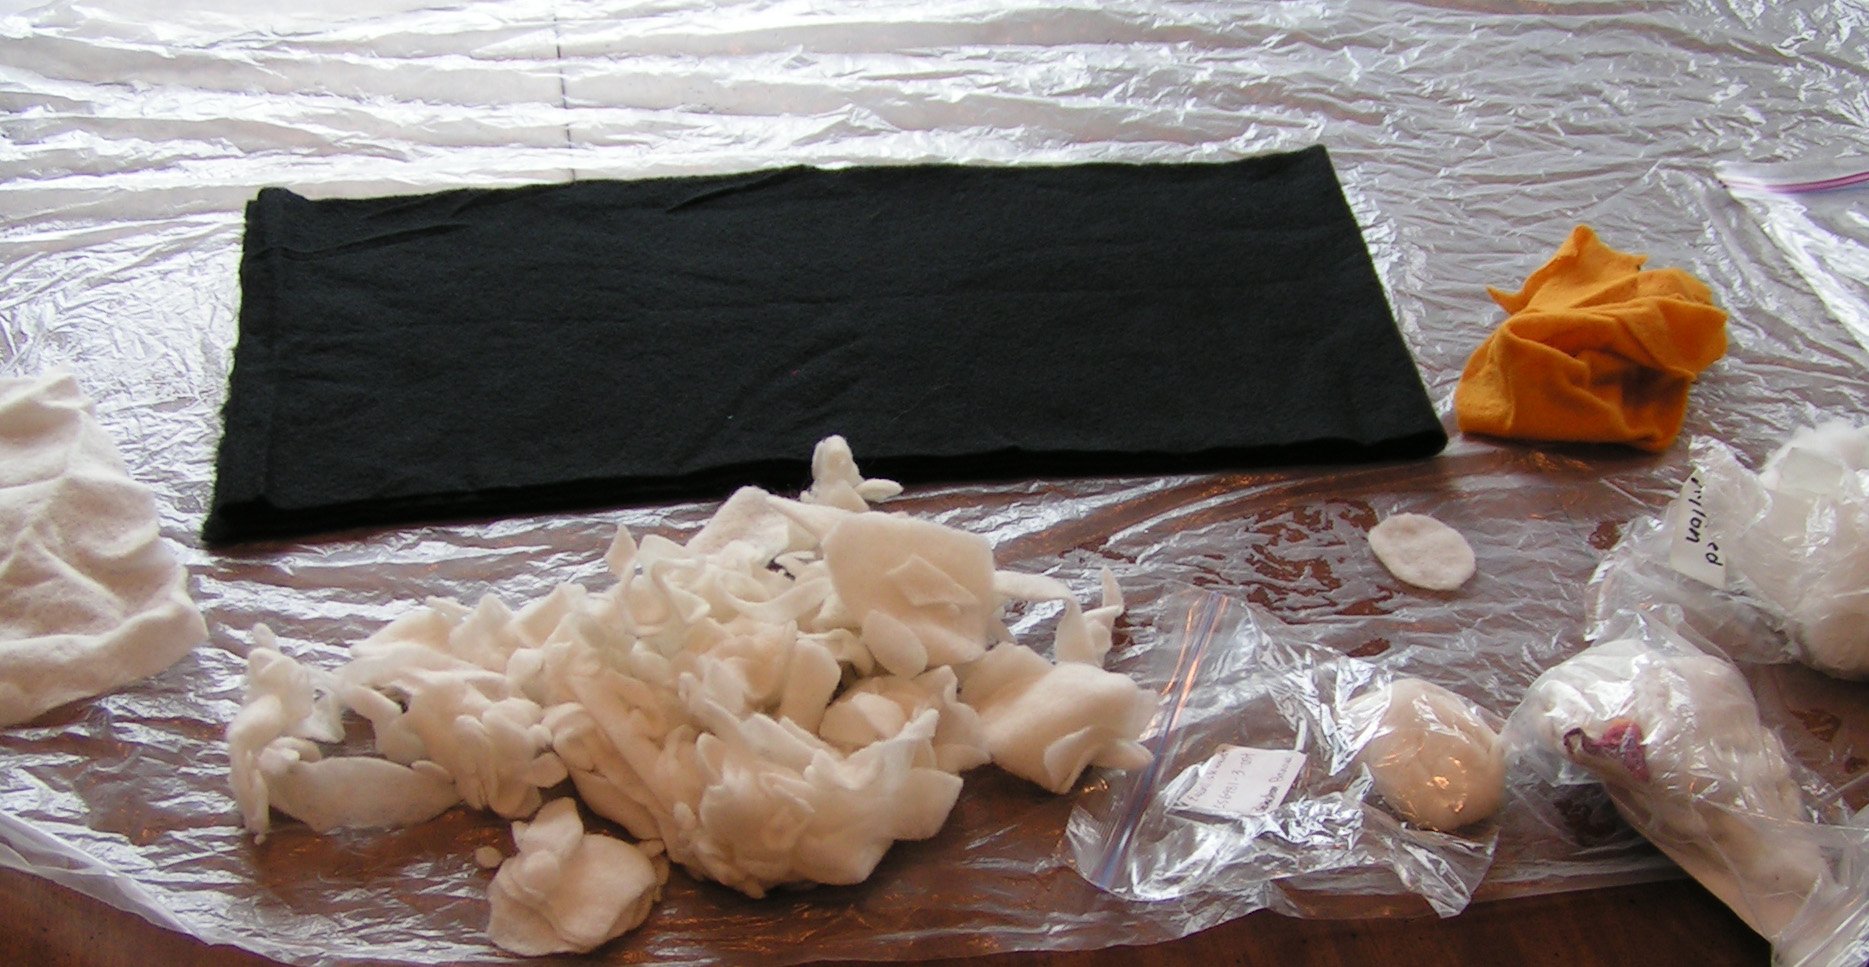
I had originally planned on doing the felted piece in multiple layers, felting each layer separately and then putting the piece together after felting. But when I got out my supplies and saw the cut up pieces of white prefelt, I changed my mind.

Materials for Jackson Pollock Challenge PieceI had a black prefelt scarf length piece that I folded so there were four layers of background prefelt. I then had bunches of scraps where I had cut up a white prefelt scarf for a sample for when I was writing my book. Of course, I saved them as I knew at some point, I would use them. I also had some crimped nylon fiber that Zed had sent me ages ago but I had never tried. I thought it would be perfect to put along the center black section and add some bright white. I also used a bit of white banana fiber as well.

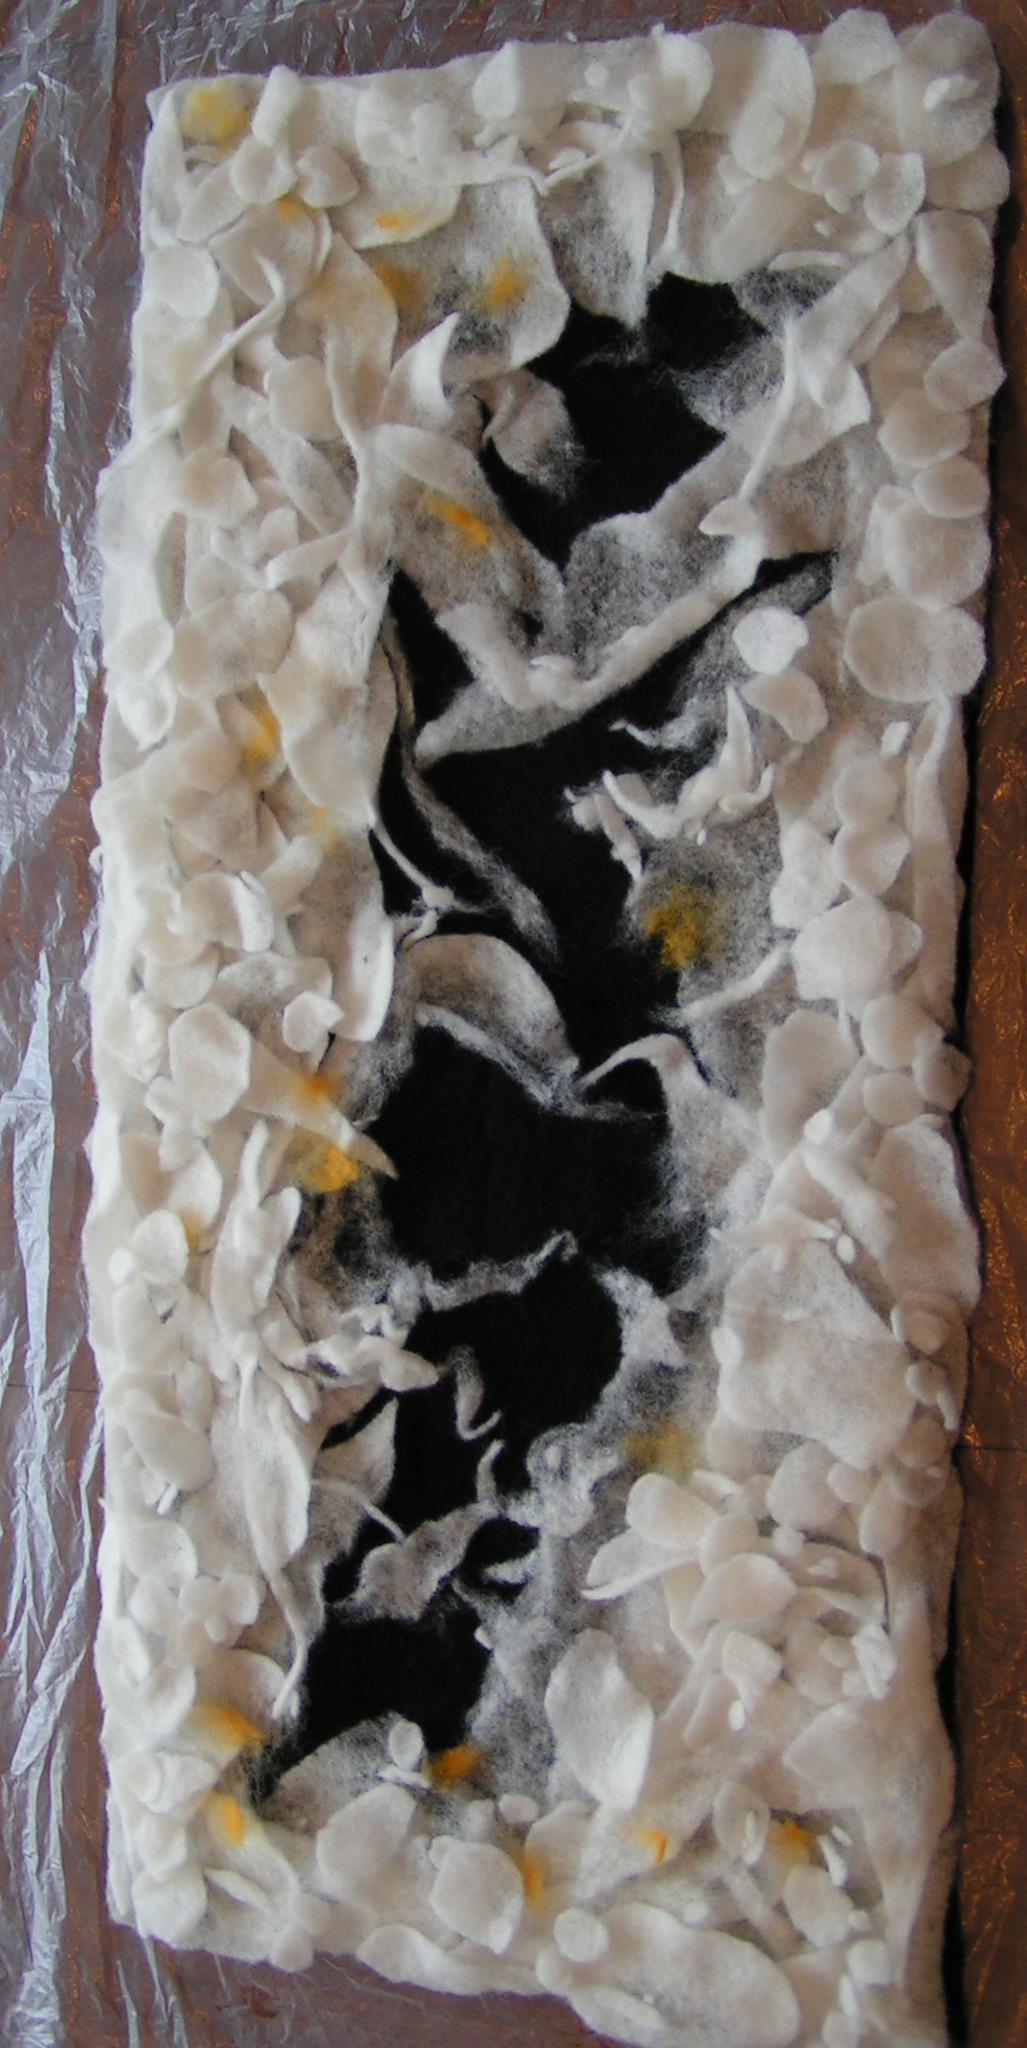
Layout with Pre-FeltNext I laid out all the prefelt pieces. I hoped that all the different sizes of white prefelt over the black would end up looking like brush strokes. Some areas had more prefelt pieces than others to give the mottled grey appearance on the edges of the original painting. I added just a little bit of yellow-orange prefelt in torn pieces.

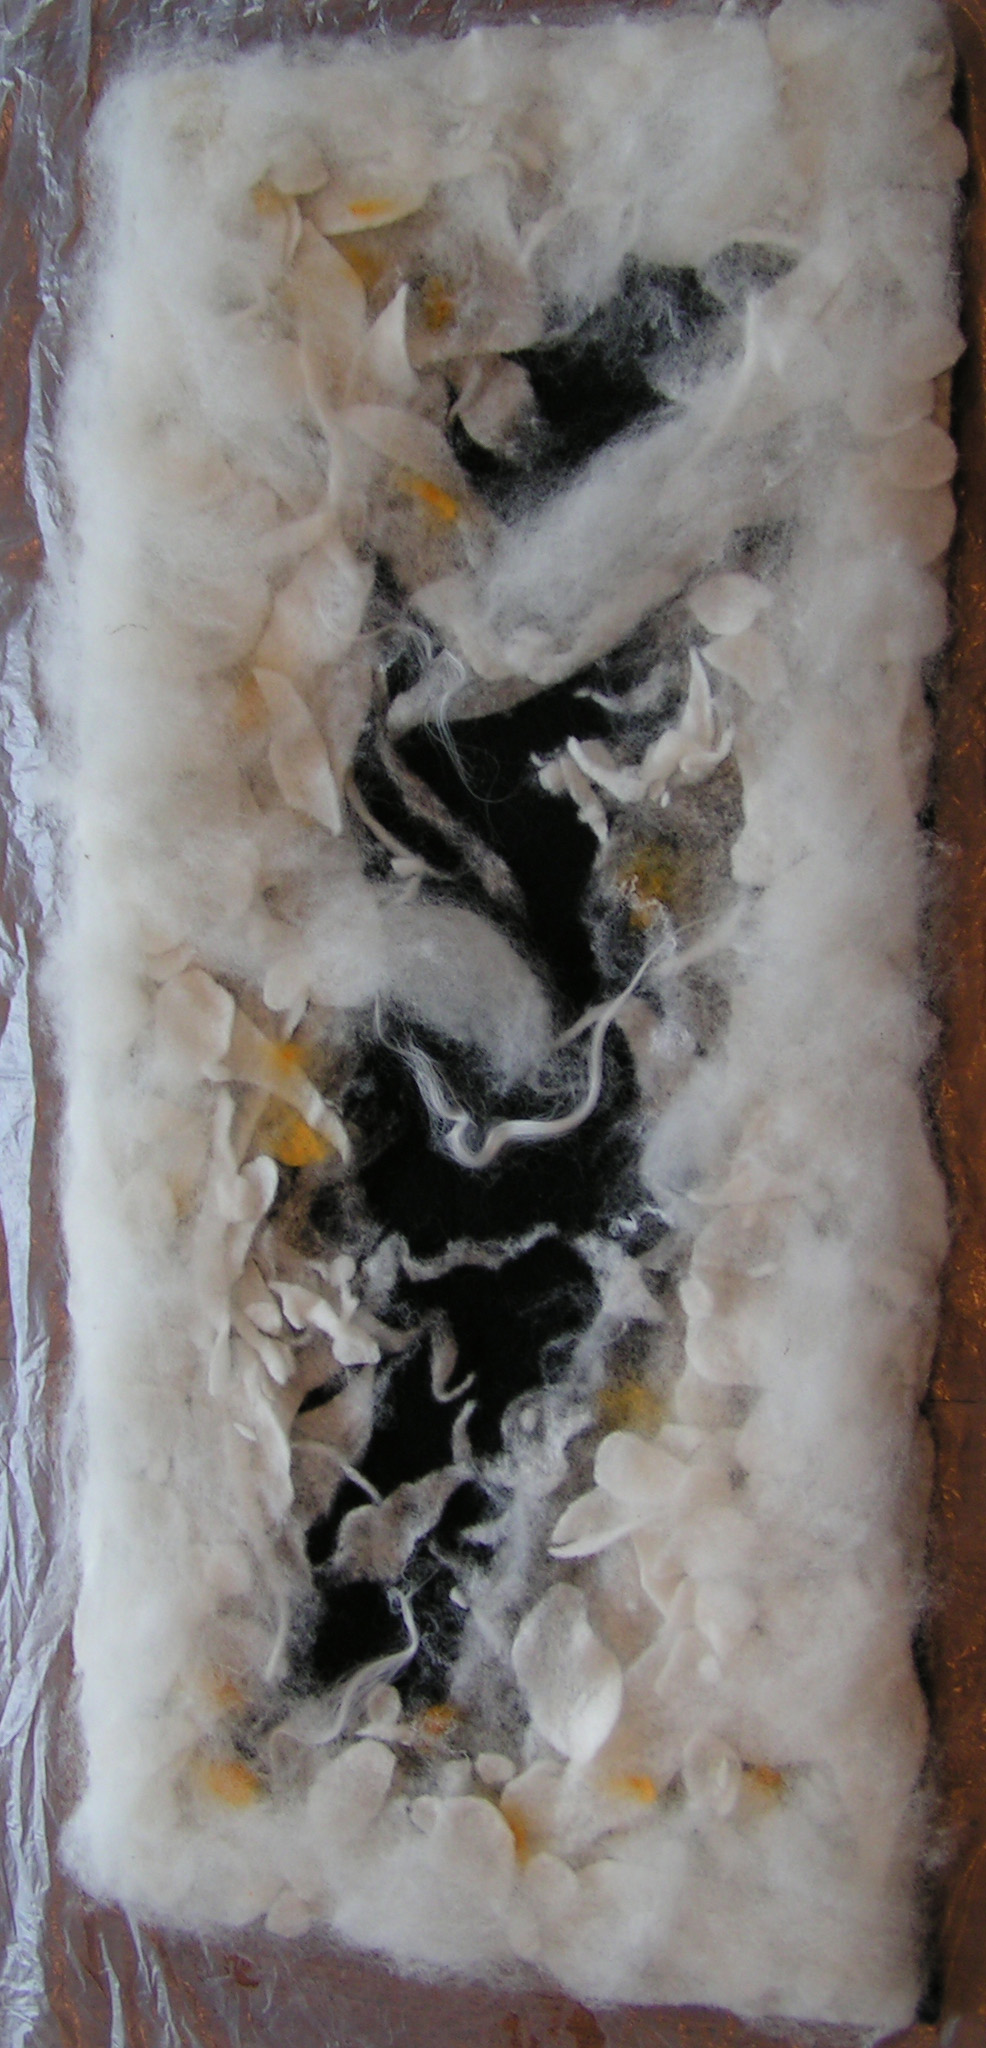
Addition of Merino Fiber in Lay OutI added the banana fiber and the crimped nylon along the edges of the center black section. In hindsight, I should have added more nylon. I also added some merino fiber around the edges as I was afraid that the outside would not be white enough with just the prefelt.

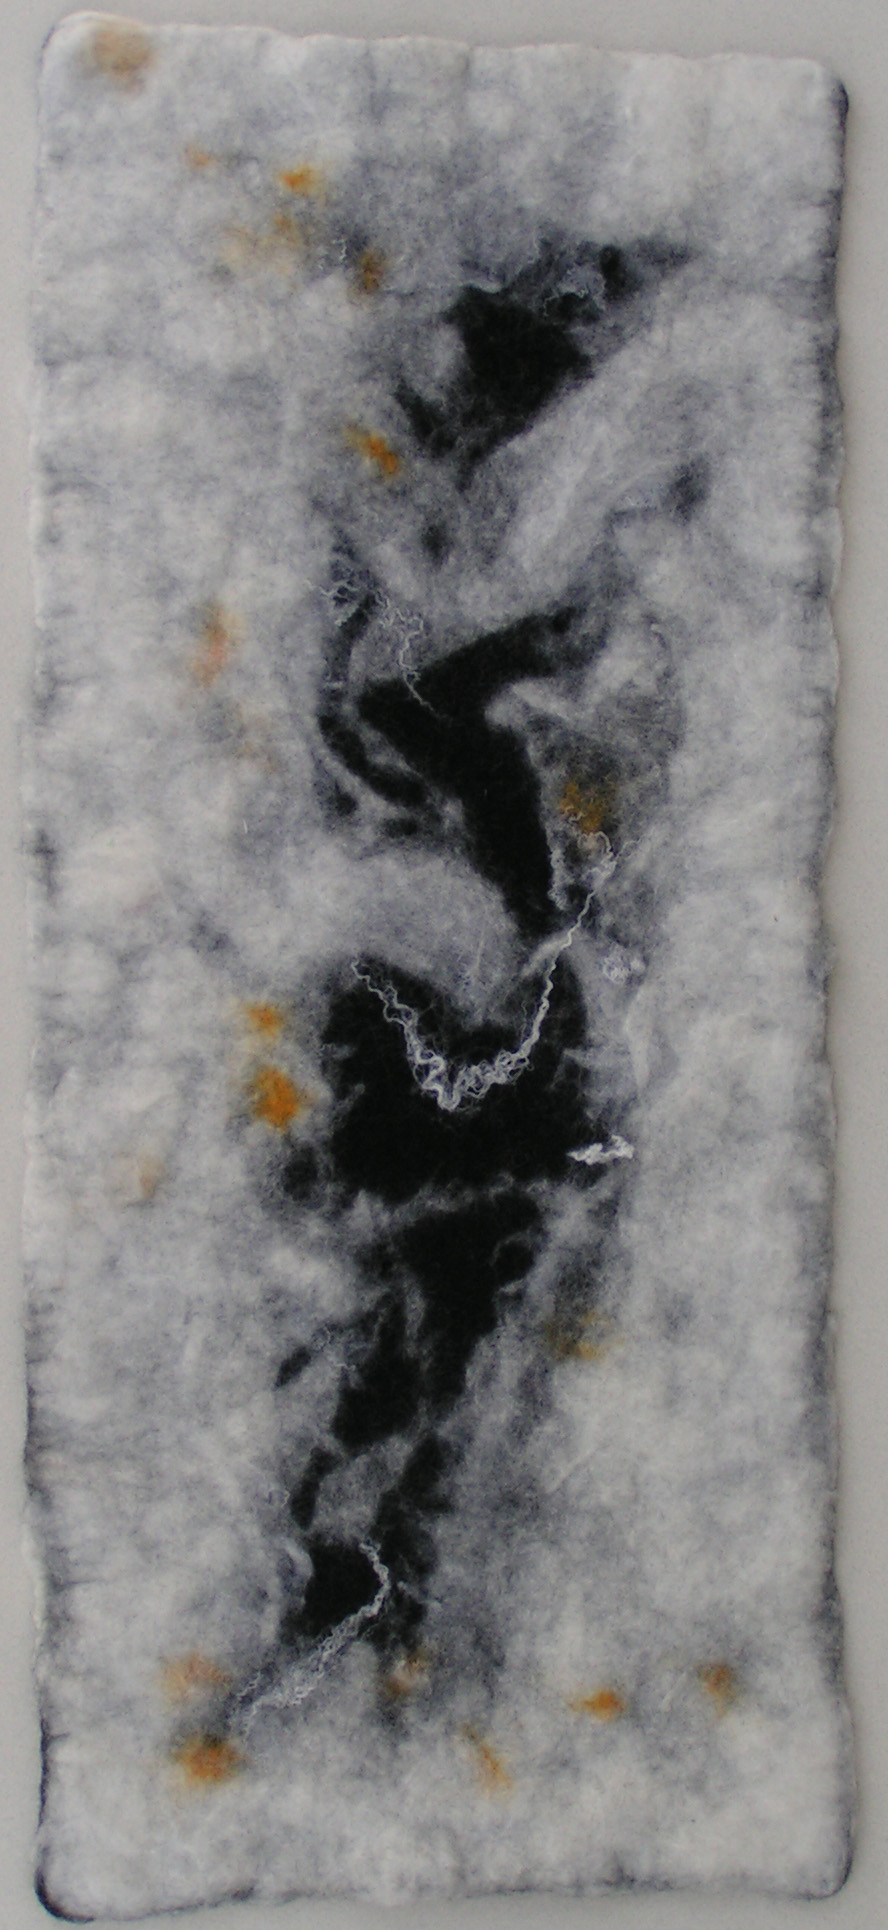
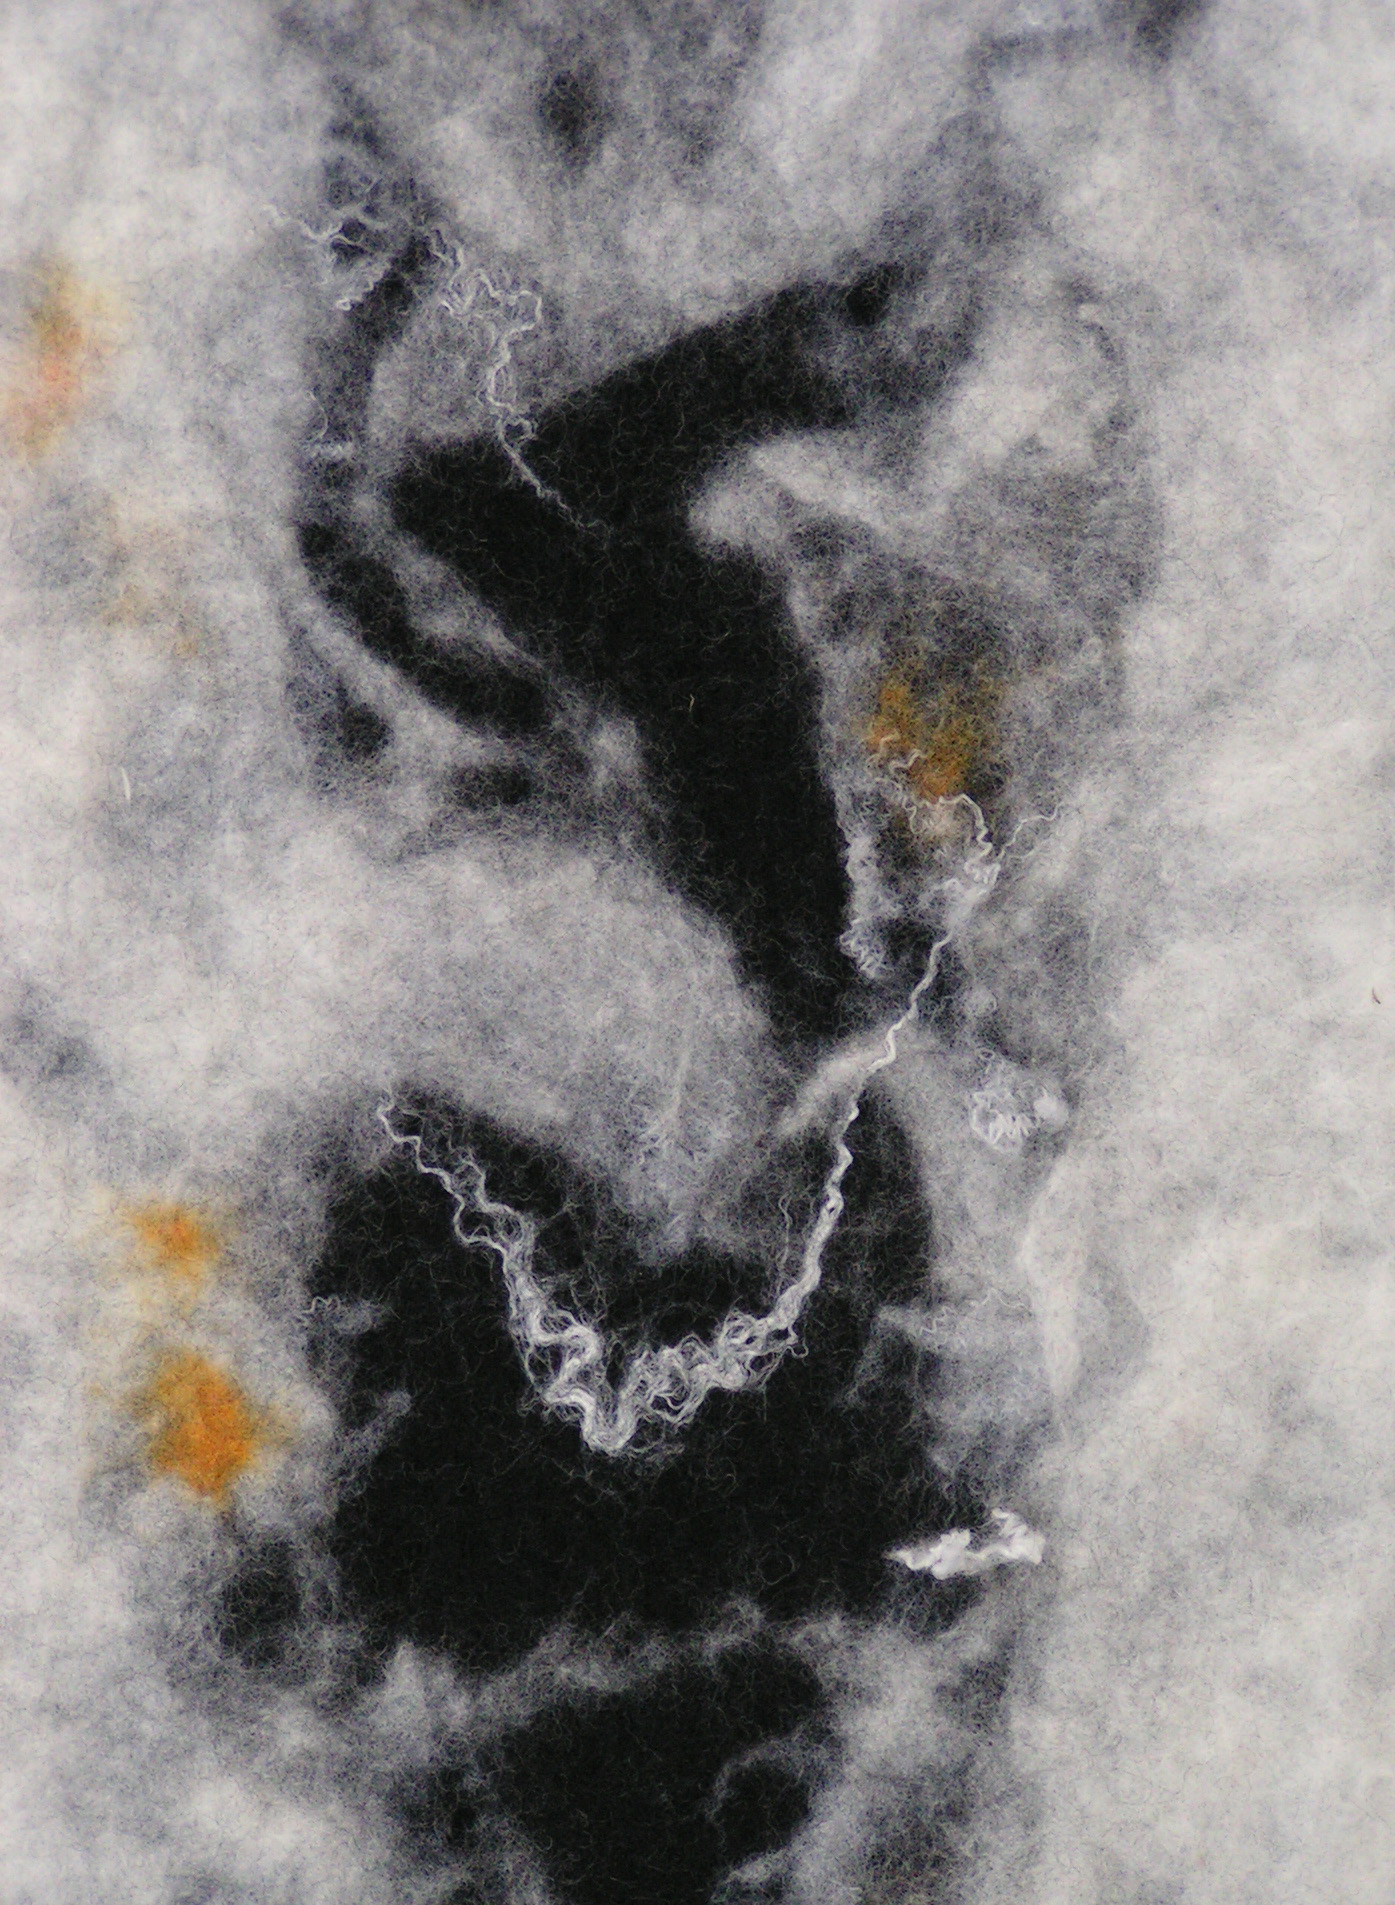
Completed PieceHere is the finished piece. You can click on the photo to see it enlarged. I liked the results and the process was really speedy since I started with prefelt.

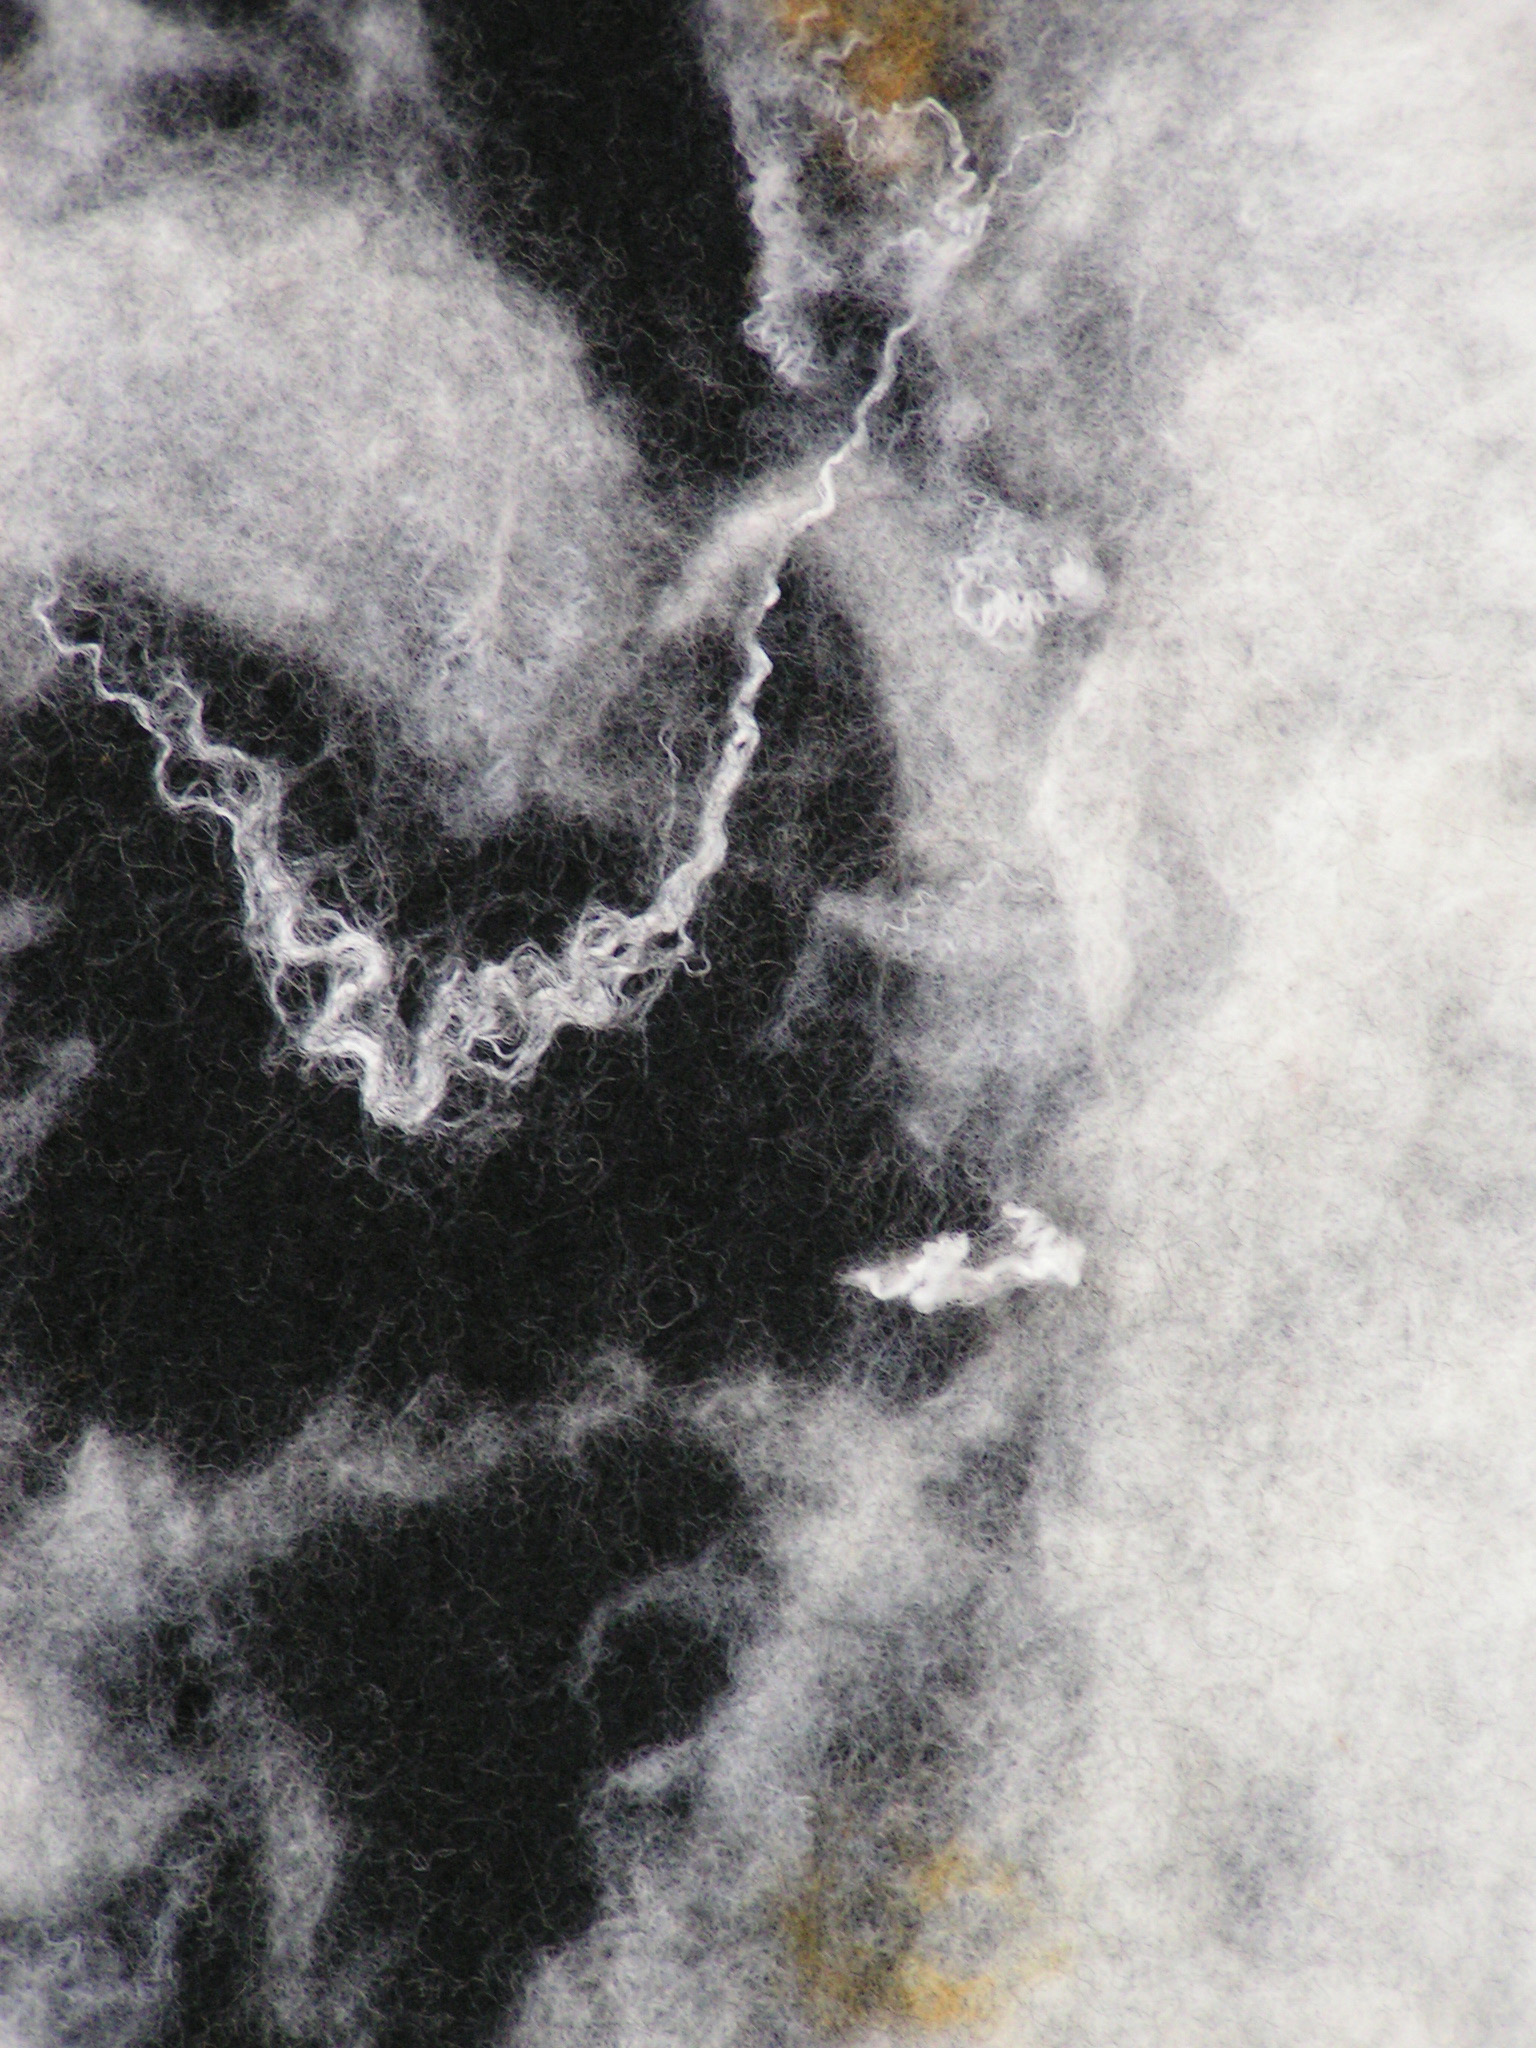
Center SectionHere’s a closer view of the center section. I’m not sure I got the depth that the painting has but I do like the results. I also see that the original has much more blue and green tones around the edges, but I wasn’t trying to do an exact rendition.

Banana Fiber and Crimped NylonThis photo shows the banana fiber running from top left to top center. You can see some of the crimped nylon just right of the center of the photo.

I hope that you’ll try the challenge even if you aren’t really inspired by Jackson Pollock. Perhaps you could just take a small portion of one of his paintings and enlarge it and use that as an inspiration. Or look for one of his less well-known paintings or something from his earlier work. It is fun to try working from a different point of view. We’d love to see what you create.

Sample Fibers

Sample Fibers

Our guest post today is from Marilyn.

***

I’ve recently purchased seven different types of fiber and decided to do a sample test to understand the feel of the fiber, how each fiber felted, shrinkage and possible uses based on the end result. Since most of them were similar in color in order to identify each fiber when it was laid out, I put a piece of different colored yarn on each one and cataloged it on a chart of the layout and taped a sample on the bag of fiber. I also made notes as to the feel of the fiber laying it out, approximately how long the staple was and the size of the sample before felting.

Variety of Wool

I wasn’t concerned about exact shapes, in fact, I left some of the layers wispy on purpose to see how they would act. Ruth has an excellent reference in her Felting book on some of these same fibers, but I wanted to see how these fibers reacted here with my water, a cold work room, my felting style, etc. I used 4 layers each at 90 degree angles for all except the Teeswater 2 , Wensleydale and Merino/silk. I just teased out one layer. I was looking for that curl I was missing.

Wool Laid Out to Felt

From top to bottom, left to right:

Blue Leicester                                                                     Teeswater
Very soft, 3-3 1/2 “ staple                                                    Soft with sheen, Long staple 5-6”
8 ½ x 5 ½” 8 x 6”

Wensleydale                                  Teeswater 2           Wensleydale 2
Coarse 10 x 4”                                   9 x 7.5”                      9 x 7.5”

Organic Polworth/silk                                                POY Corriedale
Very soft                                                                             Fuzzy feel
5 – 6 “ staple                                                                     4 – 5” staple
9 x 5 ¾”                                                                             9 x 5 ½”

Alpaca/Silk                        Merino/silk                    Gotland
Luxurious soft/sheen           Soft w sheen                   Thicker fiber but silky
3” staple                                 8 x 5”                                 3” staple
10 x 6 ¼’                                                                           10 x 6”

I covered them with mosquito netting, sprayed with warm water and rubbed olive oil soap and gently rubbed until slippery, then rolled them on bubble wrap, turning 90 degrees each time, then flipping them over for a few more turns, then fulled with the bead board and Plexiglas. Rinsed in hot (throwing in sink) and cold water then a vinegar rinse. I spun them in the salad spinner and laid them on screens to dry.

Felted Samples

After felting in the same order:

Blue Leicester – soft with a bumpy textures. There is a tight curl on the wispy ends. 8 ½ x 5 ½” no shrinkage other than the wisps formed an edge.

Teeswater – Curl obvious, coarser than before felted. 8 x 6 ½” the wisps spread out but the body of the sample stayed the same.

Wensleydale – Curl is obvious, coarse and fuzzy. 7 x 6” Slight shrinkage in length, again the wisps gathered to form an edge.

Teeswater 2 — Definite curl, slightly coarse. 3 ¼ x 8 ½” 15% shrinkage in length and 12.5% in width.

Wensleydale 2 – Some larger curl, coarse and fuzzy. 8 x 8 “ disregarding one tail. 11% shrinkage in length. Width spread out during felting/fulling.

Organic Polworth/silk – Very soft cotton puff feel. The most interesting thing about this sample was it took longer to felt and did not grasp the mohair fiber hardly at all that I used as an identifier. It actually felted at first in layers. I had to work harder to put more pressure and moisture to get the fibers to bond. At first it seemed like it was water proof. Perhaps more silk than Polworth?
Merino/silk – soft and cobweb like. 5 ½ x 5 ½” 32% shrinkage in length, spread out in process but not surprising since it was only one layer.

POY Corriedale – Surprisingly soft and airy. I had used brown Corriedale for my trees in the Autumn challenge it had a much different feel and texture. 9 x 5” 9% shrinkage in width.

Alpaca/silk – very sift and light. 8 ¼ x 5” 18% shrinkage in length, 20% shrinkage in width. With all the discussion of the difficulty of felting alpaca was surprised when it wasn’t as difficult as the Polwarth. It had the most shrinkage in both direction and. There was also some small curl evident.

Gotland – slightly coarse. This was marketed as the official “Lord of the Rings” cloak fiber. I can see why. It had the same 4 layers but is thicker and denser than the rest. This fiber would probably make an excellent cat cave or door mat. Definitely not for nuno but would be useful for coarse texture in a picture.

Close Up Felted Sample

This is a close-up of the Gotland. Pretty hairy! I have close-ups of the other fibers if anyone is interested.

This was a great experiment especially since I felted and fulled them together and used the same process for each. I was surprised at some of the results particularly the low shrinkage rates. I really recommend doing this for any new fiber so that you can get the most out of the fibers you have and understand what they can and can’t do in your environment.

***

I hope everyone has a lovely Valentines’ Day!

Felting Tips from the Forum

Felting Tips from the Forum

We have a wonderful community of felt makers in the forum and recently one post started a long discussion about rolling felt and the equipment used. I thought that those of you who aren’t members of the forum might like to read some of the tips. If you’d like to join the forum, just click on the button on the right side bar that says “Forum” and sign up. It’s easy and you’ll learn so much from the discussions, community and sharing.

Machine Ann wants to build
  • Ann’s suggestions: To prevent tiring during rolling sessions, make sure your table or counter is at the right height so you don’t have to lean over. You can sit and roll too. Put the roll on the floor and use your feet to roll. Put the roll on a towel or boot tray to keep it from slipping. You can leave off rolling until the next day if needed. You can even let the felt dry out and then re-wet when you come back. I rub my nuno first. I rub it gently on the silk side to encourage the wool to migrate up through the silk. I have it covered with a sheer. The sheer is an old curtain from the second-hand store. I love my glass wash board. It’s an old one in a wooden frame. There are many ways to felt and we all have our own way. Try as many different ways as you can and then pick the parts you like and make your own way.

    Marilyn's Felting Tools
    Marilyn’s Felting Tools
  • Marilyn’s suggestions: Use a bamboo mat or blind to roll. If you get a pool solar cover, get the lighter weight kind. With Nuno or an intricate design lay it down on bubble wrap, spray it down first, cover it with tulle, rub the soap over the netting, then after a few rolls, replace the netting with Saran Wrap until it starts to felt. With a double-sided piece, use Saran Wrap under and over along with flipping boards. You can stop and start projects when necessary. Cover it with plastic to keep it moist. Although if you won’t  finish it within a day, let it dry out. I think everyone experiments until they find what works for them and the energy and space they have to work with. Depending on the project, when I’m done rolling after the fibers are meshing I use either a plexiglass cutting board with a nubby side to full or a glass bead board I made from an old cutting board using hot soapy water. I also made a smaller glass bead board with a handle. Then I like to “throw” my projects to finalize the process. It’s great way to get rid of tension.
  • Judith’s suggestions: Use a rubber shelf liner on a towel to roll for fulling. Put on some music to roll by, “Rock and Roll” works best not the “Blues”. If you get tired, take a break. You don’t have to roll it all in one go. It’s an art rather than a science. No strict rules – do what works best for you. My son-in-law made me a fulling roller from an old wooden rolling pin. He routed grooves along the length of the pin. It works very well. I also find a microfibre towel more effective than a terry one. I prefer more rubbing than rolling and a bit of throwing is good for the soul too!
  • Nada’s suggestions: When nuno felting, start with the bubble wrap bubble side down, cover with a curtain and roll. Turn the bubble wrap bubble side up at a later stage. Roll for up to 5 minutes but take frequent breaks or pauses as needed (total rolling time 40 mins). For standard felting, place a towel first, then a bubble wrap, lay wool, spray it with soapy water (cold) and cover with very thin plastic sheeting which is used for protecting furniture when painting, press down so as not to disturb the pattern, remove the sheet and put on the netting. Then start rubbing using warm water and olive oil soap.

    Lyn's Wetting Down Tools
    Lyn’s Wetting Down Tools
  • Lyn’s suggestions: For heavier felt, use “bubble side up”. Also, replace the bubble wrap (top and bottom) several times during the felting process so the bubbles are not always in the same location. Lay the fibres out on bubble wrap, then cover with net to wet down, draw bar soap over then agitate very gently through the net. When the fibres have ‘settled’, remove the net and replace it with bubble wrap. When lifting the net it’s best to slowly ‘peel’ it off, releasing any trapped fibres gently as you go – otherwise you risk ‘exfoliating’ your piece of felt! To prevent friction damage during the final shaping of 3D felt with your hands (after rinsing the soap out of the felt) wear thin latex gloves for a smooth finish.

    Zed's Felting Tools
    Zed’s Felting Tools
  • Zed’s suggestions: I honestly don’t ‘get’ the whole rolling for ages thing … do people who roll for ages just not do any rubbing at all? I honestly don’t think I’d felt if I had to bother with all that. A small piece of felt takes me 15 minutes, 20 tops. Even felting my book cover last week and taking photos throughout took about an hour and half, so maybe 45 minutes felting. I have a few videos showing a sample being felted start to finish www.youtube.com/user/feltbyzed/videos. It might help if you don’t like rolling. I have a better towel now too, that stops the bubble-wrap moving when I rub the felt on it. Edges aren’t so hard to keep straight when there aren’t many embellishments, otherwise they act like another layer and depending how they are laid on top, pull the wool/felt in all directions, so edges always end up wobbly for me then. If you use ‘netting’, lift it up often, after rubbing each side, so it doesn’t attach to the wool.

Then the discussion turned towards what type of tools we all used for felting. Many are adapted from other purposes or forum members have made the tool themselves.

Marilyn's Bead Board Felting Tools
Marilyn’s Bead Board Felting Tools
  • Marilyn’s tools: There is a Plexiglas cutting board on the black and the cutting board and hand tool with the glass beads.  I used E6000 glue to attach the beads.  The old plastic cutting board had to be roughed up a bit before gluing on the beads,  but the bare wood board was porous enough it didn’t need any preparation.
    Side View of Marilyn's Bead Board Felting Tool
    Side View of Marilyn’s Bead Board Felting Tool

    I bought a handle and attached it to the wood, then glued on the beads and let it dry for a couple of days. They all work well and were inexpensive. I’ve also used rubber stair tread for heavier duty fulling. I have a collection of different size pool noodles, PVC, rolling pin and wooden dowels for rolling as well as blinds, bamboo mats, pool cover, non skid shelf liner and bubble wrap. I use tulle and mosquito netting and two types of polyester curtain and mesh.  I have a large roll of solar pool cover, bamboo blind, a selection of pool noodles, bamboo mats, PVC tube,  and a rolling pin. Perhaps instead of rolling with it, I should try rubbing on it with the bead board.

    Marilyn's Rolling Machine
    Marilyn’s Rolling Machine

    I also have a rolling machine.

    Ann's Tupperware Lid
    Ann’s Tupperware Lid
  • Ann’s tools: With the glass wash board you don’t rub on it you roll on top of it. I have seen people rubbing but when I tried it just made the felt all fuzzy and yucky. I use a starburst Tupperware lid for rubbing.
    The machine Ann wants to build
    The machine Ann wants to build

    I want to build a large rolling machine. It is like using your dryer. Roll up your felt and put it inside. This would make doing larger pieces possible. I am looking for the tube still.

    Zed's Bead Board Fulling Tool
    Zed’s Bead Board Fulling Tool
  • Zed’s tools: Same idea as Marilyn’s for a fulling board. I use mine for vessels when I want really sturdy felt.
    Zed's Polyester Netting
    Zed’s Polyester Netting

    I use a polyester ‘netting’, I used to get it on rolls from Ikea, but they stopped doing it, so I bought their curtains ‘Teresia’  www.ikea.com/gb/en/catalog/products/90262021/ They are even cheaper, masses of fabric for a small amount of money. They are light, but the weave isn’t so open that they felt to the wool. I’ve used Lyn’s idea too, bubble wrap pouches (so you can slide your hand in) to rub vessels.

    Lyn Using Bubble Wrap to Rub
    Lyn Using Bubble Wrap to Rub
  • Lyn’s tools: I scrunch up some bubble wrap (so that the bubbles are showing), grip it tight then wet-soap it over to make a ‘tool’ similar to the pebble boards but it’s very ‘gentle’ and ideal for the first stage of rubbing through net. There are ‘proper’ misters and water dispensers that felt makers can buy, but I’ve always found household-cleaner spray bottles and plastic milk cartons with holes punched in the lids to be just as good (well washed out, of course). And those little dish sponges are just the right shape to grip when mopping away excess water.
    Tools to Dry Felt by Lyn
    Tools to Dry Felt by Lyn

    A piece of dual-purpose ‘equipment’: I was wetting down a large piece of felt and had a gentle waterfall from every side of my table. Aaargh! So I bought an extra-large dog-crate liner to solve that problem. Then I found that it came in handy for drying large pieces of flat felt – a wide window blind (used for rolling) spread over worked well as there was air flowing all around the felt.

    Tupperware Starburst Lid
    Tupperware Starburst Lid
  • Judith’s tools: I use a Tupperware star lid for rubbing.

    Nada's Felting Tools
    Nada’s Felting Tools
  • Nada’s tools: There is a larger size bamboo blind used for shading windows (I only had to remove metal parts) which I use for fulling larger pieces of work. I use the small bamboo mat (originally used for sushi making) for rolling smaller pieces, an improvised plastic roller made of plastic, (I stuffed it with plastics and wrapped it with a strong adhesive tape. Originally it is used for insulating electrical wires and comes in different sizes but I find it useful for rolling nuno scarves, a kitchen roller pin covered with bubble drawer protection non slip plastic which I use for felting flat pieces, a plastic tray for rubbing after the first phase of felting, I don’t know what you call it, it is originally used for draining wet shoes. I like felting because it does not require expensive tools, everything can be improvised.

    Teri's Tool For Wetting Down Large Projects
    Teri’s Tool For Wetting Down Large Projects
  • Teri’s tools: My favorite tool for wetting out large nuno pieces is my garden sprayer, I found a chap selling them on Ebay for £7 and for the cheap skate list, I cut the bottoms off bin bags (pedal-bin liners are great) and cut up the side to make sheets of plastic for rolling in or protecting my work surface from water/dyes.

Amazing, isn’t it how much you can gain from other felt makers advice? I really think that felt makers are natural problem solvers as they seem to be able to make a tool for felting out of anything. If you have more tips or favorite tools, please add them in the comments or join us on the forum.

Circles Sketchbook

Circles Sketchbook

For Christmas, my sister gave me two online courses. I have been working on the first course, Designing with Circles 1 with Gail Harker. This is a self-paced course that includes loads of information and lots of videos and concentrates on working in a sketchbook. I am trying to get back into the habit again so I thought it would be fun.

This slideshow requires JavaScript.

These are the pages that I have created thus far. I have really been enjoying working in my sketchbook. I’ve been working in the evenings while we’re watching television. It’s amazing how many ideas generate from the simple circle.

And The Winner Is…

And The Winner Is…

Last week, in my cheese cloth post, I offered a give away of hand dyed cheesecloth. There were 14 people who replied and random.org chose #1 out of 14. So Lyn, you have won the give away. Congratulations! I wish I could give everyone some of the cheese cloth that cheeseclothfabric.com sent me, but we’ll all post our results to show you what we created. Lyn please e-mail me the address where to send the cheese cloth. Hopefully, I’ll get it dyed tomorrow or over the weekend.

Homeless Love by Mary Pal

I thought you might enjoy another cheese cloth portrait by Mary Pal. If you didn’t get a chance before, do check out her website.

On another note, have you started on the first quarter challenge? You might want to check out the forum challenge section as Carole has done a wonderful challenge piece and even has a video of her “Jackson Pollock” painting technique. We’d all love to see your challenge piece too. You can just reply to the forum thread that in the link above. You do have to be a member of the forum to post but that just takes a quick sign up.


Using Cheese Cloth in Textiles

Using Cheese Cloth in Textiles

Cheese cloth must have hundreds of uses and many fiber artists use cheese cloth in their work. Debra from Cheese Cloth Fabric.com sent me a sample of their cheese cloth recently to post about.

Cheese Cloth from Cheeseclothfabric.comHere’s the package I received and there is lots of cheese cloth here. Thanks Debra! If you check out their site, you’ll see that they have a variety of grades of cheese cloth and they sell in large quantities. Unfortunately, they only ship to US addresses at this time but their cheese cloth is very affordable especially if you need large quantities.

Closer View of Cheese Cloth

Cheese cloth is graded by the number of vertical and horizontal threads per inch. The grades range from #10 to #90. I have also seen #30, #40, #50 and #60. #10 grade has 20 x 12 threads per inch and #90 has 44 x 36 threads per inch. You can see in the photo above that this is one of the higher grades of cheese cloth. In the US, the cheese cloth that you find in the grocery stores is usually #10 grade.

Spices on Cheese Cloth

Many of the uses for cheese cloth are things that you might do in the kitchen. You can strain stock or broth, use as a spice or tea bag, thicken yogurt, make tofu, cover a lemon so that when you squeeze it, no seeds will pop out or even make cheese!

Spice BagI used a bit of the cheese cloth to make a spice bag for hot spiced cider over the holidays.

In the Spiced CiderHere it is simmering in the cider. But the point of this post is using cheese cloth in textiles. I have made several samples as well as a few different pieces with cheese cloth.

Ice Dyed Cheese Cloth

Cheese cloth is easy to dye. The photo above was dyed with the ice dyeing method. Fiber reactive dyes are best for dyeing cheese cloth since it is cotton.

Cheese Cloth FlowerI recently used the ice dyed cheese cloth to make little flowers.

Cheese Cloth Flowers AttachedI’m thinking about adding the little flowers to this stitched piece. The cheese cloth flowers are just pinned on right now but I am sure that I’ll use some of them.

Cheese Cloth in FeltYou can use cheese cloth to provide texture in felting. The cheese cloth in this piece is just above the white novelty yarn.

Cheese Cloth Used as StrengthenerYou can use cheese cloth in between layers of wool to provide strength. This notebook cover has cheese cloth in the middle of the felt. You can’t see it at all but it works great for items that will get a lot of wear and tear.

Ruching Cheese Cloth SampleThis sample has cheese cloth that has been ruched and then stitched down. You can either do the stitching by machine or by hand.

Cheesecloth SampleHere’s another sample where cheese cloth was stitched down in rows very close together. I also used cheese cloth to make a stitched cord. I love how organic the cheese cloth looks when you fray it.

Barn by Lynette BarnesThis piece is by my class mate Lynette Barnes. She used cheese cloth to depict moss on an old barn. Isn’t it cool?

Side View Cheesecloth Layers

This is an experimental piece in which I wanted to make ruffles of cheese cloth across a piece of felt. The edges of the cheese cloth were covered with wool and placed in rows and then felted.

Sizing Up by Mary Pal

Cheese cloth can even be used in fine art. I just love these portraits by Mary Pal. She “paints” with cheese cloth. I find this quite amazing.

Bark 12 by Kathyanne White

Another interesting use of cheese cloth is using it as a print surface. Kathyanne White uses many alternative surfaces to print photos and cheese cloth is just one of them. She even has a post about printing on to felt.

Indecision by Alicia Forestall-Boehm

Cheese cloth can even be used in sculpture. The piece above by Alicia Forestall-Boehm is one of many that she combines encaustic and cheese cloth as well as wire and foam.

My plan now is to dye the cheese cloth that I received from cheeseclothfabric.com and do some experimenting. I am going to send a portion of the cheese cloth to Zed and to Ann so I thought it would be fun if I gave away another portion to anyone who is interested in playing with cheese cloth. So if you’d like to have some dyed cheese cloth, just leave a comment below and tell me what color you’d like and how you plan to use it. I’ll draw a name on January 23rd and announce the winner on that date.  I will send the winner the dyed cheese cloth once it’s finished which will be in a couple of weeks.  Zed and Ann, let me know what colors you would like as well. Then I’ll write another post and show the results of all our cheese cloth experiments.

(We have no affiliation with cheeseclothfabric.com except that they offered to send us some free cheese cloth in exchange for posting about it.)