Browsed by
Author: Karen Lane

Something Fishy

Something Fishy

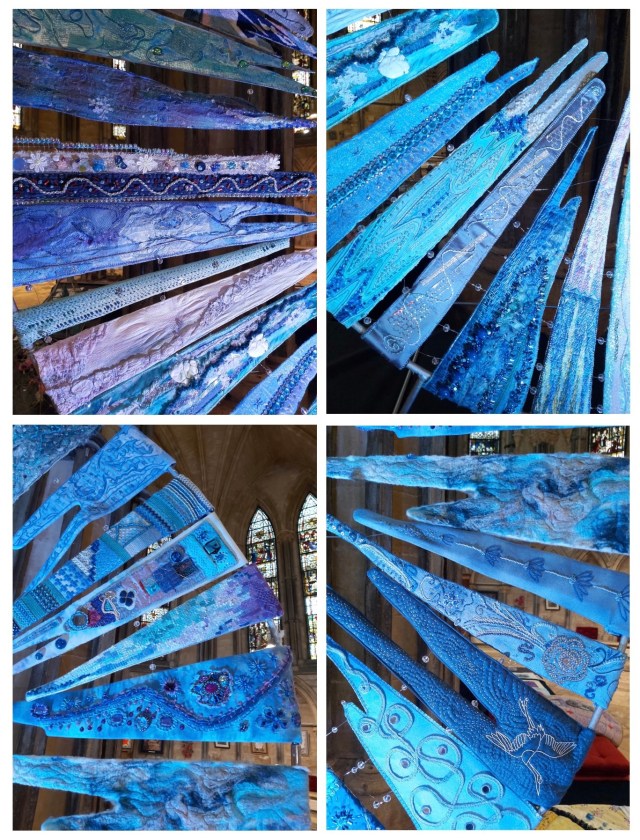
Last year I joined Lincolnshire Textiles, a mixed media textile group who meet monthly at Cherry Willingham near Lincoln. This is an exhibiting group and I was really impressed when I visited their last group exhibition which was held two years ago in Lincoln Cathedral. As well as members exhibiting their individual pieces, central to the displays is always a group piece. Last time this was Sapphire & Steel which you can see here.

This year the main theme of the exhibition is “Water” and the group piece will represent a whirlpool with 30(ish) members having contributed a section each. Along with a template we were each given a colour swatch and asked to work in shades of that colour without going too dark or light either way. This was my template for shape which is approx 60cm x 15cm at its widest parts, and the little colour swatch of thread.


My first thought was to fill the shape with swirls or crashing waves……
But then I remembered seeing some of the pieces that had been submitted at previous meetings and two or three other members had already worked on that type of design, so I decided to rethink.

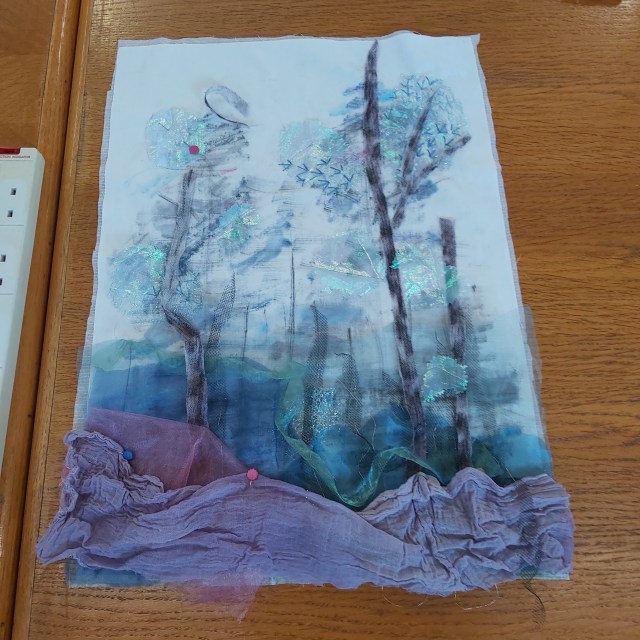
The other thing that came to mind was that my section might lend itself to being the shape of a fish so that’s what I decided on…..

The next step was to gather various threads that looked like they might be suitable and then look for different textured fabrics which I could colour. As we were asked to work in monotone it would be important to use as many textures as possible so I pulled out cotton, velour, interfacing, tulle, Lutradur, Evolon, gauze, elastic and crepe bandage.

I mixed up a shade of green that was as near as possible to the swatch and applied it to the fabrics in varying strengths. This gave me a nice variety of shades and texture to work with.

Knowing our exhibition isn’t until August I thought I had plenty of time but at our meeting this month I discovered I was one of only two who hadn’t yet handed their work in and it would be needed for the April meeting!! Panic set in and I didn’t think to take many photos of my fish once I’d got going with it….it was a case of head down and get on with it!

This is the finished fish with the addition of beads which I’m hoping will catch the light and add interest. I certainly don’t envy Hilary who now has the job of joining all of our segments together and making them fit!!


Meanwhile things are still progressing with Waltham Textiles “Making Waves” theme and I’ve added a Coconut Octopus to my exhibits. I came across some fabulous photos of the Coconut Octopus and just had to have a go at creating it.

The coconut octopus is found in the western Pacific and Indian oceans and is classified as a tropical water species. It can be found off the coast of southern Japan as well as Australia, New Guinea, and South Africa.

It prefers shallow coastal waters and spends the majority of its time on the sandy or muddy seafloor close to the shoreline. This species also shows a preference for calmer waters as opposed to the swifter seas of the open ocean, hence it is frequently found in bays, lagoons, and other inlets.

It commonly preys upon shrimp, crabs, and clams, and displays unusual behavior including bipedal and quadrupedal walking. It gets its name from gathering and using coconut shells and seashells for shelter and protection. What an amazing creature!

Photo Source: octolab.tv/species/coconut-octopus/

Another distinctive feature of the coconut octopus is its suckers. They are almost white and really stick out when the creature has assumed a darker color. The contrast in colour between its body and its suckers can create a fluorescent effect for the suckers.

Unlike Oli I which was completely needle felted, Oli II is mainly wet felted with the skirt being added once I’d got him stuffed.


I considered making the legs and body separate and joining them with needle felting but decided to go with a book resist instead.


He’s made with Corriedale Slivers from World of Wool which I’ve been using a lot of lately. They are great for both needle felting and wet felting and are available in a beautiful range of colours.


He’s nearly finished, just a few more needle felted suckers to add, which has become a bit of a ritual when I’m sat watching TV. With so many of them it’s the only way I can do it and keep sane!! Now where did I put that needle…………?

A Card for Caterina

A Card for Caterina

When Ann first invited us all to take part in a holiday card swap it was mentioned that our theme could be anything, it didn’t have to be particularly Christmassy…..and so mine wasn’t. I have to say that as more and more of the cards are now being shown, a part of me wishes I had gone with a Christmas theme, but it’s only a small part! My partner in the swap, Caterina, got in first with her card to me which I love and I felt that gave me permission to do what I really fancied doing! I won’t show Caterina’s card in case she’s going to do a post about it but let’s just say we were thinking along very similar lines.

I decided to make a mini Autumn/Winter forest floor mounted on to a 5” x 7” card. Starting with an off cut of Lutrador I used acrylics and Inktense to paint it grey with hints of green, or so I thought! Once I started to distress the Lutradur with the heat gun, what had looked very grey suddenly became very green as the green Inktense intensified. Rather than start again I decided to go with the flow and add more grey where needed later.

What was grey became very green!

Next I got out my box of Tyvek and Lutradur samples to see if there were any pieces of bark or leaves already made which I could use for this project.

The leaves were all too large apart from the one on the luggage label

All of the leaves turned out to be too large for the scale of the card apart from a small one attached to the luggage label on one of my workshop samples. This was the ideal shape and size so I used it as my template for the leaf to go on the card.

I had more luck with the tree bark as I found a few workshop samples, one of which hadn’t been painted and was the perfect size.

The barks been painted and I’m starting to audition pieces for the card

Moving the pieces around until I’m happy with the placement
I can spend ages arranging and rearranging the parts, distressing the smallest pieces of Lutradur to get pleasing shapes and checking I’ve made enough to cover the background. Once I was happy with the amount of pieces I had the bark was embroidered and everything stitched down to a piece of brown cotton fabric.
And this is the finished card complete with Colonial Knots, felt pebbles and the little leaf. OK, it doesn’t scream “Christmas” but, as a keepsake, I hope it will remind Caterina of the friendships she’s formed with the F&F group and of happy Christmas 2023 memories.


Once I’d got Caterina’s card in the post I caved in and made a reindeer themed “Christmassy” card for my local textile group swap. After trying, and failing miserably, to draw a simple reindeer I turned to clip art and found this cute reindeer pose.

I’d recently seen images of beautiful little birds online that had been made from scrap fabrics and free motion stitch and these inspired me to do something similar with the reindeer.

I had so much fun making this one that I tried another pose, got carried away and went in to production!

These have been cut from fabric scraps and free motion stitched on to patterned card (which makes a great stabiliser!) I figured the antlers and legs would be a bit fiddly in fabric so I simply used a marker pen for those.

Cards have never really interested me in the past but these were such fun to make, I can see myself creating more to put aside for next year!

I hope all our readers have had a peaceful Christmas and here’s to a healthy, happy and creative 2024 for all of us!

Melting & Felting

Melting & Felting

As much as I enjoy felting and working with natural fibres I also love mixed media work and getting creative with heat manipulative, man made fabrics. It’s all the more enjoyable when you ask at the start of a class if anyone hasn’t worked with a heat tool or a soldering iron and you see the hands go up. You just know there are going to be some “ooohs and ahhhs” and huge smiles coming from excited students once they get melting their fabrics!
Last week I was invited to teach a group at Stainfield Village Hall, just a half hour from home. The groups organiser, Clare, had attended my Layer, Stitch & Burn workshop a few months previous in Sleaford and had so much fun creating this sea shell inspired piece she asked me to repeat the class with her group.

This technique was developed by the Canadian mixed media textile artist Susan Lenz.  It involves layering synthetic fabrics on a background of acrylic felt before adding free motion stitch using cotton, viscose or rayon threads. The last stage involves  “melting” the background fabric with a heat gun to create a lace like effect as seen in Susan’s In Box and Stained Glass Series 

Susan Lenz creates colourful mixed media textile art using heat manipulative fabric.

You would imagine all acrylic felt would melt and therefore be suitable for this process but I’ve discovered the hard way that’s not the case! If you’re going to try this technique I would suggest testing your background felt before stitching as some simply discolours and singes rather than melting! Having been caught out once I now order a sample before purchasing by the metre. My latest supply came from Empress Mills and melts a treat!
In the workshop, although everyone is given the option of working with simple geometric shapes, I like to encourage students to think outside the box (pun intended!) and create a piece that’s unique to them. In the past I’ve had ladies using fossils, gum nuts leaves and all sorts of other motifs as their starting point for a design as you can see from these three examples…..

Working with a more organic design is also great for those who haven’t done free motion before, or maybe are not as confident with it, as your stitching doesn’t have to be precise. In fact a “sketchy” approach, similar to the leaf design, looks great!

At Stainfield not everyone got finished on the day but I’ve been told that, at the groups meeting this week, not only did they finish off what they had started with me but most of the ladies also began working on a second piece! The size we worked to was approximately 23cm square so it fits the square IKEA box frame. 

Another heat manipulative workshop I teach is the Lutradur Leaves. This Wednesday evening I loaded the car and drove up to East Ayton near Scarborough, a really beautiful part of the country, ahead of Wednesdays class for Anita Cassidy and the Textile Experimental Group. I knew we were going to get on like a house on fire when I heard the name of the group!
The village hall was very light, airy and spacious, perfect for this type of class.
The group were encouraged to bring some leaves to use as inspiration and I supplied sketches for those that wanted them. Everyone worked with a medium weight 70gsm Lutradur and once again the ladies produced some fabulous work which sits nicely with their current theme of “decay”.

Between my last post and classes starting up again after the Summer I’ve done a bit of dressmaking, or “top” making to be precise. I’ve got a very simple linen, sleeveless, dart-less, top that I really like and I decided to clone it, adding darts to make it more fitted. Not having made anything with darts before I figured YouTube would be a good move….and it was!

I tried the pattern out with a very cheap floral fabric from Boyes. I think it’s viscose, it’s not silky but it shifted constantly while I was working with it so I’m amazed it turned out wearable!
The “palm tree” fabric is 100% cotton and was so easy to use, it’s definitely the better of the two. 

The following week I had to create a wet felted shoulder bag to promote a forthcoming workshop. In the past I’ve sometimes deliberately used colours that I’m not that keen on to ensure I keep a piece as a sample and not be tempted to use the item myself! This time I did the opposite and carded Dream and Granite Corriedale slivers from World of Wool’s Hefty Hues range to make a bag that won’t be living in a box until the workshop in the new year!

Making Waves Update

Making Waves Update

In my last post I mentioned a few of the projects I was working on with the “Making Waves” theme, along with other members of the Waltham Windmill Textile Group. I’d begun work on a 50cm x 90cm felted wallhanging inspired by the markings on large stone slabs on the beach at Seahouses in Northumberland.

Having recently bought myself a drum carder I carded a variety of left over bits of fibre, mainly blues, greens, yellows and neutrals, to make my background and laid them out with off cuts of hand dyed silk fabric, scrim and large nepps. On the left is how it looked after felting and on the right is where it’s at right now. I’ve added synthetic sheers, machine wrapped cords, hand and free motion stitch and in some areas I’ve heavily machine stitched to push them back and encourage the adjacent areas to stand out. The original bottom left section wasn’t working with those silk circles so they were pulled off and replaced with some stiffened, rust dyed fabric circles, recycled from another piece of work. I’m calling it Going With The Flow because a) it’s inspired by a trip to the beach b) it has flowing lines and c) like most of my work its design wasn’t preplanned. It’s evolving as I work on it, adding bits in and taking bits off until it feels right. It’s got a way to go yet before I can call it done.

One of the other challenges within the Making Waves theme is to make a 3D fish and my immediate thought was to create what many would regard as an ugly fish but which I prefer to think of as a fish with shedloads of character……..one that would get noticed amongst a group of pretty fish!

Having typed  “ugly fish” into Google I lost many hours over the next few weeks looking at images and some incredible videos of life deep in the depths of the oceans. Each new search revealed yet another fascinating species of fish, some quite honestly didn’t look real while some, like the Tasseled Scorpionfish were strangely beautiful. One of the weirdest I discovered has to be the Red Lipped Batfish. If ever there was proof we descended from the oceans this red lipped, whiskered fish that “walks” on its specially adapted fins has to be it! 

Last month the Waltham group had a day making felted fish, some are finished, others are still work in progress.

Lucy made a wonderful wet felted Puffer Fish adding recycled plastics, including pipette tips, wine bottle netting and glass beads with recycling symbols underneath, to highlight the plight of our oceans.

Sue is very new to wet felting but she’s taken to it like a fish to water (couldn’t resist!) and has made “Angry Fish”. I think he looks more sulky than angry but he’s terrific!

Barbara’s felted fish is still work in progress but looking great, as is her sketch book and fabric fish purse!

Originally I had intended to wet felt my ugly fish but, after all those hours of studying them and getting excited about what I was going to make, for some reason when I took out my carded Corriedale fibres I found myself felting a cartoon version of an Angelfish…….I didn’t see that coming! Her name is TroutPout and she’s approximately 33cm x 36cm excluding her fins.

I’ve been enjoying teaching 3D Seed Pod workshops recently using wire wrapped with Tyvek fabric so decided to make my Anglerfish from wire rather than fibre. It was only when I’d got the 60cm x 33cm framework made that I sat back and realised I’d gone past the stage where I had meant to start adding my fabric! Time for plan B…..maybe I could use wire mesh to give it “body”?

I looked for some online but hesitated as I wasn’t sure how flexible or suitable the mesh would be. Having put the fish to one side, a few days later I joined the Lincolnshire Textile group and at my first meeting I was offered a piece of silver coloured Sinamay. Sinamay is one of the most popular hat-making foundations. It’s woven from the processed stalks of the abaca tree, a type of banana native to the Philippines. I couldn’t believe my luck……..being silver coloured this off cut looked like wire mesh but wasn’t and if I sprayed it lightly with water I could easily shape it to fit and stitch it with aluminium wire to my framework. So this is how far I’ve got. I’m going to add a few more wire spirals and do something more interesting with the eyes. He should have menacing teeth but I might not go that far!

Another feature of next years Making Waves exhibition will be an Octopus’s Garden so once the fish are done it’s straight on to making lots of coral and a few Octopus. I’m loving this theme and could quite happily continue with it way beyond our event next year…….it has to be the most interesting and enjoyable we’ve had so far!

Making Waves

Making Waves

One of the things I’ve noticed from being at felting workshops is how predictable we tend to be when it comes to choosing our colour schemes. Whether we’re making a wearable, a bag, a vessel, etc whatever it is the majority of us will reflect that colour back in what we are wearing or the accessories we carry on that day. Before a class begins we can mostly tell at a glance who will be working with reds, who with greens, who with neutrals, etc, etc.

Personally I’ve always been drawn to neutrals, working with fibres in various shades of grey and beige with a small amount of accent colour, usually yellow or green. Unsurprising then that my wardrobe also tends to be filled with neutral colours. So what happened when the Waltham Windmill group launched their latest theme “Making Waves”? I could have followed the theme while sticking with my neutral pallet but for some reason I found myself wanting to work with blues, and not just as an accent but as the main colour. What I hadn’t realised until this last week is that blue hasn’t just found it’s way in to my studio but, without making the connection, it’s also started appearing in my wardrobe and I really hadn’t seen that coming!

Within the groups theme we have free reign to make whatever we want plus we’ve agreed a number of specific items we will each make, one of them is a jelly fish. Having done a bit of research into the many and varied species of jelly fish I came across the spotted Blue Jellyfish which is native to UK waters. My first thought was to create a “wet look” using Merino fibre covered with lots of viscose which would create a sheen and then I would free motion stitch the spots. That was quickly replaced with the idea of making my fish from sheer fabrics…..I seem to have accumulated lots of sheers and only ever use tiny amounts so this would be a perfect opportunity to use up some of my stash. After rummaging through a huge sack of fabrics, almost losing hope of ever finding the colour I needed, I came across a small piece of blue and another of turquoise, just enough to do the job…..so much for stash busting!!

The remnants of fabric, and the size of my embroidery hoop, determined the size of my jelly fish. I’d got some of the wash away stabiliser left over from a project I did a few years ago so that would be useful for stiffening and shaping the jelly fish.

I had enough blue fabric to cut out two circles plus one slightly larger from the turquoise. I also added a small white circle of fabric underneath thinking it would highlight the spotty area. Next I cut up some scraps of felt for the spots and arranged them on the blue discs before covering with the turquoise sheer. This sandwich was then put in the hoop and I machine stitched around the spots…..or at least that was my intention! Unfortunately I struggled to see where some of the felt was so it’s a bit hit and miss but it was near enough!

After removing it from the hoop I washed out some of the stabiliser retaining a good bit of the glue on the fabric to enable me to shape it over a plastic bowl. I didn’t think to photograph the drying stage so the next image shows it dry with the unattached tentacles cut from tulle and sheers.

The final step was to wet felt a blue “inner”, with additional thin felt tentacles, sew the fabric tentacles inside it and insert into its casing.

The finished spotted blue jelly fish.

I’m quite pleased with the finished result and this particular area of the exhibition should be interesting as we’ve used lots of different styles and techniques between us.

Another piece I’ve made for the theme is a felted sculpture inspired by a spiked shell, I’ve simplified the shell shape, lengthened the spikes and it’s currently hanging on my wall but it doesn’t feel finished. I think it maybe needs more colour variation and possibly a few embroidered barnacles…..what do you think?

Speaking of which, I’ve always had a fascination for Barnacles and can’t resist collecting them when I find them on stones and shells. These marine crustaceans are related to the crab and lobster and tend to live in shallow and tidal waters, typically in erosive settings.

There are around 1,000 different species and, as adults, typical barnacles are covered with calcareous plates and are cemented, head down, to rocks, shells, pilings, ships’ hulls, driftwood, or seaweed, or to the bodies of larger sea creatures, from clams to whales.

They feed by reaching into the water column with eight pairs of thoracic limbs called cirri which are long and feathery. The cirri extend to filter food, such as plankton, from the water and move it towards the mouth as you can see in this video. (Follow the link and scroll down to Ecology)

Barnacles on rusty metal

I’ve always liked this photo of barnacles on a rusty piece of metal which was taken on a visit to Ullapool harbour so I’m experimenting with different fabrics, including cotton and Tyvek, to make a barnacle inspired wall hanging. So far I’m leaning towards the Tyvek fabric.

Tyvek fabric barnacles

Something else I think will lend itself to the theme is dendritic printing. I love the vein like patterns, very reminiscent of coral, which can be created by pressing acrylic paint between two sheets of glass or plastic and then printing with it. I’ve been trying this out on different surfaces including paper, Lutradur, chiffon and cotton.

The most surprising result was a the print on felt, I was amazed at the clarity of it and I can see this being developed further with added stitching.

Working on ideas for felted sea anemones

There are so many possibilities within this theme that my mind is working overtime and I’ve a few other projects on the go right now. One of them is this small 20cm dia embroidery being worked on an eco print cotton fabric……note the lack of blue!

Another is a 95cm x 54cm background I made a couple of days ago throwing everything I had to hand in to the mix! There’s Bergschaf, Merino, Viscose, Silk, chiffon, synthetic net, slubs, knitting yarn, etc. I see this being an ongoing project for quite a while….something I can build on, picking up and putting down over time, adding stitch and texture until it feels finished.

At our next meeting, this coming Friday, several of us will be creating wet felted fish which we are all excited about. I will show you how those turned out and give an update on the other projects in my next post. Now………where did I put my blue cardigan?

Yarn Bomb Update and more…

Yarn Bomb Update and more…

In my last post I introduced you to the amazing creative community that is the Cosby Yarn Bombers who reside in the village of Cosby, just south of Leicester. When I was down there two months ago they were working flat out to pull together this years Summer Yarn Bomb with the theme ‘Make a Splash’. I promised an update so here are images of just a small fraction of the wonderful installations that were put up around the village….enjoy!

I just love that the bather has removed one of her cucumber eye patches so she can read her iPad! The detail that goes in to this work is fantastic.

My friend Pat made an enormous wet felted Loch Ness Monster which found a new home in her garden hedge!

Having been told that a lot of the work is reused and remodelled each year I’m sure I spotted Madge (minus her crown) laying on a sun lounger eating an ice cream with the corgis close by!

Another very visual event that I can’t resist is the annual Asylum Steam Punk Festival that’s held in Lincoln over the three days of the August Bank Holiday. It’s advertised as the largest Steam Punk event of its kind and attracts enthusiasts from far and wide.

The term Steampunk was first coined in 1987 by K. W. Jeter, the author of the novel Morlock Night. He used the term to describe a genre of speculative fiction in which steam, not electricity, drove technological advancements. Since then it has been used to describe an artistic and cultural movement.

Every year I tell myself I’m going to create a costume and take part but every year it sneaks up on me and, you guessed it, I’ve no costume ready! Maybe I will join in fully next year but for 2022 I was there once again as a spectator, still having a fabulous time, taking photos and chatting to folk and generally soaking up the atmosphere.

The setting for the gathering is Lincolns Cathedral Quarter and the old Asylum which provide the perfect backdrop. There are lots of stalls selling costumes and accessories as well as a programme of activities each day throughout the weekend culminating in hundreds of folk taking part in the grand parade which is a quite a spectacle!

The green man jacket was made out of old curtains by the lady wearing it and the face was her first attempt at needle felting which I thought was pretty impressive!

While I was in Lincoln that weekend I also took the opportunity to visit a textile exhibition in the Cathedrals Chapter House. This was by a local group called Lincolnshire Textiles. It’s title, Sapphire & Steel, was a reference to the main exhibit, a beautiful, huge wheel of fabric covered shards.

This group project had been created using a variety of materials and methods including wet felting, free motion stitch, cross stitch, hand embroidery, beading, heat manipulation with tyvek, etc, etc. One of the shards is actually made from steel which has been decorated with threads and sealed with resin….unfortunately when I looked through the photos I’d taken I’d missed that one!

Another collaborative project involved each member being given a small image to reproduce in whatever materials and techniques they wanted to use. Once finished they were assembled to reveal two famous paintings. Some had been working on a Monet, others on a Klimt.

The Chapter House is a stunning piece of architecture but a nightmare when it comes to hanging display items, the ladies certainly had their work cut out!

These are just a few of the other pieces that were on display.

The whole weekend had been a visual extravaganza and I couldn’t help but come away from it feeling inspired. Who knows, I might even have a Steam Punk costume to show you next time…..just don’t hold your breath!

Getting Creative in Cosby

Getting Creative in Cosby

Last week I was invited down to Leicestershire to visit the Cosby Quilters to give a talk on the Tuesday evening and run a textile workshop on the Wednesday. The workshop they chose was “Tall Trees”, based on one of my early art quilts, which involves painting fabrics such as cotton, interfacing and muslin which are then layered with organza and free motion stitched.

Normally this is a two day class but occasionally, as with Cosby, it’s booked for one day with the students happy to finish in their own time. The ladies have made a great start with their pieces and I’m looking forward to receiving photos as and when they get finished.

Pat Screaton, one of the Cosby Quilters, lives in the village and is also heavily involved with the Cosby Yarn Bombing. It’s a joint effort by members of the Cosby Crafters & the social enterprise Gather Create Grow, which uses arts & crafts to improve wellbeing & reduce isolation.

When the workshop ladies stopped for lunch Pat said she needed to pop out for a few minutes to go round to “the barn” and suggested I go with her to get an idea of the scale of their yarn bomb activities.

The barn itself was crammed with box after box of knitting/crochet wool and there were ladies sitting on the grass all around knitting, crocheting or sewing granny squares together…..it looked a proper cottage industry! It turns out that there are regular sessions for folk to attend as well as the group reaching out to the wider community, including schools, to get everyone involved. What a fantastic enterprise!

They don’t appear to do anything on a small scale, all the characters, animals, plants, etc, etc, that they create are life size.

Everything is carefully stored between events and everything gets recycled over and over again, being reincarnated as something, or someone, different the following year.

This is their life size model of our Queen, complete with Corgi’s, made to celebrate her Platinum Jubilee…….I love the detail they include such as the Queens monogrammed gloves and the royal “posh poo” bag!

…..and a few photos from last years Nativity Scene……

The local community are currently well on the way with their 2022 ‘Make a Splash’ themed installations which will be decorating the beautiful village of Cosby this August. Back at Pats house I was given a sneak preview of a few of the pieces and they are looking impressive…..including schools of fish, a massive crocheted coral reef and a huge wet felted Lochness Monster!

The “Make a Splash” Yarn Bomb will run from 13 August to 4 September 2022 and will stay up for 25 days. It’s all outdoors, it’s going to be spectacular, and it’s completely free so if you are in the Leicestershire area it’s well worth a visit.

Quilt & Stitch Village

Quilt & Stitch Village

I’ve just taken part in my first show after two years of Covid restrictions and it felt great to be back to normal! The event was the British Quilt & Stitch Village, an annual 3 day textile show held at Uttoxeter Racecourse in Staffordshire.

It was my first time exhibiting at Uttoxeter and I wasn’t sure what to expect. Would visitor numbers be low? Most ladies attending shows like this are of a certain age (me included!) and I know some still have concerns about mixing in large groups. This is predominantly a quilt show, would there be enough interest in feltmaking or would the majority walk straight passed? I was manning my stall alone…. would the neighbouring stall holders be too busy to relieve me when I needed a loo break? I needn’t have worried, when the doors opened at 10am the visitors flooded in and it turned out to be three very “full on” days! These are a few of the items I had on show……

I’ve recently made these collars, narrower than previous designs, with a roll edge trimmed in a contrasting colour.
For me the main aim of being at the show was to advertise my workshops and this is a new workshop sample for a Wallhanging class exploring different 3D techniques.

My pitch was next to Project Linus, a charitable organisation that provides quilts and blankets for children in need. Their aims are to “Provide love, a sense of security, warmth and comfort to children who are seriously ill, traumatized, or otherwise in need through the gifts of new handmade blankets and afghans, lovingly created by volunteer “blanketeers.” And to “provide a rewarding and fun service opportunity for interested individuals and groups in local communities, for the benefit of children.”

Project Linus always attracts a lot of interest and the two lovely ladies on that stand were swamped with visitors for the three days! Somehow they still managed to cover for me when I needed a comfort break which was really appreciated!

I didn’t get much chance to visit other stands but when Jane (Wylde Oak Artistry) came over to say hello and told me she was working with Spun-bond fabrics I had to go see her work. I loved her masks and corsets, made on the theme of body dysmorphia, and came away feeling that there is so much more I could be doing with Lutradur!

Another stand I particularly enjoyed was “Traverse”, a group of exhibiting textile and mixed media artists. Apologies for not getting close ups of their work…….it’s worth following the link and taking a look at their website.

It’s a great show, spread over three large halls as well as various other smaller buildings. Most of the photos I took were prior to opening but as you will see from the last three, we really did get visitors! Roll on Quilt & Stitch Village 2023!

Deconstructing/Reconstructing

Deconstructing/Reconstructing

With the first quarter challenge being all about making samples by deconstructing/reconstructing different materials I had intended to spend a day doing precisely that and detail them in this post. Like a lot of well intentioned plans time slipped away and I’m sitting here with no new samples and a post to write!

For the sake of getting this post out on time I’m going to have to cheat and show some of the deconstruct/reconstruct work I’ve made in the past.

This sample was my first attempt at Nuno Felting, made with synthetic sheers and some cotton fabrics. I remember thinking at the time “never again” as the process seemed to take forever! Obviously I did do it again and soon learnt which fabrics I prefer to work with. This sample eventually got cut up and used for brooches. Thanks to Helene and her post, which you can find here, for reminding me about these.

My second sample had silk fabrics top and bottom, cut from charity shop scarves, with a piece of my aunties wool shawl in the centre. As you would expect, being somewhat bulky, the wool section shrunk far less than the silks but all three pieces felted very quickly and easily so I was encouraged to go on and make lots more Nuno felt.

It hung around for quite some time before I decided to cut it down, add some stitching and put it in a frame. It’s now a lovely reminder of aunty Das who has since passed away.

Off cuts of prefelt, or deconstructed fully felted pieces, never get thrown away as they are always useful for cutting up and using as inclusions beneath fabric when Nuno felting.

This little fossil sample was a trial using Merino fibres and cotton wadding left over from a quilting project. The wadding felts very easily and is useful for creating ”lumpy” relief designs.

One of the great things about making felt is that, even if it doesn’t work out how you wanted, it needn’t be wasted. This mossy pebble necklace is an example of that. I had intended it to be asymmetrical but when it was finished it wasn’t asymmetrical enough. There’s a fine line between something looking intentionally asymmetrical and looking like you tried to make it symmetrical and failed! This looked the latter….. just plain wonky!

Thinking I would work on it at some point I left it on display next to a grey Bergschaf bowl……… and months later had a light bulb moment! The necklace was deconstructed and recycled to create the large surface “bumps” on this bowl.

Another deconstruct project was this triangular scarf. I loved the combination of the Superfine Merino and Viscose Fibre but wasn’t particularly happy with the design of the scarf. Several months later, after never being worn, it got cut up, pleated, beaded and recycled to create this chunky, highly textural bracelet.

My final samples were inspired by a photograph I took of barnacles. I can’t remember now what they were attached to but I saw them in the harbour in Ullapool and just loved the shapes and colours.

The hand dyed cotton fabric, left over from an old project, was given to me by a friend. The barnacles are constructed from several pieces sewn together on the machine and stiffened using acrylic wax. The next step will be to sample materials and techniques to create the very textural background.

If you have any deconstruct/reconstruct projects you would like to share, big or small, we would love to see them over on the Forum.

Monstera

Monstera

Happy New Year to all!

At the Waltham Textile group we normally have a biannual exhibition of our work but, due to Covid, it was cancelled in 2020 rescheduled for 2021 and then had to be cancelled again. It’s now been confirmed for August but in the meantime I’ve sold my main “Leaf” themed piece so recently made this mixed media “Monstera” to replace it.

I’m also thinking of submitting this piece for the 2022 IFA online exhibition which has the theme of Flora & Fauna. I’m waiting to hear if a mixed media piece will be accepted. I can’t imagine it being a problem but, if it is, I can simply crop one of the images to show the felted leaf.

I bought a 40cm x 80cm canvas with the intention of painting Monstera leaves on it and then adding a 3D Felted leaf. After drawing a template onto paper and offering it up to plan the layout I changed my mind about painting onto the canvas. It’s not something I’ve done before and the surface appeared to be a bit too textured for the look I wanted to create. Instead I sketched the leaves onto a piece of white cotton fabric, outlined them with an Inktense pencil and added a little shading. The aim was for very simple, very smooth, perfectly formed leaves looking more like curved metal than the foliage on my cheese plant. I think this was influenced by the very smooth metallic looking Tyvek seed pods I’ve been making lately. The Monstera in our lounge has been a bit neglected, to the point that I couldn’t bring myself to photograph it for this post!

I don’t consider myself a painter but I do like painting on to fabric. If you need to paint precise lines a good tip is to use aloe vera (by far the cheapest) or acrylic medium instead of water when applying acrylics on fabric. This keeps the paint where you want it to be and avoids it bleeding into other areas. I managed to get a tiny bit of black paint on the lower section of the fabric but stopped short of starting all over again when I realised the felted leaf would cover it up!

My paper template for the painted leaves was 13” x 18” so to make the felted leaf I multiplied by 1.4 enlarging it to 18.5” x 24” to allow for shrinkage. Layer one was a very yellowish green Merino (might have been lichen but not certain). Layer two was a combination of various shades of grey with the yellowish green running down the centre. This was topped with a layer of dark green Merino and Ireland Viscose all around the edge and snippets of gold Viscose down the centre. These images don’t give a true representation of colours but you get the gist.

After wetting out I measured the fibres and found they had spread to approx 20” x 27”. At the fulling stage, every now and then, I put the original template on top to check for size and ensure I was keeping to the right shape.

Once it had shrunk to the correct size it was left to dry. The next stage was to add wires to the back of the leaf so it could be shaped. This could possibly have been done with directional laying of the fibres and lots of fulling but I wanted the option of posing the leaf once it was attached to the canvas and wires are a good way of doing this.

The wires were spaced out and attached on the reverse using a zigzag stitch which also formed the veins on the front side. You can see that bright yellowish green colour on the reverse of the leaf. Once that was done it was just a matter of cutting into the felt to form the individual leaves and the characteristic little holes of the cheese plant.

After attaching to the canvas with a few strategic stitches the leaf was given its final shaping. It’s now hanging in the lounge above my cheese plant where it will stay until the exhibition…..although if I do get the chance to sell it I suppose there is still time to make another!!