Browsed by
Author: frabjousfabrica

I live in North Dorset, UK. I have been working in textiles on an off for most of my 75 years. I am mainly self taught and, with no basic grounding in art or design, picked it up as I went along, usually from books, but with occasional workshops. I have experience of all types of textile work but have now “rounded down” to felt making (both wet and needle), embroidery, crochet, and basic needlework; with the odd forays back to other techniques as needed for a particular project.
Theatre Textiles – Act 2 Scene 3

Theatre Textiles – Act 2 Scene 3

We have costumes for two Pantomimes and one Murder Mystery Play in this post; and yes at last I’m going to tell you about the costume hair and makeup for the Wicked Queen (above).

First let’s tell you about Dig for Vengeance, the Murder Mystery Play since there isn’t much to it.  In fact the only textile “makes” involved as far as I was concerned were in makeup.  I was playing the part of the Reverend Simeon Knatchbull (we were – as usual – short of men so I was to do a bit of cross-dressing.) Sid, who spent most of his time in his allotment shed to get away from his garrulous wife, was played by my friend Fiona.  The textile parts of the makeup were our eyebrows and side burns (extra long ones for Sid) which I made out of Shetland Moorit fibres.  The Rev. was the one “who dunnit” so I‘m able to show you his mug shots and here’s a snap of Sid at his shed.

2 head shots, one profile and one full face
The Rev. Simeon Knatchbull (source local fuzz)
bucolic man with knitted beanie hat and stubborn expression
Sid in his shed

The Pantomime which was our February 2019 production was Treasure Island, and I was to be cross dressing again – not sex this time but species.  I was Polly, Long John Silver’s parrot.  As soon as I saw the script I knew that that was the part I wanted, and although there were a couple of others trying for it, I got it.  I like to think that it wasn’t just my offer to make my own costume that secured it.

The Director, Fraser Wilson (a professional actor and director) decided that he would prefer Polly to be a cartoon, rather than a realistic, parrot.  That did make things much easier.  I had had a look at fabrics that I had available – there was some scarlet and some royal blue, which might work so I delved into Google Images and decided on a Scarlet Macaw as the basis for Polly’s caricature.  I collected various reference pictures of real Macaws as well as some cartoon characters.

The fabrics that I used for the costume came from two sources.  The fabric for the body and the hood came from some old red and blue curtains, and the wings and tail were made from some off cuts of some sort of plasticky fabric that I had acquired from somewhere, blue and red (luckily almost exactly the same hue as the curtain fabric) and some small pieces of yellow.

The costume was made in four sections and consisted of feet and legs; lower body and breast; a tail coat – literally in this case; and a hood with clashing pirate tricorn hat.

Having again resorted to Mr Google I obtained some reference shots of parrot feet.

image of parrot feet
Reference image – feet

I constructed the feet with toes from sections of foam pipe insolation covered in needle felted yellowish fibres. I stuck some bent pieces of black painted, cotton covered wire in the tips for claws, which actually wasn’t a good idea as they kept coming out. In the event it didn’t matter as they weren’t visible from the audience anyway. I stitched the toes to an old pair of fabric shoes which I had painted black, and added more yellow needle felt around the openings to represent the feet. We always lay a black floor on The Exchange’s shiny wooden stage for pantos, so my black shoes would be less visible under the parrot feet. I stitched a length of cotton fabric, much the same colour as the toes, to the opening of each shoe, with snap fasteners up the back, to make Polly’s legs. These came up to just below my knees and were tied with a draw string to make sure they didn’t slide down during a performance. Since Polly was old – 70 – I added some varicose veins (known as “various veins” in our house – thanks to Terry Wogan), couching on some blueish pieces of yarn.

I caused great hilarity at the first rehearsal when I donned Polly’s feet. I wanted to get used to moving in them so that I didn’t trip over the toes, but I admit that it did look odd the way parrot feet protruded from the end of my jeans.

2 images - 1 parrot costume feet and legs side view 2 parrot costume feet and legs front view
Polly’s feet

The body consisted of a bib-type front, attached at the top to a red tee shirt. Parrots having short legs without visible “knees”, I had decided that the costume crotch should come down to just above my knees. I attached very short pant legs which covered my knees and the tops of the costume legs. It might have been slightly more realistic if the crotch had come below my knees, but I remembered just in time that I’d got to be able to walk and climb stairs in this costume. Climbing steps on stage was still a bit difficult, but then Old Polly could be seen to stagger from time to time. The back of that part of the costume came up to my waist and was again tied with a draw string.
Next came the tail coat. A couple of years earlier I had acquired a Vogue Pattern, one of Sandra Betzina’s Today’s Fit series which gave me exactly what I needed to help me with the design of Polly’s tail.

I constructed the coat using the pattern back, but adding wings instead of just plain sleeves.  The tail feathers I boned with extra large cable ties, which gave the length and amount of rigidity I needed and I did the same with the main wing feathers.

I extended the wings/sleeves to the tips of my fingers ending on the underside in a sort of glove construction making separate sections for my thumb and first three fingers.  Then I added the feathers, attaching the first three pinion feathers to the backs of the fingers of the glove. I could then move the feathers with my fingers to simulate Polly’s cartoon hands, and co-incidentally was able to hold on to bits of scenery when climbing.

The fronts of the coat were reduced to just small “bolero” type fronts.  These were affixed to the body/bib just in front of my shoulders with Velcro. There was also a strip of Velcro attaching the coat inside-back just above the tail to the back waist of the body.  I padded out Polly’s stomach with a thinnish sheet of foam rubber to get the right parrot shape..

I do not have any progress pictures of the costume since this all took place before I found and joined the Studio. However, I did wear the costume again 2 years ago for an appearance at the Sturminster Newton Cheese Festival. SNADS were helping out with stewarding the Festival in return for a donation to our funds and I was allowed to dress up as Polly again.  That was fun, but quite warm in view of the padding.  It did mean that I had a short period in which I could take some photos of the tail coat just before I donned it.

showing the underside of the tail "feathers"
Tail underside
showing back view of costume tail with blue and red feathers
The tail feathers from the back
showing back of right wing of costume
The right wing

The hood, was just plain red and tight fitting, and the hat was more of the plastic sort of fabric, with a wired brim, and skull and crossbones appliquéd to the front. The orangy-pink with pink feather edging to the brim clashed nicely Polly’s head. The tricorn was slightly too small so I had to resort to a large safety pin to attach it to the hood to avoid it falling off during performances.

The final touch, which I didn’t really want to do but I was over-ruled by the director, was to stitch feather boas to Polly’s breast.  He was right, it added that je ne sais quoi to the costume.

I found a close up image of a parrot face for makeup reference, and used a lot of red water based makeup (I went home with a pink rinse every night – very fetching!)  I made Polly’s beak from some thin EVA foam, painted yellowish orange, that was stuck onto my nose with spirit gum; and I had yellow feather eyelashes.  The beak was a mixed blessing.  We were “miked up” for the performances so I was able to tuck the end of mine under the beak so that it wasn’t obvious.  However, the theatre was very hot on the Friday night performance and just before the finalé and walkdown the beak came unstuck.  The audience didn’t seem to mind though.  It’s amazing what you can get away with in a Panto.  I made doubly sure of it for Saturday’s two performances though.

close up of red parrot head showing face markings
Makeup reference image
parrot character head and torso
Polly complete with feather eyelashes.
parrot character rear view
Polly peering through the big house gates
parrot character with Long John Silver and pirate
Polly with Long John Silver and random pirate (Silver with crutch made by my husband)

Now at last we come to the Wicked Queen.  I was asked to dress Fiona (my friend who played Sid in Dig for Vengeance) as Averice, the Wicked Queen in Snow White.  This was to include wig, makeup and Crown and two complete costumes.  I was given two existing dresses which fitted Fiona and which I could adapt and add to; one was red and black and the other silver and black.

The red and black was to be worn in the first half, it had a red bodice and under skirt with black lace sleeves and a black lace over skirt.  I altered the dress merely by lifting the over skirt up at the centre front and fixing it with some spare bits of jewellery.  At that time Fiona had a habit of stepping backwards when about to speak, so we decided that she would need a train falling behind her to help her to lose this trait and, because she learned that if she stepped back, she’d step on it, it worked.  As the  dress was not quite floor length, we decided that a long cape type cloak would be worn over the dress.  I had a small piece of red velvet which I made into a short cape covering the top of her shoulders, and added red braid around it’s edges.  We had a large piece of heavy red lace fabric with sparkles in it, which we attached to the underside of the cape starting from the front of the shoulders.  The cape was fastened with more jewellery pieces.

wicked queen dressed in red and black wearing a crown
Avarice in Red

The second dress, silver and black, was pretty plain in design (although the skirt fabric was strongly patterned) and again had no train. So I decided that I’d try to make an overdress, which I would drape on my ancient dressmaker’s dummy. I had some mauve satin type polyester fabric which I decided could do the job. I made use of Google images for some design ideas and came up with two completely different styles that I thought could be amalgamated.

I liked the cut away front of the skirt in the picture.  This could be extended at the back into a train, and there could be full over-sleeves like those in the reference image with the cross over design at the shoulders.

Having had the design approved by the wardrobe mistress I set about draping some Vilene that I had had lying around, and making pattern pieces to be cut out of the mauve satin.  That was silly mistake No. 1.  It wasn’t until I was three quarters of the way through draping and pattern cutting that I realised that I was using lightweight iron on Vilene, not the old sew in version that I no longer used for dressmaking.

The sleeves I drafted by basing them on a normal sleeve pattern but moving the under arm seam to the top of the arm and extending each side to form the cross over at the shoulder seam, and at the same time greatly extending the sleeve length and width.  I cut 2 sleeves out of the mauve satin and 2 more out of purple organza, which I would use as lining.

Getting all the pieces for the overdress out of the mauve satin was going to be tight. In fact, in making silly mistake No. 2, I made it even tighter.  I must have put one of the cut out pieces in the wrong place on the work table, because I managed to cut another pattern piece out of it, so had to do a bit of “jigsaw” patching to get enough fabric for all the pieces I needed.  It’s a good job that theatrical costumes are rarely seen up close – the joins were not discernible from the auditorium.

When I took the overdress in for Fiona to try on I found silly mistake No. 3.  I had not allowed any ease in the patterns made with the draped Vilene so the garment was too tight.  I had to alter some of the darts I had put in for shaping, and slim down a couple of the seam allowances as well as move the front fastening.

I had a piece of black and silver furnishing fabric which was decorated with large gothic type motifs.  I cut out and applied these to the dress.  One large one was placed at the waist on the wrap over front. This helped with disguising the “jigsaw” seams and the added decoration helped co-ordinate with the under dress.  More motifs were appliquéd down the sides and end of the train to add weight to it.  I also added a short length of curtain weights to the underside of the end of the train.  This solved the problem of the train tending to flip over as Fiona moved around the stage.

wicked queen in purple, black & silver costume
Avarice in full rant
wicked queen in purple dress showing motif added to front
Avarice showing the motif covering the “jigsaw”

All this work was obviously done at home in my workshop.  However I still attended rehearsals twice a week, and while I was waiting to rehearse my cameo part (a bear!) I was working on a wig for Fiona.

two hairstyles - long hair set into long low pony tail and with sections tied off down to the end - second hairstyle shows tail doubled back to nape of neck
reference images for the pony tail treatment

I had chosen an older synthetic wig mainly for its colour.  It had become quite tangled so I was cleaning and combing it bit by bit whilst the rehearsals were progressing.  I found that by using a light oil I could comb out the tangles in the wig without pulling too much of the hair out.  Once all this was complete, I started to plait parts of the wig and these plaits were wound around the head, leaving the long back hair to be gathered at the nape of the neck, as shown in reference image 1, but with the ends doubled back up to the nape as shown in image 2.  I made snoods to match each costume to cover the “tail”.

Next came the crown.  Again I searched for reference images to help with the design.  I wanted something strong that would add to Averice’s character, rather than a pretty tiara type crown, which would not do at all.  In the end I decided to base the design on Ravenna’s crown (Snow White and the Huntsman).

Head shot of film actress playing Ravenna showing crown and hairstyle
Ravenna, crown and a glimpse of hairstyle

I made it from shiny, stiff card, which was actually some bobbin lace pattern pricking card that I had got from somewhere somewhen.  I painted the card with bronze acrylic paint and added some braid with marcasite-like stones attached and a bead/pendant from an old necklace, which I painted with pearlised nail varnish.  I had to stick a couple of loops on the inside of the crown, so that we could use hair grips to fix the crown onto Fiona’s wig, which was itself fixed to her “wig cap”.  That’s in quotation marks because the wig cap was in fact a holdup stocking.  The non-slip “stuff” on the inside of the stocking is just the thing to hold onto the actor’s head/hair.  With hair grips fixing the wig to the cap it will not slip off. (touch wood!)

Finally the makeup.  I looked for various types of makeup for Averice, looking at “Wicked Queen” references and also “drag” makeup (which I find great for exaggerated Panto styles). In the end I picked the image that would give Fiona permanently bad tempered eyebrows.  I’m not a speedy MUA so although it would have been good to have fantastic eye makeup, there wouldn’t be time to do it and get Fiona dressed and crowned in time for curtain up.

head shot of makeup for a wicked queen
Makeup reference image – it’s the eyebrows you know
head shot of Avarice crown wig and makeup
Avarice Crown Wig and Makeup. See what I mean about the eyebrows?

I’m going to have to tell you about my bear costume and  the other bits I helped with in these Pantos in another post as I’ve run out of space and time with this one, watch this space.

Theatre Textiles – Act 2 Scene 2

Theatre Textiles – Act 2 Scene 2

This is a further Scene from my theme of costume and prop making for my local Amdram group, SNADS. The first one can be found here https://feltingandfiberstudio.com/2021/08/23/theatre-textiles-part-1/  followed by https://feltingandfiberstudio.com/2023/04/17/theatre-textiles-act-2-scene-1/

The next production for which I can remember making a costume was Sleeping Beauty in 2015.  I was asked to make the costume and do the makeup for Baskerville, the blood hound.  (You didn’t know that there was a dog in Sleeping Beauty did you? – How else did anyone find her inside all those brambles?)

After looking up some reference pictures (including one of Sir Clement Freud and his pet) I decided that the face would be part mask and part makeup.

Man - Sir Clement Freud and 2 bloodhounds
Sir Clement Freud and his look alike pet and another bloodhound – my reference images for Baskerville

The costume was in the main made from an old poly-cotton sheet which was a sort of mid brown colour with the odd dark brown markings in acrylic paint, and included a hood from which the long ears hung either side of the face. The mask was wet and needle felt, which covered the actor’s forehead, cheeks and nose, leaving large eyeholes.  This so that there was room for the eye makeup which revealed dropped lower eyelids.  The forehead had bloodhound-like skin folds, and the muzzle had my usual needle felted nose painted with Artist’s Gesso and then with black enamel.  The actor’s chin was visible beneath the mask so was made up to match it.

Boy on hands and knees dressed and made up to look like a bloodhound
Baskerville the Bloodhound

The next panto we did was Alice in Wonderland and I got roped into making bits for various animal costumes.  Unfortunately I don’t have any progress pictures and most of  the pictures I do have have been extracted from the DVD we had made of the show, so they are not of the best.  Hopefully they will give you a flavour of the costumes.

First there was the Cheshire Cat.  As with Baskerville, the cat’s body was made from an old cotton sheet, this time “dyed” ginger-ish with acrylic paint and with stripes added roughly following tabby cat images from Mr. Google (what would we do without him).

image of grey tabby cat face and brown tabby cat back
Reference images for tabby cat markings

The head and mask were also made from the same fabric and from felt.  The only photos I have of the Cat are of it inside a “tree”.  They aren’t very clear because the hole in the tree is faced with gauze so that you could only see through it when what was behind it was lit from that side.  This was so that the cat could slowly disappear as the light faded, leaving only a grin visible.

actor dressed and made up as Cheshire Cat and seen inside tree set.
Cheshire Cat inside it’s tree
actor dressed and made up to look like a grinning cat inside a tree set
more grins
Cheshire cat grin inside the tree set with 2 actors, (Dame and Joker) on stage
And just the grin, with Alice, the Dame (Alice’s nurse) and Joker (Queen of Hearts’ Jester)

Next there was the March Hare whose ears I had made from felt and attached to a felted hood; and the actor also used the muzzle with two front teeth that I made for her, also in felt.  Unfortunately it looks as if whoever did her makeup didn’t match the face colour to the mask so the Hare looks a bit odd.  This could be because the actor had a couple of other, bigger, parts in the panto, so her makeup needed to fit all three parts as far as possible.  I had made the mask so that it could be removed with the hood and that adds to the odd look I think.

Head and shoulders of actor playing Mad March Hare with felt ears and muzzle with 2 front teeth
March Hare with ears and teeth
actors dressed as Mad Hatter, Dormouse and Mad March Hare
The Mad Hatter, Dormouse (without his teapot) and March Hare in the final walk down.

The next and most testing task was the Hookah-smoking caterpillar and the subsequent butterfly which emerged from it. The script called for the actual metamorphosis to happen on stage, which was really going to pose a bit of a problem.  If this was going to work it would be necessary for the caterpillar costume to be worn over that of the butterfly.

In the story, the caterpillar sits on top of a large toadstool.   Usually depicted as a fly agaric mushroom – the one having a red cap with white spots.  This in fact is my scenery-making friend’s signature image and there are always some of these mushrooms somewhere about the stage in all our pantos (did you spot them at the bottom of the Cheshire Cat’s tree?)  Before the mushroom was made I asked that the back be cut away to enable the actor to be able to stand up against and behind its (chunky) stem.   I had decided that the caterpillar costume would be mainly affixed to the top of the mushroom and the head and “torso” would fit over that part of the actor which appeared above the mushroom.  The costume would have to be open down the back so that the butterfly could immerge from the caterpillar by stepping down and backwards.  I would need to make the butterfly costume first so that I would be able to fit the head and torso of the caterpillar costume over it with sufficient “ease” to enable her to get out of the caterpillar without assistance.

Again Mr Google helped me with reference pictures of a swallowtail butterfly, which I had chosen because of the lovely shape of its wings, and it’s caterpillar.

2 images - a green and black caterpillar and a swallowtail butterfly displaying its wings
Reference images for the caterpillar and it’s butterfly

I wanted the costumes to be as naturalistic as possible, which meant finding a way of making enormous butterfly eyes, remembering that the actor would need to be able to see through them.  I was sure that I had seen some half globes in clear plastic covering a large sweet, and after lots of buying and tasting (!) I found some, though I cannot now remember what the sweets were.  I made a mask which held these over the actor’s eyes and side of her head and which also covered the top and back of her head but left her nose and mouth free.  From the images on the DVD, it seems that I covered the globes in some way since it is not possible to see the actor’s eyes through them.  I can’t now remember what it was I used, but it must have been transparent at close quarters because the actor was able to dance around the stage without falling over the “little butterflies” which were dancing with her.

I made up the lower part of the face and I seem to remember making “mouth parts” and a version of the curled tube the butterfly uses to suck up nectar. These were attached to the mask between the bottom of the eyes.

head and shoulders of actor dressed as butterfly to give more detail of the head.
A very hazy image of the butterfly’s head (it looks as if she’s managed to dent one of the eyes, but I doubt that would have been visible from the auditorium.)

The butterfly’s wings, were painted white organza which had wire along the top edge.  I couldn’t add wire in the usual way the whole way round the edge of the wings because they would have to be squashed and held behind the actor’s back whilst she was still a caterpillar.  So we clad the actor’s arms and hands in black and she used her hands and arms to open and “flap” the wings.  This meant that the verisimilitude of the butterfly costume ended there – only one pair of legs instead of three.  I could have made some “pretend” legs to attach to the actor’s chest, but they would be likely to get hooked up inside the caterpillar costume and make metamorphosis difficult!

I made the caterpillar costume out of various bits of cotton fabric which I painted, and because the butterfly mask was quite large, the caterpillar had to be very large too.  The head of the real caterpillar is as wide as it’s body, which made that a bit easier.   I made it to fit right over the butterfly head and shoulders, with the actor’s black covered arms poking through as the first of the caterpillar’s six legs.  This was so that she could use the mouthpiece to smoke from the hookah which was sitting on a little green hump beside the mushroom.

Actor dressed as caterpillar with it's tail on top of fly agaric mushroom
Hookah-smoking caterpillar. You can possibly just see that the mouthpiece of the hookah is clutched in one tiny “hand”.
image of back of actor dressed as butterfly showing spread wings with empty caterpillar costume on top of mushroom and with Dame and Joker in background
The emerged butterfly showing off her wings. The empty caterpillar on the fly agaric mushroom is no longer smoking its Hookah and Nursie and Joker are seeing the little butterflies off stage.

Our next panto was Ali Baba.  I didn’t have to make any of the costumes for this.  I played the front half of Kamil, the clever camel, and when I wasn’t doing that, made up one of a trio of revolting looking gossipy women.

This was followed by “A Right Pantomime”, written by two of our members – “a comic conflation of almost every pantomime story you can think of.…”  I played one of Snow White’s dwarves (I can’t remember how many we were, but I don’t think there were seven of us) but wasn’t involved with more than helping with scenery.

I will end this Scene here, and yes I know that we still haven’t reached the Panto in which the Wicked Queen in the title image appears, but maybe next time.


FLEA THE PANDEMIC

FLEA THE PANDEMIC

Back in September 2020 I was asked if I would make a prop for a play which Taboo Theatre Company, a locally based actors’ collective, was to perform in November of that year, at The Exchange in Sturminster Newton, Dorset.  The play had been written especially for them by professional playwright Sue Ashby.  Sue has written, among other TV and theatre scripts,  episodes of Coronation Street (a very popular, long-running soap in the UK).  More details of Sue’s career can be found here  https://news.dorsetcouncil.gov.uk/dorset-history-centre-blog/2023/07/24/historical-plays-set-in-north-dorset/

You will no doubt guess from the dates that we were out of the first Covid19 lockdown, but still under strict mask wearing, social distancing and other rules and regulations. The play, “Flea the Pandemic Dorset 1348”, tells the story of the first Bubonic Plague to hit the UK; so, given that it was rat fleas that carried the Black Death, the prop obviously had to be a flea.

Bearing in mind that the stage at The Exchange is 23 feet (7m) deep and its proscenium arch is 40 feet (12m) wide, and that the hall it serves is 118 feet (36m) deep and normally capable of seating 301 audience members, making a flea that a full audience could see was going to be a problem.  This was to be a play not a pantomime, so having an actor play the flea was not going to happen. (I don’t think that it had been decided, at this stage in the proceedings, that most of the action would take place on a much smaller podium constructed on the floor of the hall.)

After some (socially distanced) discussion with Craig White (director) and Robert Cowley (actor/producer), it was decided that the flea should be about the size of a cat, and be fixed on the end of a long enough pole to allow the cast member, who had to control its movements between the (socially distanced) actors, to do so without getting closer than 6 feet to any of them.

If I remember rightly, it was at this stage that my husband Graham became involved, not only to provide the pole, but also to work out how to enable the flea’s head to move and for its eyes to light up bright red.

With the help of Mr Google, I found some reference images of fleas (cat fleas in the end because the oriental rat flea which carried the bubonic plague was not that different in appearance but seemed not so photogenic).  I enlarged a side view of a flea to fit on A3 paper, and having found a “full face” view of the head, I also enlarged that to a similar size.  Quite fascinating really in a revolting way.

coloured drawing of flea with body parts named
Reference Image, drawing of flea with body parts named
flea's full face head
Reference image – Cat flea head. Not “just a pretty face”.

I had initially thought to make the whole flea from felt, but, because there had to be batteries, wires and an electrical switch concealed somewhere about its person, I had to change my ideas somewhat.  I’m afraid that I do not have any progress photos, nor do I have any notes of how we proceeded.  This was before I joined the Studio and it didn’t occur to me that anyone else might be interested in how we did it.  Luckily The Flea  was not disposed of after the performances so I have been able to examine it to jog my memory of the steps we took to produce it.

The body of the flea was made from three pieces of dyed and stiffened calico – two sides and a belly gusset – with its segments and spiracles painted on.  This was stretched over carved lumps of polystyrene.  The switch and wiring for the eyes and the battery pack were attached to a 6 foot long metal pipe, where it passed through the inside of the body from the neck to the “tail” end.

image of inside of flea's body with battery box, batteries and on/off switch
Flea “innards” showing the battery box, batteries and on/off switch.

The head, which was separate from the body so that it could be moved, was needle felted from brown wool (I can’t remember the breed) with mouthparts made from painted foam, plastic wire insulation coating and more painted and stiffened calico.

image of flea's face again with beside it a drawing of the face and mouth parts
That “pretty” face again and the drawing of face with mouth parts.
image of felted flea head, with mouth parts and glowing red eye
The Flea’s head – I’m really glad that fleas aren’t the size of this one.

Graham had to come up with a method of allowing the head to move and the eyes to keep glowing red, all without breaking the connection between the eyes and the wires running from the battery pack or those wires being tied in knots.

The method he came up with sounded extremely complicated to me, but then I’ve never had to put lights in a miniature building or lamp post.  A circular piece of PCB (Printed Circuit Board) with a hole cut into the centre was attached to the flea’s “neck” at the top of the body, where the pipe was also firmly fixed.  The PCB had the ends of the battery pack wires, through which the current would pass, soldered to it.

The wires from the red LED eyes in the head were soldered to another circular piece of PCB  and the head was sewn to this (Graham having pierced suitable holes in it for the purpose).

The head was attached to a piece of wooden dowelling long enough to pass right through the neck piece of PCB and on through the pipe inside the body and protrude from the pipe’s “handle” end.  This ensured that, so long as the two pieces of PCB were in contact, once the eyes were “switched on” they stayed on until switched off again, even when the flea was “looking around for it’s next meal” as the actor twisted the end of the dowel.

image showing PCB pieces, with soldered wires on neck end of head and neck end of body with dowel protruding from it.
Graham’s solution to the problem of the glowing eyes.
image of dowel protruding from handle end of pipe
This is the handle end of the pipe with the dowel protruding from it with the “bits” stopping it pushing through and decapitating The Flea.

The belly gusset on the underside of the body, which allowed the switch to be reached and the batteries changed as necessary, was closed with extra large snap fasteners for convenience (in case the manipulating actor was male!)

image of snap fasteners used to close the belly gusset
The “man-sized” snap fasteners used to close the belly gusset.

The Flea’s leg segments were needle felted in the same wool as the head and wired, with the claw ends just being fabric covered and painted for colour and stiffness.  These were affixed to the flea’s thorax with wire and thread.

image of underside of the flea with closed belly placket and legs.
Closed belly placket and The Flea’s legs.
image showing front view of the completed Flea
The completed Flea – in mid jump?
side view of completed flea
Side view of The Flea – definitely in mid jump.

After we had handed The Flea over to Taboo, but before the play could be performed in November 2020, Covid raised it’s ugly head again and we went into the second lockdown.  As a result the performances were re-scheduled to the end of January 2021.  Unfortunately because of the post-lockdown rules and regulations, which effectively prevented The Exchange from re-opening in time, the play had to be postponed – again.

It was eventually performed on the 19th & 20th June 2021.

If you would like to see a critique of the play, try this link: https://www.theftr.co.uk/flea-the-pandemic-taboo-theatre-the-exchange-sturminster-newton/ It will tell you more about the plot, as well as the action.  Unfortunately the images which were originally posted with the review have had to be removed, but the reviewer, Gay Pirrie-Weir very kindly provided the four images of “The Flea Acting” which you see below.  I must say that it appears that the lighting techie has turned the actors and The Flea, as well as the set, purple.  I’m forever having this problem with costumes and props changing colour on stage – grrrr!

image of two actors one with The Flea landing on his shoulder
The Flea Acting – just coming into land.
image of two actors, one manipulating the flea and the other shaking hands with an unseen actor
The Flea still acting – hanging on to it’s victim’s shoulder – just!
Image of 3 actors, 1 manipulating the flea, 1 "driving a cart" and the narrator reading from a book
The Flea being “carted” inland, while the narrator continues the story.
Image of 2 actors - the narrator and the carter with the flea at one side
The Flea “resting” while the story continues.

Oh, and we mustn’t forget The Mayor – you will need to read the Gay’s review mentioned above to learn about him.

an actor wearing a brimmed hat and standing at a lectern
The Mayor (Boris?)
FANTASTIC FUNGI

FANTASTIC FUNGI

I don’t know if any of you are fantasy fiction fiends.  Some years ago now I read the first of a trilogy by Alan Dean Foster, called Spell Singer.  It was about a man in the 1960/70s who managed to slip through time/space to a different dimension of our world in which animals wore clothes and talked (including Mudge, the man-sized otter with a foul mouth!)  So why am I mentioning this?  Well part of the story took place in a marshy area inhabited by a lot of very depressed mushrooms and toadstools with faces, which moaned and groaned and exuded misery, which was catching!

My mind immediately trotted down the rabbit hole of needle felting mushrooms – with faces.  Mushrooms and toadstools of different varieties would have different temperaments and expressions.  I thought of the white spotted red capped Fly Agaric; plain red capped Gomphidus Roseus (with a name like that they would definitely look odd); white button mushrooms; brown chestnut mushrooms; large flat horse mushrooms; fairy ring toadstools and, eventually, bracket fungi.

So I was off.

I decided that the bases of the fungi with stalks would represent a piece of turf, probably woodland or scrub.  I had purchased, a few years earlier, some fibres sold for lining hanging flower baskets.  It never got used for that because the bulk of it consisted of sheep’s wool, and I considered that it would be wasted if used for it’s original purpose.  From the look of it, and of the quantity of “foreign matter” caught up in it, it was the sweepings from a mill floor or even a shearing shed.  (I think that this was a good way of using up what would otherwise be wasted.  Unfortunately I don’t think it’s available now.)

All the material was roughly dyed green but luckily so patchy was the dyeing that it was not a flat uniform colour.  The different thicknesses of the fibres, the kemp  and the vegetable matter all seem to have picked up different shades and tints of green.  Just what I needed.

To save on this precious material, I used some scrappy scoured merino bits as a base for the underside of the grassy humps I was making, and then topped them with the basket fibres, and needled the lot together.  I was delighted to find that, even close up, the result did look like a bit of scrubland grass.

In each case my fungi were to have faces and, hopefully, characters.  I thought that as they were all wearing hats/caps, I’d place the faces at the join of the gills and the top of the stalk.  I also decided that, rather than just a single lonely fungus,  I’d make families.

4 felted Gomphidus Roseus mushrooms with bright red caps and daft faces
Gormless Gomphidus Roseus mushrooms
3 Fly Agaric mushrooms. Red caps with white spots and faces with blue eyes
Fly Agaric Mushroom family – Granddad, Mum and Dad with baby
4 felted large flat mushrooms with hairy brown caps and black gills, with faces
Hairy Horse Mushrooms

The horse mushrooms are hairy, not because they were horse mushrooms but because I used some Herdwick fleece for the caps and didn’t know about shaving in those days.

In the end, the button mushrooms and the chestnut mushrooms not actually having any gills on view, I placed their faces on the top of their caps.  I also gave the chestnut mushrooms Fymo eyes – little painted and varnished balls on each end of a piece of wire.

3 large button mushrooms and one small mushroom with bright blue eyes
Buttons family
3 Chestnut Button Mushrooms with surprised blue eyes in the top of their caps with 2 baby buttons
Chestnuts. Looks like the Dad on the left has 2 wives and children – naughty!

The fragile, skinny fairy ring toadstools were to sit together in a circle, as they do, on a larger piece of grass with so much magic erupting from it that it became visible.  This was represented by whisps of iridescent trilobal fibre (of which I have lots.)  There was also magic appearing on the tops of their caps.  These were made from scraps left over from a large piece of white merino felt in which a large quantity of the iridescent trilobal was embedded.  (More about this felt at some time in a future post.)

Ring of tall thin white and iridescent toadstools facing inwards, with iridescent fibres in the centre of the ring
Magic Fairy Ring Toadstools – chatting. What about I wonder?

These were the main families I made, but in the end I did make quite a few solitary mushrooms and toadstools (perhaps that’s why they were so melancholy?)

It was while I was making the Horse Mushrooms, which have black gills and therefore black faces, that I started to think about bracket fungi and Welsh male voice choirs.  I can hear you saying “why?”  It was the black faces.  I am half Welsh. My mother’s family come from a South Wales mining valley, Ogmore Vale, and all my Welsh uncles were miners (hence the black faces), and they were all singers.  (I even got to go down a pit on a rare holiday to stay with the family when I was about 7 or 8 – and I cried for the poor ponies down there even though they were well looked after).  Anyway Welsh miners were magic to me, and having been thinking about magic since I made the fairy ring toadstools, I wanted to create a magical tree stump on which to grow a male voice choir of bracket fungi.

The inside of the tree stump was made up of part of a Jacob fleece which had absolutely refused to felt, and subsequently ended up in the cats’ bed – disappearing over time bit by bit into the middle of other needle felted items.  I covered the stump in more of the basket fibres to represent a rotting, moss covered piece of wood. Thanks to the unevenness of the core Jacob I was able to easily create a surface with the ridges and dips usually found on oak trunks.  There were also what looked like various entrances to the hollow centre of the stump.  I lined these with black or dark grey fibres to give them depth and added some mixed brown and iridescent fibres to represent magic escaping from the stump.  In two of these I also added a pair of (Fymo) eyes peering out at the world.

close up of tree trunk showing bracket fungi on left and 2 holes with eyes peering out
All that can be seen of the internal inhabitants

I added a sort of representation of tree age rings on the top of the stump, but also allowed the hole in the middle of it to remain and added a lot more escaping magic fibres.

Close up of felted tree stump showing top - tree rings and "overflowing magic".
Overflowing Magic

I made a lot of bracket fungi, both representing individual singers (baritones and basses – big and bigger ones)

close up of several bracket fungi with faces, large ones to the front, smaller towards the back
The basses and the baritones
close up of one large bracket fungus with face, blue eyes, large nose and open mouth showing toungue
Big Bass himself

And Tenors, since they were smaller, in groups of three.

close up of tree trunk showing 4 bracket fungi each with 3 faces
Some of the tenors

I know I researched a type of bracket fungus and was able to give them black “faces” on the undersides and brown tops with pale margins.  However I cannot remember what they were, nor can I find my reference pictures.  They may have been polypores of some sort.

Having made a batch of the “choir members” I needled them on to the stump, adding faces  with  singing mouths.  I attached the stump to an artist’s canvas board, 20” x 16”, which I had covered with a piece of cotton patchwork fabric, coloured in various greens, to represent the surrounding trees.  Originally I wanted to add a “dead man’s fingers” fungus, which could be conducting the choir, but at that time I had not heard of using an armature and it wouldn’t stand up on its own, so I gave up that idea.

A felted tree stump with bracket fungi with faces on a green background
The finished Tree Stump

My husband thought that the mushrooms would sell like hot cakes, but unfortunately I think I only sold one family.  I ended up giving the rest away, apart from the tree stump which I have retrieved from the attic.  I’d like to hang it on a wall in my workshop – if I can ever find a space large enough for it – if I can I might have another go at the dead man’s fingers.

Bags of Inspiration

Bags of Inspiration

Having just read Kiki’s tutorial  https://feltingandfiberstudio.com/2023/11/19/left-overs-yessss/ on using up prefelt scraps, it occurs to me that I may not have mentioned something we used to do at our Guild (Dorset Guild of Weavers Spinners & Dyers) mainly to raise funds for the Guild but also for fun.

When I attended the Stitch and Creative Crafts Show at the Bath and West Showground in Shepton Mallet (Somerset, UK) back in 2010  – I saw a stand selling (for £8.00 each) bags containing 35gr of silk fibres, yarns, fabrics scraps, carrier rods and cocoons in various colours, left over from old projects which, when put together, made a fascinating collection for future projects.  So fascinating that I bought three of them.

They must have made quite a bit of profit on them because they appeared mainly to be the “waste” from artwork.

At that time (when I was part of the sub-committee organising the Guild’s Exhibition and Sale of Work) we were looking for a Guild Project which could be part of the exhibition or something hopefully to help raise some funds.  Well, I thought, our weavers must have lots of off-cuts of hand woven fabric, not to mention warp ends.  Then there were the spinners who would have odd bits of spun and unspun fibres of all types and colours.  We also had members who were dressmakers, beaders and embroiderers, and a soft furnisher, who were bound to have the odd bits and pieces that they didn’t really need.  So, with the blessing of the committee,  I put it to the members in the next newsletter that if they would donate to the Guild any odd bits of fibres, yarns, threads, warp ends, bits of fabric, beads, button, feathers, felt, cords, braids, tassels, sequins, sequin waste, ribbons, silk flowers and any other bits and pieces they could think of, we could make up some “Bags of Inspiration” and sell them to members of the public at our open days and outside demonstrations.  (I don’t know about in the rest of the world, but in the UK the word “bags” means “lots of” as well as “containers”, so the punning name “Bags of Inspiration” seemed apt.)

We used A4 sized polythene bags (which I was able to buy quite cheaply from our local green grocer) with an A4 sheet of card inside for stiffening, and I made up some stickers with the Guild’s logo on and a brief description of the contents, and posters also giving details of the contents.

Image of a poster detailing contents of a Bag of Inspiration
Bag of Inspiration Poster

We arranged a few bag making days at a pub in the village where our then President lived.  She had persuaded them to let us use their skittle alley at no charge, and we had a great deal of fun making up the bags and tucking in to “refreshments” from the bar and kitchen.

The members who came to these, brought with them all sorts of goodies which we spread out on tables, so that we could make collections of pieces which seemed to go with each other.  Those who didn’t think that their colour theory was good enough, could pick out a picture from a selection of magazines and have a go at matching colours from this  It was amazing how compulsive making the bags became.  You could pick up a piece of fabric that looked so dull and dreary and be amazed how it perked up and positively shone with life when paired with different fabrics, yarns, trimmings etc.  You just couldn’t stop picking up likely bits.  The difficulty was keeping the weight of each bag between 80gr and 100gr, so we quite often ended up making up at least 2 bags with similar contents.

image of tools and accessories for making up Bags
Equipment & Extra “Bits” for making up Bags
Prospective contents of a Bag of Inspiration - fabrics, yarns, fibres etc.
Prospective contents of at least one Bag of Inspiration

We put a price of £3.50 on each bag and they went like hot cakes – we sold out on their first appearance at our exhibition and sale of work.  Embroiderers and mixed media artists in particular liked them.

After a couple of years, we didn’t get so many volunteers to make up bags but we still had mountains of “stuff”.  So we added another string for our open days – Pick and Mix Your Own.  I had remembered that Woolworths (now there’s a blast from the past) used to have a counter full of different sweets and you could take a bowl and pick and mix what you wanted, and in the process buying a lot more than you would have if just buying a ready filled bag.

Boxes of different sweets to be picked and mixed
Pick and Mix Sweets.

It worked with our stuff too.  We gave the visitors the polythene bags and they could wade through all the bits and pieces picking what they needed, and we weighed them when they’d finished, charging £3.50 for 100gr.

We had had a lot of fibres donated so we started making up what are now called Art Batts and selling them as “Batts of Inspirations”, but because we were mainly selling these to Guild spinners and felt makers, they didn’t do quite so well as they were mainly able to make their own.

In all we made around £1000.00 for the Guild in the four years we were doing this.  Eventually though the members got fed up with spending time on making up the bags and the whole thing was shelved, as the Guild seemed to be relatively well off at the time.

Some time after that I took the idea back to myself and I was making up Batts to sell at Guild meetings, using luxury fibres as well as merino and synthetic fibres.  I made up some bands to fix around the Batts detailing the various fibres included in each.

This slideshow requires JavaScript.

I was also making up and selling Bags, mainly at a Needlework Festival in Dorset where most of the vendors were selling materials and equipment for crafters, as well as various craft fairs and so on.

This slideshow requires JavaScript.

I was getting the odd question like “they’re lovely but what do you do with them?” and  “can you make a bag out of what’s in here?”  So I made a sign from images of items that I’d made myself over the years and that helped.

Image of items made with contents of Bags of Inspiration
Some of the things I’ve made with the contents of BoI over the years

However, once Covid started causing problems, my selling opportunities dried up.  I had been intending to try selling Bags and Batts via my website, but it was very difficult and too time consuming to photograph the Bags so that the contents were visible, because of reflections on the polythene bags.  So that sort of died a death too and I’ve now shelved that project, and am using the bits and pieces I’ve collected over the years on theatrical costumes and props.

Perhaps some of our readers’ organisations, like Ann & Jan’s OVWSG, might use this idea to raise funds?

Local Heraldry

Local Heraldry

Ever since I had visited Kew Gardens as a child and seen the statues of the Queen’s Beasts lined up outside the great Palm House, I have been fascinated with heraldic animals and heraldry generally.  [https://www.kew.org/read-and-watch/the-queens-beasts]

When we moved to Sturminster Newton, every day I came home over the mediaeval bridge I saw the Town’s Coat of Arms.  We have a large (about 10ft high) coloured display of these Arms marking the entrance to the town.

In 2007, when I’d reached the age of 60 and reduced my working days to just 3 days a week, I was looking for something to keep me occupied.  By that time, I had met our Town Crier, who when not Crying worked in a local store.  Kevin Knapp was a popular figure, regularly opening events and leading processions in the town.  He had also won numerous Crying competitions.

2 images of Kevin Knapp. On left he's leading the Town's 2008 Remembrance Parade. On Right he is posing in front of the Sturminster Newton Mill
Town Crier Kevin Knap – Left: Leading the Town’s 2008 Remembrance Parade. Right displaying his costume in front of Sturminster Newton Mill

Having inspected Kevin’s Crying uniform, I realised that he had lots of different badges, most relating to awards he had won but also the County Arms, but not the Town’s.  I thought that this could be a project to keep me busy, having consulted Kevin who said he’d be pleased if I could make a badge of the Arms for him.

After a visit to the Town Council offices, where I had discovered that the original Letters Patent – the deed granting the right to use the Arms – were held, I asked the Council formally for permission to photograph the Deed and to make the badge for Kevin. Once I had received permission, I went, with my husband, to the Offices and we photographed the Deed. That wasn’t easy as the Deed was housed in a purpose made, glazed, cabinet which hung on the wall in the Council Chamber. Eventually we managed to get a reasonably clear picture without too many reflections on the glass.

Image shows hand written Deed - Letters Patent - with images of the granted Arms and Badge painted on it
The original Letters Patent showing the Arms granted top left and the Bull’s Head badge bottom centre. The other Arms shown are those of the three Heralds who made the Grant.

The Letters Patent, couched in the archaic style of the Norman French which characterised early English deeds (though thankfully not totally in that actual language) was dated 1st September 1961. It evidenced that three English Kings of Arms – Garter Principal King of Arms,  Clarenceux King of Arms and Norroy & Ulster King of Arms. authorised by the Duke of Norfolk – Earl Marshal and Hereditary Marshal of England – granted to the then Sturminster Rural District Council “such Armorial Assigns and in the same Patent such Device or Badge as may be proper to be borne and used by the Sturminster Rural District Council and by its successors constituting each for the time being the local authority for such place and district on Seals or otherwise according to the Laws of Arms” (note the lack of punctuation – typical of legal documents in this country even today); hence the right of Sturminster Newton Town Council to use the Arms and also the Bull’s Head Badge. The Badge’s primary use would be to mark the Council’s property (including, some 800 odd years ago, it’s serfs, servants and men at arms!)

Image of a Bull's Head within a ring with "sun's rays" around the outside, all in Gold with black outline
The Bull’s Head Badge painted on the Letters Patent

The actual words of the Letters Patent describing exactly what was granted are: “Vert [green] a Saltire [diagonal cross on a shield] Wavy Argent [silver] between in pale [one above the other] two Crosses Moline [having jagged ends] and in fess [horizontally] two Garbs [sheaves of corn] Or [gold] And for the Crest [device sitting on a helmet] Out of a Coronet composed of four Ears of Wheat and four sprigs of Oak fructed [with fruits] set upon a Rim Or [gold] a Mount Sable [black] thereon an Heraldic Panther statant [standing on all 4 feet] guardant [shown full face] proper [lifelike colours(!)] Mantled [with cloth on helmet] Vert [green] Doubled Argent [on the reverse silver/white]” and the “Device or Badge”: “Within an Annulet [hollow roundel] Reyonnée [with sun’s rays] Or [gold] a Bull’s head caboshed [without a neck] Gold”. The Arms and the Badge were also drawn on the Deed for further reference.

Having got all this information from the Deed I started to prepare a working drawing indicating what stitches, yarns and cords I would be using.

A drawing of the Coat of Arms in outline with lists of goldwork stitches and indications of where these are to be placed
Working Drawing – you may be able to decipher my scrawl of what I was intending to do at that stage.

In doing so, I realised that the Heraldic Panther was a very odd creature: it appeared to have orange flames coming out of its ears and mouth and it was spotted – red, blue and green spots!

drawing of heraldic Panther, yellow body & face, with large blue red and green spots on the body and flames coming from ears and mouth
The Heraldic Panther painted on the Letters Patent

So I headed to the library to see if they had any reference books which might throw some light on this.  Luckily there were several in the catalogue, but none at our local branch, so I would have to wait for one to arrive.  When It did I was able to find that the flames were a mistake made by the artists painting the arms on early Letters Patent.  In the book there is a reference to the Garter King of Arms writing in the early 17th century regarding the Heraldic Panther: “this beast … is admired of all other beasts for the beauty of his skyn being spotted of variable colours; and beloved … for the sweetness of his breath that streameth forth of his nostrils and ears like smoke, wch our paynters mistaking corruptly do make fire.” Further reading indicated that the origin of the panther was likely to have been a cheetah, hence the (guessed at coloured) spots.  You will note that I was down another rabbit hole!

Well our panther was shown on the Arms as having flames coming from his ears and mouth, so that’s how I’d got to depict him.  It was also then that I realised that the Arms as granted were not exactly the same as the Arms currently used by the Council.

You will see that in the current version of the arms, the Bull’s Head Badge appears five times on the mantle, which has been altered to enable the badges to fit. (The mantle represents the cloth which the Crusaders wore over their helmets to ward off the rays of the sun)

Apparently the then Sturminster R.D.C. decided to use it to decorate the actual Arms instead of to mark it’s property (and/or servants!)

After some manipulation of the photograph of the Deed I managed to get a reasonably clear image of the Arms and could make a tracing to use to transfer the design to the background I had prepared

During the time that I’d been waiting for the book, I contemplated the fact that the actual badge would be very much smaller than the original tracing and I’d be lucky to be able to carry out all the various stitches I’d originally envisaged, and I wondered if I might make some of the badge in felt.  I needed to make a “sketch”.  Using a piece of old blanket as a base, I transferred the design and filled in some of it in needle felt.  I thought that this would work.

image of partial needle felted coat of arms
The partially needle felted “sketch” of the Arms

It would certainly make life a bit easier as I was not very experienced in gold work and doubted that I could do a good enough job in the smaller scale. As it was I managed to lose the “jagged” ends of the two gold crosses and the Saltire was not really “wavy”. It was supposed to be a nod to the river Stour, which divides Sturminster from Newton (which despite it’s name is in general the older part of the town).

In the end I felted the Helm, with the gold Rim and the Panther. I also padded the sheaves of corn. Here’s a progress picture and another with felting needle which will give you an idea of the actual size of the whole thing.

Once I was reasonably happy with the shape of the helm, I painted it with artists’ gesso and then (when it was dry) sanded it as smooth as I could get it.  Then I painted it with some of my husband’s metallic enamel paint to represent steel. (Can you imagine what a squire’s life must have been like sanding and polishing a suit of armour and weapons made of steel to get rid of and keep it free of rust? – no stainless in those days.)

It did take some time to complete the badge – some 4 years in fact although I wasn’t actually working on it all the time.

Image of finished Coat of Arms with full coloured green satin stitch, silver and gold work.
The finished Badge

Oh I nearly forgot – the motto “Quis Metuit?” means Who’s Affeared?  It is apparently used by many local authorities – I’m not sure why though and, for once, the question defeated Mr Google.

The Town Council, in the form of it’s Leader, formally presented the badge to Kevin on 30th November 2011.

Image of three people - Left Charles Fraser, the Author and Kevin Knapp, he being presented with the completed badge.
L – R: Charles Fraser, Town Council Leader; Me; Kevin Knap at the presentation of the Badge. The picture above my head shows Sturminster Newton Station as it was in the days of the Somerset and Dorset Joint Railway.

Kevin decided that rather than attach the badge to his coat, he would affix it to the back of the roll containing his Cry so that it would be visible when he was reading from it.

Sadly Kevin died on 9th October 2018.  His wife donated his costumes (which she herself had made) to the town’s Museum.  I’m not sure what happened to the Badge though as the Museum doesn’t have it.  The position of Town Crier remains vacant.  If you are interested, I’ve found an obituary for Kevin published by the Bournemouth Echo.  https://www.bournemouthecho.co.uk/news/16998263.kevin-knapp-died-earlier-month/


The Bull

The Bull

We have three public houses in Sturminster Newton (at one time there were 11 in our small market town!) and The Bull Tavern is one of the oldest. The building consists mainly of a 3 roomed 17th Century cottage with an attic room, built of old timber infilled with wattle and daub. Some additions were made in the 18th Century. Records show that the cottage was definitely an alehouse by the late 1700s. Apparently there was a slaughter house at the rear and a Pound where straying animals were kept until collected – upon payment of a fee of 1 shilling (which must have been a fortune when you consider that a married man’s weekly wages at the Town’s Workhouse were all of 9 shillings and a single man’s only 6). Part of the C18th additions was a stable block (which eventually became a skittle alley and later part of the restaurant of the pub). It is rumoured that the horses stabled there were used to help get carriages and carts up the adjoining steep hill leading to Sturminster Common and the small community of Broad Oak.

The building, known to Thomas Hardy (one of our famous inhabitants) as The Old Bull Inn,  is shown on the earliest known map of the area dated 1783, as being part of the Pitt-Rivers Estate.  You can learn more about the Pitt-Rivers family here: https://www.dorsetlife.co.uk/2012/04/sturminster-newton-and-the-pitt-rivers-family

About 18 months ago, after our then favourite landlords moved from the White Horse Inn in Hinton St Mary, the pub was closed for refurbishment. Hinton is a village about 1.25 miles away, where the Pitt-Rivers manor house is situated.  We used to walk there 3 times a week – our exercise with benefits – but since the benefits had disappeared we decided to patronise The Bull – for our exercise of course.  The only trouble with that was that it’s uphill on the way home whereas it was down hill from the White Horse.

During that time we had come to enjoy the chats with Marianne and Lance, the Bull’s managers.  Lance being the very good chef, and Marianne “Front of House”.  Early in January 2021, they announced that on Christmas Day they had got engaged.

One of my felt paintings – commissioned by a mutual friend –  had been given to the White Horse landlords as a wedding present a few years ago, and Graham, my husband, suggested that I do something similar as a wedding present for Lance and Marianne.

Felt picture of sepia tint image of old public house
My interpretation of an early image of The White Horse, Hinton St Mary

Although The Bull itself is a very interesting building, I wondered if I should do a picture of an actual bull for them. No date had been set for the wedding at that time, but I thought I should at least start collecting reference pictures, both of the pub itself, including some of their Pub sign and of some animals. I thought about breeds that might have been around in the 16th Century – White Park Cattle and black Gloucesters; and also looked at Herefords since that was the breed on the Pub sign.

image of Bull Tavern sign with hereford bull above image of the public house
The Bull Tavern and it’s sign
image of black bull with winners rosettes and image of large white bull
Gloucester and Park White Bulls
image of hereford bull head, image of bull grazing, image of bull in field
3 Hereford Bulls. I eventually picked the one at top left.

In the end I decided on a Hereford bull. After a lot of thought and manipulation of pictures, and also starting on a background field for the bull to stand in, I still could not come up with a layout that I was happy with. One idea was to surround the image of the bull with cameo pictures of nearby local landmarks – the water mill and the mediaeval bridge – with perhaps an image of the pub itself as well.

Then, just after Christmas 2022, Marianne said that they had set the date for the wedding – 10th June 2023.  Now I had to get my ideas together and get on with it.  The picture would need to be simplified if I was going to get it done and framed in time.

It was about then that my picture of the horse on the hillside in Devon was finished and it occurred to me that I could use a similar method of producing a figure with more depth.

image of felted horse on background of trees and stream
Detail from my Glorious Devon picture showing the horse added to the finished landscape.

  I finally decided upon a cameo type picture of the bull’s head and shoulders and I would use the background which I had made back at the beginning of this saga.  I would paint (with wool) the shoulders and neck and outline of the head on to a piece of flat wet felted core fibres.  With a separate face and ears, and a further separate set of horns and the nose on another piece.  I would cut all of the pieces from the backing when these were substantially finished.  I would fix the torso and neck onto the original background and layer on the face and ears, horns and nose, then I would do the final titivating and framing.  I made a start and here are the initial progress pictures:

This slideshow requires JavaScript.

As I said earlier, it was intended that this picture would be a wedding present for Lance and Marianne, but at the beginning of April this year, they told us that, because of various unforeseen difficulties arising out of successive pandemic lockdowns (which included them catching Covid between lockdowns so having to shut the pub again)  they had decided to give up the tenancy of the pub.  They had obtained a job, with accommodation, managing a Touring Caravan Park in Cornwall.  Marianne was leaving almost immediately and Lance would stay on for a couple of weeks, with his last trading day on the 19th April.  So the picture was going to have to be a leaving present.

That caused a bit of a panic at home as you can imagine, so I had to get my head down and finish it NOW!  These were the final steps;

This slideshow requires JavaScript.

I managed to finish the picture and, with Graham’s help, I mounted it in a deep box frame in time to hand it over to Lance on the 19th, when we went in for a final lunchtime meal.

So here’s the completed and framed picture – my entry for the 2023 Third Quarter Challenge – Something Special About Our Town.

image of felted bull head and torso on a field and sky landscape in wooden box frame
Finished and framed.
Craft Basket Makeovers – part 1

Craft Basket Makeovers – part 1

A good few years ago now, after I had acquired and learned how to use my spinning wheel, I was casting around for some means of storing the associated equipment in a reasonably respectable way.  The wheel and associated bits lived with us in our living room and needed to be tidy.

Quite by chance I came across a shop selling off cheaply a large deep cane laundry (I think) basket.  It was only going cheap because one of the handles was broken and it had no lid.  The much reduced price compensated for something which was no problem as far as I was concerned.

I used to work in Maidstone (Kent) and nearby there was a lovely shop called C&H Fabrics (sadly no more) which sold both dressmaking and curtain fabrics and haberdashery.  I could never bypass their remnant section – they almost always had something good and large enough to be really useful.  I managed to purchase several large pieces of curtain fabric of a design which was really “with it” at the time (most rarely  for me, I am usually following several years behind fashion fads).  This was during the time when Macramé made it’s first appearance and I was very “into” this.  So I removed the remaining cane handle and instead added two twisted cord macramé handles.

laundry basket without lid, with macramé handles, filled with spinning equipment


Then I set to and lined the whole of the basket using the curtain material, making sure that there were pockets around the sides of sufficient size to take threading hook, spare bobbins; flyer; carders; ball winder and my Neatsfoot oil – my wheel had a leather connection between the treadle and the footman – the bits that actually drive the wheel, and the neatsfoot oil is a good natural conditioner for leather and ok for oiling the metal parts.  The rest of the associated bits – fleece, box of carded rolags, tea towel used as a lap cover, cord for tying skeins and niddy noddy would just sit in the middle.

Now I needed a lid for the basket to keep the dust out (our bungalow was very dusty because part of it was still a building site).  So I cut two circles of the fabric and a circle of wadding.  I attached the wadding to the wrong side of one of the circles, by machine quilting around the pattern/motifs printed on the fabric. On the other circle, which would be the underside of the lid, I added a zipped pocket.  I then finished the lid by stitching the circles right sides together with another length of macraméd cord attached to one side.  Then, after turning the circles the right side out, and hand stitching the turning gap, I attached the other end of the cord to the basket. The lid sat on top of the basket with everything safely inside; well except for the niddy noddy which was too tall and had to stick out of the side, so it made do with a length of cord to attach it to the basket.  My brother in law had made the niddy noddy for me, having already made one for my sister.  It is purposely on the large side because each circle of a skein wound on it would be 1 yard long.  This made it easy to calculate the skein’s length.

Lined spinning basket with lid folded open to shop equipment in pockets
Finished basket open

Finished basket with closed lid to show quilting, with niddy noddy poking out of top.
Finished basket, closed.

The fitted out basket sat comfortably by my chair and spinning wheel while I was working at home, but was a bit big to take with me when I went to my spinning group each week. Luckily my sister, having visited the Willows and Wetland Centre on the Somerset Levels, gave me a large basket which she had bought there.  The Levels is a large flat low lying area where Withy Willows have been commercially grown for basket making for at least the last 200 years.  In fact willow baskets and other items have been made there since pre-Roman times.  If you are interested there is more information on the area here: Somerset Levels (As an aside, Glastonbury Abbey, also referred to in the link, used to own much of Sturminster Newton where I now live, despite Shaftesbury Abbey being much nearer to us and owning most of the rest of the surrounding land.)

But I digress.  The basket which my sister gave me was intended as a picnic basket.  It was short and wide and it’s carrying handles positioned so that it was carried flat.

picnic basket on lawn with handles up
See how the handles work to carry the basket flat?

It was just what I needed to carry tops (roving?) and spinning equipment when I was away from home.  Of course it needed to be fitted out with pockets to keep everything tidy and safe.  I had sufficient fabric left of the remnants used for the large basket to make them match.  I lined the base of the basket adding pockets at one end for flyer and bobbin, lap cover and oil.  I didn’t want to spoil the look by using the plastic box for my rolags and by then I had learned basket making courtesy of the WI.  So I made a basket to fit, lined it and made a lid with more of the fabric.  The lid of this little basket was quilted in the same way as the lid of the large basket, and also attached with macramé cords made from fine crochet cotton, with a wooden toggle closure.

small handmade cane basket with fabric lid attached by macramé cord with macramé and wooden bead closure
Rolag basket in the sun

By this time I was also “into” Tunisian Crochet. I had been making ordinary crochet items for as long as I could remember but fell for this new (to me) technique. So in addition to storage for threading hook, personal bits, glasses etc., I needed storage for at least one Tunisian crochet hook – this looks like a knitting needle, but instead of a point it has a hook. I also needed somewhere safe to put large sheets of paper patterns, as I tend to use diagram type patterns and they take up a lot of room. So I set-to to line the lid of the basket with just one layer of the fabric, but with pockets, short & fat and long & thin attached. I sewed this onto the inside of the lid but left one of the shorter ends unattached so that I could tuck paperwork etc., inside.

Open lined picnic basket showing lid lined and with pockets, and with rolag basket and other equipment in the basket.
All my equipment (almost) in the basket.

Incidentally, the sharp eyed amongst you may have noticed that odd bit of hooked wire tucked away in the longer tube/pocket and be wondering what it is.  It’s a do-it-yourself lazy kate – a device for assisting with plying yarns from one, two or more separate bobbins.  An old shoe box (or a basket) and this bit of wire are all you need, poke the wire through one end of the box, slot the bobbin(s) on and poke the wire through the other end of the box.  It’s not the best way to do it, but if you put some tension on the yarn by passing it from the bobbin around the wire once before taking it to the wheel for plying, it works.

Oh and a quick boast – can you see the handle of the threading hook poking out of one of the lid pockets?  The handle was actually a light pull which I had made while having a go at wood turning some years earlier, and the hook is only an unbent paperclip – but it works ok too.

So that was my basket set up and ready for journeys.  Oh yes, the niddy noddy.  That was too big again, so it had to sit on top.

Closed picnic basket with niddy noddy on top attached by cords but with handles down.
Basket with niddy noddy (but the handles are down so I’ll have to remove the niddy noddy, put the handles up and replace it because the right handle won’t go over the end of the niddy noddy – then I can pick up the basket.)

Eventually the cane hinges of the lid, and the cane closure wore out so they were replaced with macramé cords.

Some time before I moved from Kent to Dorset in 1999, I wrote an article about these baskets and submitted it, with photographs, to the Journal for Weavers Spinners & Dyers as I thought it might be of interest to them.  Apparently not though; I eventually received a letter returning the photos (but not the article, so I’ve had to rewrite it!) and saying “… the Editorial Committee … felt that the article was rather too indirectly concerned with weaving, spinning and dyeing ….”   Oh well!

Theatre Textiles Act 2 Scene 1

Theatre Textiles Act 2 Scene 1

After our move to The Exchange,  as mentioned in my first post  there followed several years’ worth of productions in which I was not called upon for costume assistance although I regularly helped my artist friend who designed and painted the Panto scenery, and assisted with makeup.  I once got the chance to make a giant beanstalk for our “Boy and Some Beans” Panto, after which I quite often was given the “head gardener” position whenever the scenery needed “vegetation” in addition to the painted sort.

In the mean time, and for several years running,  SNADS were asked to put on some form of Haunting for the Halloween weekend  at the local ruined mediaeval Wardour Castle.

Wardour Castle

Each year we wrote a short play, the various scenes of which took place in different spaces within and around the castle and it’s stone grotto, and 2 or 3 performances would take place each night over the nearest weekend to Halloween.  This was great fun, even if decidedly cold and/or damp on occasion, and we actually got paid for doing it!  It enabled me to expand my special effects makeup, which I had learned about at a theatrical summer school.  It was there that I learned of the amazing things you can do with gelatine and porridge oats!

I always liked to be a witch or a ’orrible ’ag as this gave me greater scope for doing ’orrible makeup and practicing my witch’s cackle!

Zombie face made up with gelatine and oatsPorridge anyone?

image of Halloween prop skull and skeleton hands beside zombie actorMe and a Friend (that’s me on the right)

I was tasked with making a prop for our 2010 Panto Arabian Nights.  The Sultan had a tame rat, which I was asked to produce as a hand puppet so that it could open and shut it’s mouth and wave it’s paws in a menacing way, and it was to have eyes that would light up red.  This of course I made in felt (wet and needle) and my husband provided the tiny red lights for the eyes from his model railway stock.  To make it more believable I needled a false hand onto the back of the rat and the section of arm extending from that hand covered the actor’s own arm as it disappeared inside his sleeve.  From the auditorium it was not really clear that the hand holding the rat was not the actor’s own, except that it was not the quite same colour as his real hand – which should have been made up but wasn’t.

Image of actor as Sultan with rat puppet and image of sultan, rat, captive dancing girl and Sultan’s chief wife
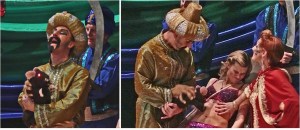
The Sultan’s pet rat

For the same Panto I was asked to make up the Genie.  Here he is with a camel.  (I didn’t have anything to do with either costume though.)

image of pantomime camel head and genie in turban wiping camel spit out of his right eyeCamel and Genie

I was actually the front legs of this camel in our 2017 panto Ali Baba – great fun but tiring because my head was in his front hump and my arms were up his neck, holding up the head with one hand and using the other to poke out his tongue!  This is the least tiring two person panto animal we have, at least for the back legs actor, because s/he is able to stand up with his/her head inside the second hump (it’s a dromedary).

In June 2013 the Society obtained permission to perform Terry Pratchett’s Monstrous Regiment.  This is the one which is (loosely) based on the story of “Sweet Polly Oliver”, as she is called in the old folk song. She joined the British Army, dressed as a man, to try to find her brother, who she had looked after as a boy.  (The “Monstrous Regiment” of the title comes from a pamphlet written by John Knox in the 16th Century – a “gentleman” who I think would have felt quite at home in today’s Afghanistan in regard to his attitude to women.)  In addition to the Company’s enlisted “men” – all women pretending to be men –  the Company boasted a (female) vampire and a mountain troll (also female, but it is difficult to tell the gender in the case of trolls).

I was cast as the troll – Carborundum by name.  Mountain trolls are actually living rocks and I thought that I could do something with the costume for that.  I had, a few years earlier, needle felted some bas relief gargoyles/water spouts using mixed bats of Jacob fleece, which actually looked like stone – as long as you didn’t get close enough to see that it was hairy, I should have borrowed my husband’s razor!

Corner Gargoyle/Water Spout – The original of this water spout is attached to the corner of a church tower in Hinton St Mary, the village just up the road from where I live.
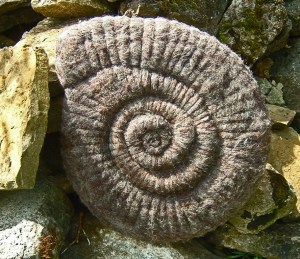
So I thought I could use felt, but what to attach it to so that it looked like rock and not clothing?  Well, a couple of years previously my Guild (Weavers Spinners & Dyers) held a special exhibition as part of the Dorset Arts and Crafts Association annual show, which was entitled Dorset Coast and Country – or something like that.  We had a whole room to ourselves and we filled it with exhibits depicting the county.  The Dorset coast is actually part of the Jurassic Coast – a World Heritage Site – and runs from Orcombe Point in Exmouth, Devon, extending east for 95 miles to Old Harry Rock, near Swanage in Dorset.  Therefore we had to include some exhibits around this.  I made a giant ammonite in needle felt and it was formed on a base of foam pipe insulation.

needle felted sculpture of ammonite leaning against some rocksAmmonite

So I knew that if I could find some grey foam I could make the troll’s costume out of that with felted embellishments.  Now I wonder where I got the foam from – silly question, as a needle felter I had been collecting foam in various sizes and thicknesses for ages.  Anyway, I put together a rocky costume, complete with some “moss” and embroidered lichen. I made up my face to be more flat planes than chubby me and this is the result.

actor made up and costumed to look made of stone – head & shoulders onlyCarborundum

Front row: Troll, female vampire trooper, Back row, officer and sergeant “baddies”


Terry Pratchett himself actually came to our Saturday night performance and obviously enjoyed it – he gave us a standing ovation.

Terry Pratchett talking to Troll with more cast behindCarborundum chatting to Terry Pratchett

I got to wear the costume at the Haunting of Wardour Castle that year and actually managed to frighten some of the punters when a chunk of the grotto turned round and glared at them!

Watch out for Act 2 Scene 2 sometime soon, when I might actually get as far as telling you about the Wicked Queen in the title image.


GLORIOUS DEVON – IT’S FINISHED! (Almost)

GLORIOUS DEVON – IT’S FINISHED! (Almost)

At the end of the third post https://feltingandfiberstudio.com/2022/08/20/glorious-devon-part-3/ regarding this picture, I left you with an image showing you where I had got to when I had to stop because of a very painful shoulder. This is the image:

 pile of blended fibres in different colours, part of the original photograph, part of the felt painting, the felting cushion, the needle felted horse, a pair of scissors and a pair of glasses
At the End of Part 3

After some months during which the pain moved from my shoulder down my arm and into my wrist, I became pain free (relatively) and was able to finish the picture.  Here are the final steps which I took to achieve that.

You may recall from Part 3 that I had decided that the horse, which was the focus of the picture, would be created separately from the picture and added at the end; and that I had got to the stage where I was about to do that.  So now I needed to position the horse on the picture.  After trying a couple of slightly different spots, I finally decided where I wanted it to be on the picture.

the felt painting with horse in position held by a felting needle; mini carder full of green fibres on left.
Initial Placement of Horse

Here you will see the horse sort of held in place with a few swift jabs with a needle.  I have moved his tail so that it doesn’t get in the way while I am fixing him down.  I needled the surplus felt at the end of his feet and muzzle into the picture and then covered the white felt with more of the green mixture.  I also needled the lower parts of his legs.  Then I needed to sew the main part of the body to the picture – to avoid him falling out of it.  I used the linen thread that I had previously attached to the back of the body.

Image of the back of the picture with linen thread protruding from it.
Securing the Horse – view from the back

And this is a close up of the horse fixed in place .

Close up image of the horse attached to the picture.
Horse in Place

It was about now that I remembered that the original picture showed a pied wagtail in it near the horse, and that I had wanted to include one if I could.  So I looked up some reference pictures and saved three as they showed me the size that I would need to make the bird in the picture.

Composite picture of the images of pied wagtails with horse.
Reference Pics – Pied Wagtail

And here’s a close up of Willy Wagtail.

Iimage of corner of felt painting with wagtail near horse’s nose.
Pied Wagtail in Place

And that was it, done.  That is, I managed to stop myself “titivating” after I had tidied up some of the background.  I straightened the horse’s ears and smoothed his tail to allow for the appearance of it being stirred by a breeze, and mounted it. 

Completed felt painting mounted on dark green mount board.
Finished and Mounted Picture

Unfortunately, despite umpteen attempts under different lighting, the photograph shows the mount board as blue rather than green, although strangely it doesn’t seem to make much difference to the colours in the picture.

I took the mounted picture along to our local camera shop – which also does bespoke framing – to have the picture properly framed.  The horse, added on top of the bas relief picture meant that they would need to use a deep box frame, but they were to get some samples for me to choose from.  Unfortunately they didn’t, they went ahead with what they had, which resulted in the horse being pressed up against the glass (and I had made it clear that I did not want that to happen).  They had also sealed the frame so that I couldn’t get at the picture (which I had also insisted should not happen because I would need to make sure that the tail and ears were positioned correctly before it was finally sealed).  I found this very disappointing and I was not prepared to accept it, so the picture was removed from the frame and returned to me, along with my deposit.

The picture spent the Christmas and New year holidays sitting in our living room beside my other pictures, while we decided on the next step.  At the time of writing this, I have just returned from taking the picture to a “proper” picture framer. Having spent some time with them deciding on the change of mount board to a forest green colour and choosing a frame which would compliment the picture,  I am fully confident that the result will be just as I want it, and worth the higher cost.

I had hoped that by the time this post was to be published I would be able to add an image of the framed picture, but unfortunately it is not yet ready for me to pick up. I will however put up an image in the 2023 First Quarter challenge section – I have been working on this since late 2020/early 2021 so it must have been a UFO!

Now I can get on with the next picture.