Trying To Organize My Stitching Projects
Lately I always seem to have several stitching projects going on at the same time and I have found it helpful to use one basket per project to store my threads, etc. in. I have a friend that makes lovely pine needle baskets and I have mainly been using them. But lately I seem to have more projects going at one time and found that I didn’t have enough baskets for all of them! I found myself going around my house emptying the contents of other baskets so I could use them for my projects. (This of course, led to another issue about where to put all the stuff I was taking out of those baskets!) I guess that tells you how crazy things are at my house!
When I was at a retreat in February, one of my friends was making fabric covered rope baskets for her projects. She also likes to have all her project’s supplies in one spot, and she likes to be able to easily move them from place to place as well as have the option of stacking them. My thoughts kept going back to her baskets as I kept running out of storage for my things.
Over 20 years ago I took a class at my local quilt shop and made a fabric covered rope basket. It’s been sitting in my closet all these years waiting for me to attach the handle. It’s kind of big and funky but I love the colors. I think I planned on using it for my knitting projects. I could still do that, but I decided to use it right now to store my wool socks in. I don’t need the handle attached although I guess I could still do that. (Maybe in another 20 years??) I am also kicking around the idea of deconstructing it and making 2 or maybe 3 more usable size baskets out of it.
This one is 9” tall and around 12” in diameter. I think I was having too much fun sewing it together and didn’t know when to quit!
These are still all my favorite colors!

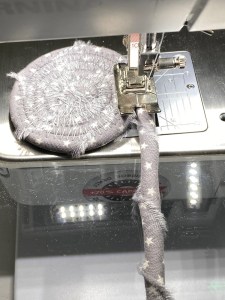
The way the rope was covered in that class 20 years ago was not how I wanted to make a new one. Back then, we wrapped folded fabric around the rope and straight stitched it to the rope which was a nice feature as there were no raw edges visible. Today that seems like a lot of prep work that I really don’t want to do. My friend was just wrapping approximately 1” strips of fabric around the rope and zigzagging the covered rope pieces to each other. Much faster process. I’m all for getting things done faster! These baskets are a great way to use up fabric scraps or fabrics you wondered why you bought them in the first place.
I followed the tutorial from my friend’s website Create Whimsy and tweaked it to my needs.
https://createwhimsy.com/projects/fabric-coil-baskets-and-bowls/
I had a jelly roll of 2 1/2” fabric strips sitting around that I was never going to use for a quilt. I tore them in half and started wrapping my 20 year old leftover rope and zig zagging them together.

I wanted the bottom of the basket to be at least 6” wide and the sides to be around 2” high. I wasn’t sure how much rope I would need to make the size I wanted. (I ended up having enough rope left to make a smaller basket if I want to.)

I was happy with my first basket even though I wasn’t crazy about the fabric used for it to begin with. Those big white blobs are the selvedges. I decided I didn’t like how they appeared, so I started cutting them off as I introduced new strips. I like how the stars on the fabric appear as bits of white. Overall, I’m quite happy with how this turned out! It will be very usable and will definitely not be sitting in my closet for the next 20 years!
I also had some fabric covered rope left over from my 20 year old basket project so I thought I’d see if I could make a basket out of it.

It was interesting to see how different the two methods of covering the rope were when zigzagged together. I think I like the newer method of just wrapping the fabric around the rope and not caring about the raw edges or the joins. It’s kind of fiddly but looks just fine to me after stitching. The “prewrapped” rope had lots of puckers to it, the wrap as you go method coiled together with a snugger fit.

Here is the finished second basket. It definitely had a looser feel to it although it is still sturdy enough for a project basket.

Here’s a peak at my little menagerie of baskets, including my two newly made ones.

It was fun to make them, and they sewed up rather quickly. If you try one, I’ll forewarn you that you’ll go through quite a bit of bobbin thread. And they are kind of addicting to make.
I also found two felted bowls in my closet that I had made years ago. (Wonder what else is in that closet that I could put to use today?) They were knitted to begin with, and they were my one and only foray into felting. This one was under consideration for becoming a project basket, but it’s too flimsy. I am now using it for my thread bits. Perfect use for it!

Happy stitching!
Tesi Vaara
24 thoughts on “Trying To Organize My Stitching Projects”
Love your golden colours. I have beenmaking coiled baskets and teaching the techniques for about 12 years. I learnt with a lovely lady called Helen Diegan who asked me if I would like to teach her classes when she moved on to weaving and I’ve been doing so ever since alongside my feltmaking! I call the classes Memories Baskets, as I believe they are a good way to use your stash of favourite fabrics or remember past favourite clothing – blouses, daughters’ dresses etc. So much better to have a useful recepticle than a pile of fabrics or garments that rarely see the light of day!
I love the idea of Memories Baskets! What fun you must have in your classes.
A friend of mine, who makes collectable bears (I’ve got one called Fred), also makes memory bears. https://m.facebook.com/people/Zillabears/100064306377023/ Clients send her a couple or three old baby grows and she makes the bears out of them – her strap line is “Cuddle your Memories”. Your memory baskets seem a great way to recycle and retain memories too.
Ann
That’s an interesting use of fabric off cuts. I wonder though how easy it is to stitch through fabric and rope. I could see lots of bust needles if the fabric was much thicker than that usually used for patchwork. I’m thinking curtaining as I have a source of lots of curtain fabric pattern books and often wonder what these lovely but more substantial fabrics could be used for.
Mind you, the thought of spending hours making inch wide strips of fabric as instructed in the tutorial you’ve given us a link for makes me think I won’t bother (I’m lazy). I’d stick to making felt and stitch bowls – I think Lyn has a tutorial for that one on her website – Lyn?
Ann
I didn’t have any needle breakage issues when I coiled the fabric around the rope. I think I had a Topstitching needle in my machine. I did however break a needle when I sewed using the coil done by the older method. It broke when I got to where the seams had a join in them. Too thick!
Your collection of baskets is fab, but I particularly like your 20 year old fabric basket that is now seeing the light of day. The colours are gorgeous – redolent of a beautiful sunset.
Your post is a coincidence as a couple of months ago, I too started looking at making fabric baskets, but with hand stitching….I don’t think I could cope with too many broken machine needles!
Looking forward to seeing more of your baskets as you create them Tesi.
The rope sewed really well using the wrap method. I was amazed. My machine that I have today also zig zags around 9mm vs 5mm that my old one sewed so I think that helped.
Both your baskets are lovely: I particularly like the delicious orange & yellow colours of the second one. I’m completely inept on the sewing machine so can’t imagine being able to do this but I enjoyed watching you make them!
I love those colors too! Happy colors!
Your bowls are fabulous Tesi! I have seen this technique many times online but have not tried it. I keep thinking I will but now my sewing machine is broken. So no machine sewing for me for a while. Sigh…
I too love it that you have gotten the bowl you made 20 years ago and you are using it now. Who needs handles?
Oh no Ruth! I had to laugh at myself when I read that as my first thought was “WHAT?? You only have one machine?” Right now I have 3 so if one breaks, I’m good to go until I get my other one back. My condolences but I know you have many, many other things that you can do.
Love the bowl made with the starry material – how long did it take you to make it Tesi?
It would be a good idea to make 2or3 baskets out of the 20 year old one – they would be a more suitable size for the use you have in mind for them.
Having bowls to keep all your needs for projects on the go is a good idea 🙂
It took less than an hour to make. Neither of them were too large. I am seriously thinking about deconstructing the big one to make several small ones. I enjoy taking my socks out it every day but I think my stitching projects are much more important, LOL.
Your original basket is so bright and cheerful- wonderful colors! I would keep it as it is as you can make more to house your projects going forward. Thanks for sharing
Thanks for reading and commenting!
I love the baskets. a great way to keep all the notions and thread for each project together. I bet felt snakes would be good to use but maybe they would be to dense. Maybe you could put a plant in the big one or put a lid on it and keep a hand stitch project in it.
The big one is working really well for my socks at the moment. Using it for a plant might be an idea I could consider though.
What wonderful baskets they are! I wouldn’t have realised that the sewing machine needle would go through something quite as thick as that rope. Did you break any needles making these projects,
It’s kind of amazing how easily it sews together. I did break one needle when sewing the covered rope made 20 years ago. It happened where I had joined one length of fabric to a new one. The old method had you folding back all the edges so there were no raw edges and that increased the bulk of the fabric as you added new fabric strips. Other than that one time, the rest sewed easily. I don’t know what needle I had in my machine to begin with, but the replacement one was a Topstitch 80/12 and it worked wonderfully.
Love your baskets Tesi. I have seen videos of these being made. They are so pretty and aperfect addition for your various projects. The newer method of creating them (thanks for the link by the way)certainly appears more user friendly. Could you tell me what size sewing needle you are using. I am visualising mine breaking under the strain.
Helene
ps I am curious to see what’s in the baskets, perhaps in your next post …
I’m not sure what needle I started with but it was sewing well until it broke in the area where there were several layers of fabric. Things went sideways when I got to that point. The next needle was a Topstitch 80/14 and it sewed through the layers very well. I was a bit more careful going forward in the thick areas where the fabric strips met up and had all the folded over edges going on. I definitely like the method of just wrapping the strips around the rope as you go and sewing them together.
Thanks Tesi. I have lots of the 80/14 needles in my sewing drawer. Now to find the fabric!
Love your new baskets!
Me too! They make me smile!