Mark Making and Bear
My local group has an art retreat every year and it’s coming up soon. (We’ve all been vaccinated.) This year we are planning on creating some abstract art and I wanted to create some of my own mark making tools. I have been collecting feathers around my house for years and since we have a lot of wild turkeys, I find a lot of larger feathers. I also, collected some goose feathers when walking by my sister’s house.


The turkey feathers are on the left and the goose feathers (right) are from Canada geese. Now all I had to do was figure out how to make a brush from a feather. So Youtube is the answer. You can learn just about anything on Youtube. I found two videos and decided I would try both methods.

The first method involved cutting the turkey feather in a specific way to get a “sharp” point. I had a bit of trouble with the hollow shaft cracking on this one. I’m not sure if that was because it was old and had dried out more or not. But I used some tape and attached it to a chopstick that had already been used for mark making in my studio.
Second method found on Youtube

The second method uses almost all of the shaft of the goose feather and you pulled the vanes of the feather off to just leave the top portion for the brush. This seemed to work a little bit better for me and this shaft didn’t crack. It was definitely a newer feather and wasn’t as dried out.

Then because I had a large piece of goose feather left over from the second method, I decided to use that to create a brush by using double stick tape, masking tape and a skewer. It actually gave me the “sharpest” point on all three of the brushes.

The last brush I created by making a tassel from black #5 Perle Cotton on a chopstick. You can use any kind of stick for the handle and next time I plan on using some natural found sticks which will be more interesting. With this method, I created the tassel and then wrapped it tightly around the end of the chopstick. It seems to be very sturdy and won’t pull off too easily. I left the tassel ends long but you could cut them to any length that you prefer. Or you could cut them very raggedly so that would produce a different type of mark.

Then I tried the brushes with a bit of black paint to make some marks. I need to play a bit more and try some different types of movements with the brushes but I was happy with the start of making my own brushes. More to come!

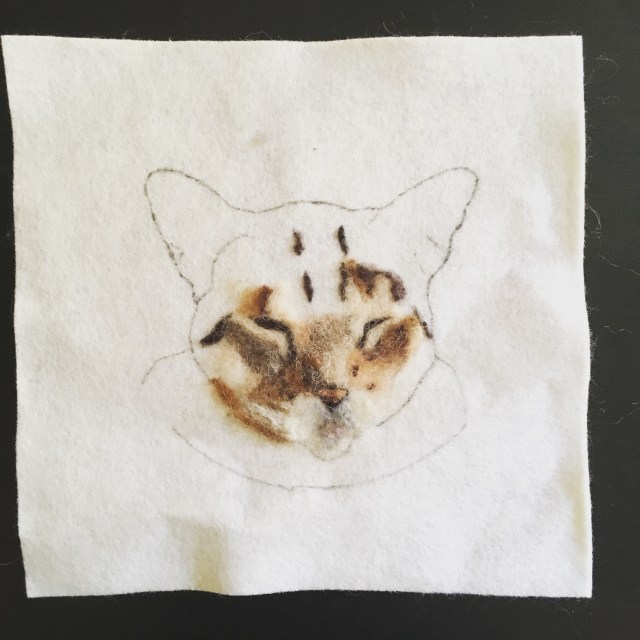
This is Bear, my friend Nanci’s dog who has since passed away. Nanci has been so kind to collect our mail and papers while we travel. So I wanted to create a gift for her that was meaningful. I have been doing paint and stitch portraits of my dog Edgar for my class homework so I thought I would try one of Nanci’s dog Bear. Luckily, I had a photo of Bear on the computer because Nanci used to work for me and we used various pet photos in our social media campaigns. The photo was really dark but I was able to put it into Photoshop Elements and add in more light so that I could see the outline of the dog. I then traced the outline on to lightweight cotton muslin with a pencil. Now on to painting.

Here is Bear after painting. I used guar gum and watercolor pencils/crayons to paint. The guar gum is a thickener that keeps the paint from spreading too much on the fabric. I was happy with the result and almost left it like that. But I decided a bit of free motion machine stitching would highlight the furriness of the dog more.

I added a tear away stabilizer and did some stitching in black and darker red brown threads. Bear is complete. I gave the portrait to Nanci recently and she loved it. Come to find out, she loves this photo of Bear as it is the last photo ever taken of her. I had no idea that this particular photo meant so much to Nanci but it was what I had on my computer. Serendipity, I guess.