Fourth Quarter Challenge
Although I don’t normally make a big deal out of Christmas the one thing I’ve always enjoyed, and can’t imagine not doing, is decorating my tree. The bigger the tree the better….in fact if it doesn’t touch the ceiling it isn’t up to the job! At this point I will come clean and admit that, as the trees got bigger and bigger, I made the shift from real trees to an 8 foot artificial one. I can hear the groans from those who wouldn’t dream of buying artificial, that used to be me, but it is what it is!
Most of my tree decorations have been homemade or received as gifts with some of the quirkiest, and most meaningful, coming from my Aunty Das who sadly isn’t with us any more. These lovely wooden decorations were gifted from Das to my partner who’s hobby is flying.


And these are a few I’ve made in the past…..


With a big tree there’s always room for more baubles and with the fourth quarter challenge being Christmas Decorations it was the perfect excuse to make more. I found some 10cm and 8cm polystyrene balls locally and covered the large ones with four coordinating cream/black fabrics and the small ones with four green/red fabrics.


One of the first wet felting workshops I attended was run by Robyn Smith who taught how to make these gorgeous fairy boots…..I’ve made them as gifts every Christmas since then. With more time on my hands this year, and prompted by the Challenge, I’ve made myself some plus a few extras to sell.

As it’s the season to be jolly, and gnomes have always made me smile, I’ve had a go at making some of those too. The Scandinavian gnome is typically associated with the Winer Solstice and Christmas season so I thought I’d have a go at making my version of a Scandi gnome.
The gnomes came about by accident really. Spurred on by the challenge I’d ordered some 14cm high polystyrene cones online (by this time we were in lockdown) with the intention of making Christmas Tree shaped table decorations. When they arrived every one of the ten cones was damaged.

Rather than send them back, the challenge now was, what could I make with them that didn’t need to be a perfect cone shape? That’s when the gnomes came to mind….the wonky cones would make the perfect base!
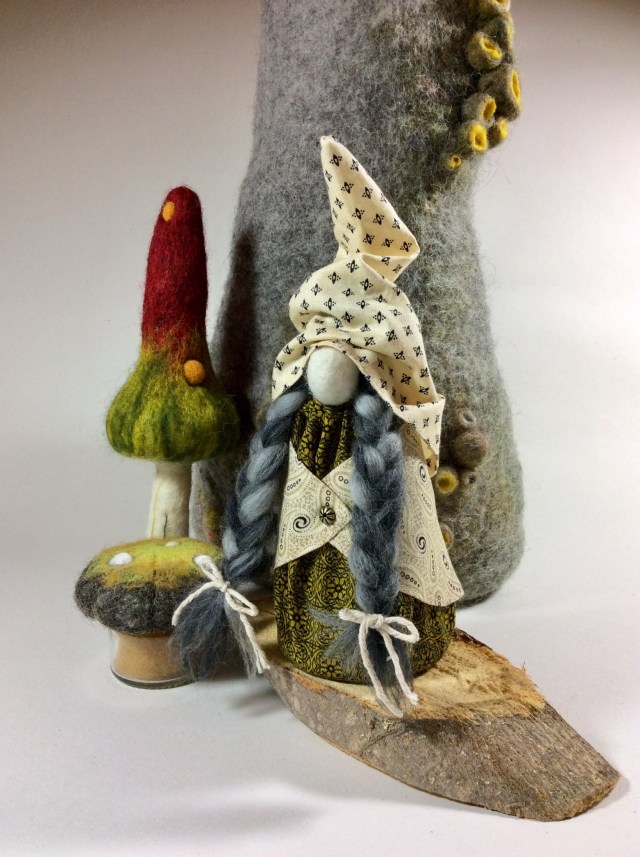
Originally I thought about making flat felt for their clothes but then decided to use the same cream/black fabrics I had used for the large baubles, plus a few others. Being in lockdown and wanting to get straight on with them I searched around for something to make the beards out of and found an old cardigan at the back of my wardrobe that had a faux fur collar…..needless to say it doesn’t any more! The first beard I cut didn’t look right. With trial and error I’ve discovered that the way to cut faux fur is by working from the back and only cutting the backing fabric, not the fur itself, using a scalpel blade. That way you get a nice shaggy beard.
The females have Merino wool plaits and both sexes have felted button noses. I’ve machine sewn their outfits but if you were making these with children they could be made just with the glue gun for a quicker finish.
The clothes are simply a triangle for the hat, a semicircle for the jacket and a circle for the dress and/or gents undergarment.


The dress circle is simply hand stitched around the circumference, put on the cone and then pulled tight and the thread knotted. The front of the dress is then pulled up to approx 10cm from the base and hot glued in position.

I decided to use a belt and braces method to attach the nose as I was afraid it might get knocked off (really??) It’s been hand stitched to a strip of white fabric and that in turn is glued onto the cone. Thinking about it now, was this over engineered? Definitely!


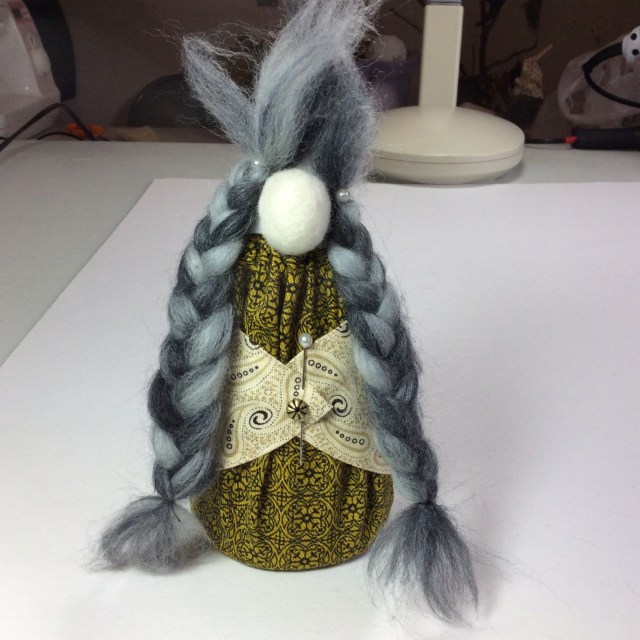
The waistcoat was finished with a metal bead and the Merino fibre plaits attached either side of the nose using hot glue. The oversized hat has been glued in several places to create the sloppy look. To finish them off I’ve stood each gnome on a slice of wood.
I’ve had fun making these and I’m keeping a male and female on a shelf in my studio because I can’t look at them without smiling! Besides, a gnome isn’t just for Christmas!
Whatever you get up to over the Christmas period have fun and stay safe!
