Browsed by
Category: Mixed Media

Beading & Felting

Beading & Felting

Beading and Felting

I know there are some spectacular bead artists out there and this week I thought I’d try my hand at some beading, I’ve been following Robin Atkins blog called Bead Lust

http://beadlust.blogspot.com.au/

 Her work is so beautiful. I’ve never really wanted to learn about beading before but since getting into more of the mixed media side of things it’s made me more interested in the beading process, of course not on the scale of Robins though , just enough to try to work into my pieces.  Robin has been beading for a long time and she has written a couple of books, she has now put out her first book as a free book for anyone to read, so since I was following along I thought I’d take the time to read it.  She explains her methods of beading and basically works free hand with no pre conceived ideas, or nothing set in stone.  So having read that I thought I’d give a small piece a go, mind you I don’t have thousands of beads to choose from so I started this little one with one of Zed’s hand made buttons and went from there.

It definitely helped to read her book as I was under the impression that I should have some sort of design in mind before I started, but I actually found it so much easier not to.  This is only a small piece I know but reading her book  gave me the courage to have a go !!

I’ve also made a couple of small note book covers, inspired by Zed once again, and I wanted to  do something else with my flat pieces of felt and not just wall hangings.  The first cut was the hardest I must admit, spending all that time rubbing and rolling the felt only to cut it up in the end. These 2 covers were made with the one piece and then cut in half so I had the 2 different colours in each cover.

I then embellished with embroidery stitches learned from the TAST 2012, so I used Blanket, Fly & Cretan stitches and then added some beads in too.

I did not have any success with creating skeleton leaves so we’ll leave that for another day lol

I hope everyone’s had a productive week and I’d love to hear what you’ve been up to.
Surface Texture Challenge – From Studio Journal to Finished Piece

Surface Texture Challenge – From Studio Journal to Finished Piece

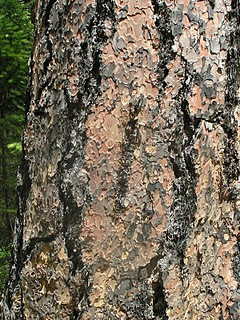
Here is one of my many photos of bark. This type of bark has flat looking pieces that resemble puzzle pieces. The pieces gradually flake off and I collected a bunch of these off the ground. I love the different layers and colors that result. Many times, I work in a studio  journal when I find an inspirational source. Over the last several years, I have played around with these bark pieces.

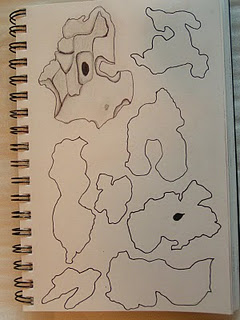
Here I have sketched the various shapes of the bark. Most are multi layered like the sketch in the top left hand corner. I just shaped the overall shape of most of the pieces. I made several different stamps and a few stencils of these shapes.

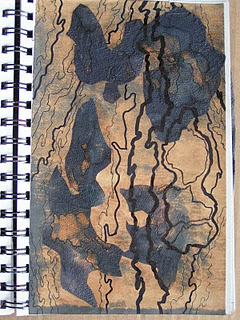
This is a collage that I did in my studio journal with pieces of discharged paper and stamps. I also added the linear components to give it the feel of bark on a tree. This has been in my studio journal for two years and I really haven’t done anything else with it. This past weekend, I decided I was going to try a technique that I have been thinking about for a long time. Because I had this challenge to work on, I finally got this idea in motion.

I took two pieces of water-soluble fabric and sandwiched some wool and viscose fiber between them. On the top piece of water-soluble fabric, I had traced some of the imagery from my paper collage. I then free motion stitched with zigzag stitch over the lines and shapes. I ended up not putting in as much detail because it shrunk so much with the stitching. And it would shrink more with the next step.

I then took the free motion design and added it into a felted cover I was making for my new Kindle. Since the fabric is water-soluble, it would wash away during the felting process and just leave the stitching. When you stitch directly on felt with the machine, it gives a quilted effect. I was trying to add machine stitching without getting that quilted look. I also want to be able to add machine stitching easily to 3D felt objects. It is hard to get a three-dimensional felt to fit under the sewing machine.

Here is the result. It was a bit dark when I was taking the photos so sorry for the quality. (Click on the photo so you can see the details better.) I loved the result! The stitching is completely attached as the fibers it was sewn to, felted right in with the rest of the fibers. And the stitching is right on the surface, it worked perfectly. The darker lines in the middle were yarn that was couched down by machine stitching. The machine threads are shiny in comparison with the felt and add a very interesting texture as the thread didn’t shrink but the wool did. I will definitely be trying more of this technique.

Here’s the Kindle sliding into the top of the cover. I made the cover fairly thick so that when I put this in my bag, it won’t get banged around so much. That shows a little bit of the way I tend to work. Have you tried anything yet for the surface texture challenge? Do leave a comment and let us know.

Felt Scrap Christmas Tree Ornaments

Felt Scrap Christmas Tree Ornaments

These ornaments are made with the same technique that I used for the Felt Scrap Bowl Tutorial . This was much quicker though because these are only about 3″ x 6″. I had the scraps left over from a prior project and I didn’t change the shape of the scraps at all. I just placed them so they looked like branches. I did cut the trunk pieces out of left over brown felt.

I then sandwiched the scraps in two pieces of water-soluble stabilizer and free motion stitched with dark green thread.

Here’s one of the trees after the stabilizer was dissolved.

I was just going to glue the sequins on the trees as it would be faster. I tried one but the sequins were already falling off and I really didn’t like how it looked.

So I ended up sewing on the sequins with a bead to hold it in place.

I finished two trees. I did add a loop of ribbon to the top so they can be hung.  It was fairly quick for one of my “last-minute Christmas projects”. I always vow I won’t make anything this Christmas but I never seem to keep that promise.

Happy Holidays to everyone and thanks for stopping by!

Felt Scrap Bowl Tutorial

Felt Scrap Bowl Tutorial

Mixed Media Bowl made from Felt Scraps

Last year I made felt poinsettias for Christmas out of red and green felt. I ended up with a pile of felt scraps. I saved them of course. Who knows when you’ll need a small piece of felt? Recently, I saw someone online (I’m sorry I don’t remember where or have a link) making scrap bowls from left over quilter’s cotton fabric.  I thought that would make the perfect project for using up my felt scraps. So I used water-soluble stabilizer, some yarn, the felt scraps and free motion stitched it up on my sewing machine. It worked like a charm.

I have included the PDF tutorial below (Thanks Karen for helping me out with that!) and I’d love to see what you make using the tutorial. After I made the bowl, I thought it would be a great idea to use the green scraps to make small Christmas tree ornaments. I haven’t gotten those done yet but if I do, I’ll show you how they come out. This process could be used in a number of different ways and I’d love to hear if you come up with a different way to use the technique. Have fun and if you make something from the tutorial be sure to post it to our Flickr group photos.

felt-scrap-bowl-tutorial