Browsed by
Category: Community

Book Resist Tutorial by Teri Berry

Book Resist Tutorial by Teri Berry

This is a guest post by Teri Berry, a forum member, who is a wonder at making three-dimensional felt items including some fantastic hats. Please follow this link for more free tutorials and links to Teri’s fabulous instant download tutorials.

After my post about the First Quarter Challenge, we had a discussion on the forum about “book resists” and Teri offered to write a tutorial on how to use a “book” resist to make a more complex shaped felt item. Thanks Teri!

Following on from the Q1 Challenge, there was some discussion on the forum about what a “book resist” is, I’m sure these resists go by a variety of names but I think”book resist” is a pretty apt description as the “pages” of the resist do look a lot like a strangely shaped book. This post is a description of how I like to work with this style of resist but if you have any tips or alternative ways of working please leave a comment below, I’d love to hear from you.

Getting Started

You will need some flexible plastic sheeting, stiff enough that it will stand up on its own if you hold it by the edge but flexible enough that it will fold in half without breaking.

I like the plastic that carpets come wrapped in but this isn’t very easy to come by, an alternative are the plasticised (wipe clean) table cloths. As much as I love foam underlay for resists, I find it a little bit thick for this technique, especially if you want to use more than 2 layers, but it will do if you have nothing else.

Take a sheet of plastic and draw a line down the middle (this is where you will join your layers) then let your imagination go wild and draw out the template on one side of your line. I have added some photos of the resists and corresponding felt structures at the end of the post if you need some ideas to get you started.

Tip – make sure any pointy tips are rounded, if you don’t, they will poke through the felt and create a hole.

Tip – try to avoid putting wide sections on the end of narrow stalks, it’s not impossible, but it will make it harder to get your resist out.

Tip – remember the felt around the middle of your resist will open out to form a space. This can be needle-felted together at the firm prefelt stage if desired.

If you want a radial sculpture where all the arms are the same, fold your plastic in half along the straight line and trace your design onto the other side.

Stack additional sheets of plastic under your design, if you want your sculpture to have 7 or 8 arms you will need 4 sheets of plastic, if you want 9 or 10 arms you will need 5 sheets.  Pin them altogether then sew along the line down the middle. You can use a sewing machine if you wish, but set your straight stitch to long so as not to perforate the plastic too much, as this could make it easy to tear when you come to remove the resist.

Tip – if you find it hard to push the needle through the plastic, gripping the needle with a pair of pliers might help.

Tip – if you want an odd number of arms in your sculpture keep two of the felt leaves together while you felt over them. Similarly, if you think you would like to use the same resist shape for making several sculptures but with different numbers of arms, use enough sheets for the largest sculpture and then reuse the same resist but encase 2 or more pages of the resist in wool to reduce the number of arms in your final sculpture.

Cut around your design, through all the layers of plastic.

Getting Wet and Woolly!

Start laying out your wool, at least 2 fine layers will be needed, more if you want don’t want your structure to shrink very much or if you want it to be sturdy / functional. I typically use 2 layers for lampshades and 4 layers for more structural sculptures. I like Blue Faced Leicester wool for this type of work but wrote a post on how several different wool behaves for small sculptural pieces here if you are interested.

Once you have laid out at least 2 layers (in opposite directions) wet it out.

Then lay a piece of painters plastic (or a strip of plastic bin liner) over at least half the wool then flip over one of your pages.

Fold the wool over the edges as you would when working with any resist being careful to smooth out any folds of wool where you are working on the outside of a curve.

If you need to cut the wool to fold it around an indentation in the resist, avoid cutting the last 1 cm/0.5″, to avoid creating a hole in your wool.

Then continue laying out your wool over the next 2 “pages” open in front of you (one page will be partially covered by the wool folded over from the previous page). Cover with some decorator’s plastic but before you flip to the next page, go back a page and fold the wool ends over so it is all nice and neat.


Continue laying out wool and flipping pages as you work your way around the resist.

Note: where you have folded the wool over from the previous page of the resist, if the wool is already quite thick, there is no need to add more on the reverse of the page, this usually happens where you have a narrow projection, as on the top of this resist.

Tip – if you are finding your resist is becoming a little lop-sided with a big pile of wool covered pages on one side, flip the first 2 or 3 pages (on the bottom of the pile) over to the other side from underneath. That should even it up and make it easier to lay wool on the remaining pages.

Tip: laying a few strands of wool across the top and bottom joints (where the pages are stitched together) will help prevent holes like this one from opening up when the resist is removed:

You are now ready to start felting…

Use  a piece of painters plastic to gently rub the surface of each page in small circles, paying particular attention to the edges of the resist. I find going over the entire surface of each page 50 times is enough. The plastic should glide easily over the surface, if it doesn’t add some more soapy water.

Tip – If you are working with lots of pages you might find it helpful to remove the painter’s plastic as you complete each page so you know when you have reached where you started.

Tip – don’t forget to felt the pages at the back, the ones lying face down on the table.

Tip – work your circular motions from the edge of the resist towards the centre, this will help prevent wings / ridges of felt forming on the edge of the template (unless of course that is what you are trying to do!).

Do the “pinch test”, your fibres should be holding together well by now but if not, go through another cycle of rubbing (it may help to add some hot water too).

Removing the Resist

Now we have to decide where to make a hole to remove the resist. For most templates, a hole near the line of stitching makes it easiest to remove the template but anything is possible! I make my hole just big enough for 2 fingers, the hole will stretch some more as you pull the resist out so don’t make it too big.

Depending on the shape of your template, ones with long, spidery arms are the most fiddly, you may need to gently gather and work the felt over the resist in order to get it out without stretching or tearing the felt.

Once the resist has been removed hold the felt up to a light and look inside, through the hole where the resist came out, for any thin spots. Any holes should be repaired now , before fulling begins. Now you are ready to knead and throw it, stopping every 30 seconds to check the arms aren’t felting together. This is also the time to start rubbing it in any directions where you want it to shrink and to start shaping it.

Once you are happy with the shape, folds etc. it can be stuffed while it dries.

Variations:

Try adding wings by laying wool off the edge of the resist.

What would happen if you stitch different shaped resists together or stitched them at different positions (not just down the middle)?

How can you fold / shape / manipulate felt pods made from the same resist so that the final sculptures look very different?

Some example resists and their results:


Different Types of Wool, From a Swedish Felter´s Perspective

Different Types of Wool, From a Swedish Felter´s Perspective

Guest Post from Zara Tuulikki Rooke

As a felter and sheep-owner, I am intrigued by the variety of wool from different sheep breeds. As I live in Sweden, I have mostly felted wool from Swedish breeds, which are divided into three different basic types:

1)    Finull, which literately means “fine wool”. We have a breed of sheep with the same name, which produce a soft, silky and fine-fibred wool (often 20-30 microns), with little difference between the undercoat and outer coat (i.e. it all, more or less, looks like undercoat).  The fibres are quite short and have a fine crimp. Finull sheep can be white, black or brown.

2. Gobelängull, which can be translated into “tapestry wool”, and Gotland wool are our equivalents to “long-wool”. This is a slightly coarser, but lustrous wool (from 30 microns and upwards), with fewer crimps (“waves”) per cm. Coarser wool from Finull sheep, with no more than 5 crimps per 3 cm, is classified as Gobeläng. Gotland sheep have been bred for meat and pelts, and the latter has steered the selection towards long, lustrous, medium to large curls in the outer coat, with an undercoat of similar length and thickness. A fine-fibred undercoat would only lead to the pelts becoming fuzzy. Gotland fleeces can vary quite a lot, both in colour (very light to very dark grey) and in the shape of the locks. As a general rule, finer fibres have finer curls/crimp, and coarser fibres have a larger curl.  

3)    Ryaull, which can be translated into “carpet wool” (“rya” is a type of hooked wool carpet). Sheep of the breed Rya have a short, fine undercoat and a long, lustrous, wavy to straight and rather coarse outer coat. Ideally, the undercoat makes up 40-60% of the volume of the fleece on an adult sheep. Rya sheep are either white or black.

Below is a sketch showing the general difference between the three types of wool, and photos of wool from Finull, Gotland and Rya sheep to illustrate the difference.

Photo 1Thanks to rather recent conservation programmes, we also have a number of smaller native landrace breeds. These are small breeds, which have been locally isolated and are now named after the region or village where they were rediscovered. They are generally quite small and hardy, with good mothering instincts and easy lambing, and can vary in colour and type of wool even within an individual fleece. Below are photos of wool from two such breeds, Åsen and Klövsjö, which to me both look like finer versions of Rya.

Below are also three photos of white wool from cross-breeds. “Svea” is a collective name used for native breeds crossed with imported meat breeds (such as Texel or any of the British Downs). As expected, the wool on a Svea sheep can vary a lot depending on its ancestry. The photo furthest to the left (“Svea”) shows a fuzzy type of wool, which is typical for the meat breeds. The photo in the middle (“Svea x Finull”) shows wool with a crimp of Finull type. And the photo furthest to the right shows wool from an interesting new breed called Jämtland (named after the county I live in), which originates from a cross between Svea, Finull and Merino. This breed has been developed to produce fine fibre wool as a complement to lamb meat production.

Photo 2Now that we have looked at the different types of wool, it´s time to do some felting! Swedish native breeds are known to have wool that felts easily, but I wanted to compare their felting characteristics to these cross-breeds and to merino. Wool properties can vary between individual animals, and even within the same fleece, and this is not a strict scientific set-up with replicates. But I did try to standardize as much as possible. The wool was washed and carded, and I used 10g of each wool. I laid out the wool in 4 layers to cover a 20cm x 20 cm square, and on top of that, I laid out a piece of red cotton gause, a piece of wool yarn and a piece of cotton yarn. Then I felted each piece – wetted, added soap, rubbed, rolled and finally fulled it by more rubbing and tossing with hot water.

Photo 3As expected, the Finull, Gotland and Rya wool was easy to felt and full. I measured the width and height of each piece and compared that area (in cm2) to the original size (20 cm x 20 cm = 400 cm2).  The finer Finull shrunk to about 50% of the original size, while the coarser Gotland and Rya shrunk down to 42%. The latter two also result in a very thick, sturdy and rather hairy piece, where the fabric and yarn have become enclosed in the wool. These coarser wools are good for things that need to be sturdy and robust, such as slippers or rugs. They are perhaps not the best choice for nuno-felting, but a little shave would bring out the fabric again. The Finull is much softer, although densely fulled, which must be ideal for e.g. a hat or anything you would wear close to your skin.

Photo 4The Åsen and Klövsjö behaved pretty much like the Rya, with the Åsen actually shrinking a little more (to 39%), but felt a little less hairy. That makes sense, as they looked like a finer type of Rya, and consist of a mix of finer fibres and some coarser fibres (as opposed to the Gotland that more or less consists of only one type of medium coarse fibres). That the Åsen shrunk the most did not surprize me either. The wool comes from my previous ram, and his fleece often felted before I had a chance to shear it. The Klövsjö wool is from my new ram, who is still a lamb, which explains why it still feels quite soft. His fleece will probably develop into a coarser Rya-type fleece with time.

Photo 5Apparently, all the Swedish native sheep breeds, and the British long-wool breeds, have a different type of scales on their wool fibres, compared to other breeds. Their scales are smoother and laid out edge to edge. This reflects more light, making them look more shiny/lustrous, and provides less friction, making them feel softer and facilitating the fibres to slide into each other and felt together. Other breeds have rougher scales, overlapping like roofing tiles, which makes them more difficult to felt. Wool from meat breeds is described as fluffy wool, that wants to return to its previous state when squeezed, and therefore good to use as pillow stuffing, but not for felting. This difference becomes quite obvious if you try to stuff a bag with wool from a Swedish native breed versus a meat breed. The latter just feathers back and takes up space no matter how much you try to squash it down.

Below are photos of my felted samples of cross-breeds. The cross-breed with meat-type wool (Svea) did felt, but was difficult to full and only shrunk to 77% of the original size. The resulting piece also felt quite loose and spongy. The cross-breed with Finull-type wool felted a lot easier and shrunk down to 52.5 % in size when fulled (which is close to the pure Finull). The finer Jämtland (a cross between Svea, Finull and Merino) took a little convincing and careful handling to start felting, and couldn´t be fulled down to less than 72% of the original size. However, this piece felt very flat and dense, and very soft. In my opinion, an excellent choice for felting anything where softness is important.

Photo 6Lastly, I felted some merino (dyed and of unknown micron value) and some wool from a cross of dairy breeds (East Friesian Dairy Sheep x Lacaune Lait). The merino wool is, of course, unbelievably soft, but being used to the coarser and more easily felted Swedish breeds, I do find it a bit trickier to felt. The initial wetting down and start of the felting requires much more patience and caution than I am used to. I guess the fine fibres have a lot of air in between them, and it takes a while to convince the fibres to latch on to each other. I couldn´t full the merino down to less than 68% of its original size either, which is similar to the Jämtland wool. Compared to Jämtland, the merino does feel slightly more spongy, but much denser than the Svea meat-type wool, and yes, very soft. The dairy wool felt very fluffy to begin with (I have only seen it in a carded state), but felted very nicely and evenly and shrunk to 52.5% (the same as the Svea Finull-type wool). It´s a bit spongy too, but also denser than the Svea meat-type wool, and very soft. A nice wool for felting things that do not need to be so sturdy.

Photo 7 If you have managed to read this far, you must be a fibre nerd… The differences I have described above may seem small to some, but to a felter, the felting-capability of a wool, and the difference between shrinking to 39% or 77% of the original size, can make quite a difference in the finished piece. All the samples I tried could be felted, but they acted differently, especially during fulling, and produced different results. From smooth to hairy, soft to sturdy and dense to spongy. Different types of wool are better used for felting different things. Is softness or strength and lustre more important for what you want to make? Knowing your wool helps, because even if felting is fun, you don´t really want to wear through your slippers too quickly, or wear a hairy and itchy hat, do you…?

Thanks Zara for this wonderful guide to Swedish sheep and their wool.

A Peek at the Knitting and Stitching Show in London 2015

A Peek at the Knitting and Stitching Show in London 2015

Our guest artist/author/photographer today is Leonor Calaca from Felt Buddies.

If you’re in Europe and a fibre aficionado, you’ve probably heard of the Knitting & Stitching Show. It happens in a few different locations and dates in the UK, and is probably the largest fabric/fibre event in Europe when hosted in Alexandra Palace here in London.

As it happens, the Alexandra Palace (or Ally Pally as it’s also known) is only 45 minutes away, on foot, from my place; as it happens as well, I’ve been volunteering for the past two years as a member of the London Guild of Weavers, Spinners and Dyers, to work a few hours a day at a booth that serves as a hub for all such UK guilds. Not because I’m such a wonderful and helpful person, mind you, but because this means I get a free pass to come and go anytime during those 5 days (and, at £16 for entry only, I think it’s well worth my time).

Last year I got all mesmerised by the fibres and materials I saw, and almost went bankrupt. This year I decided to be good,  more sensible and buy only the things I absolutely needed, which worked to an extent. I also decided to focus more on my energy on the really good exhibitions, and that’s what I’m going to write about.

Let’s start with an embroidery. How lovely and detailed is that?

Photo 1

Art wasn’t just in 2D, the sculptures were very interesting as well.

Photo 2

A glass and wool sculpture by Helen Pailing. She aims to use remnants from the glass and wool industry and incorporate them in a way that makes them not only art, but something you can keep instead of take to a landfill.

Photo 3

The Wishing Tree by Eileen McNulty. Just look at those little details.

Photo 4

I don’t know the author of this one, but here is ‘Palace,’ made with cocoon stripping paper and silk organza. The theme of this booth was vessels.

Photo 5

Elena Thomson embroidered a sieve. Would you have thought of that? I think this would be wonderful to confuse old ladies.

Photo 6

‘Stumpwork’ by Alana Chenevix-Trench.

Photo 7

And a lovely sheep by Margarita O’Byrne.

Photo 8

Then I went to Studio Art Quilt’s Associates (SAQA) booth that just blew my mind. I had no idea these detailed works of art could be made in that technique. The theme was Food For Thought and this is ‘Mushroom Frittata’ by Jean Sredi.

Photo 9

‘Pepitas’ by Vicky Bahnhoff.

Photo 10

‘Yum! Pineapple Upside Down Cake’ by Diane Powers-Harris. Yes, this is still a quilt.

Photo 11

‘Il Mercato’ by Jeannie Moore

Photo 12

‘Elegant Edibles’ by Jennifer Day.

Photo 13

Who doesn’t love dolls?

Photo 14

This one was my favourite: what a grumpy face.

Photo 15

These two sculptures surprised me, as they’re made from a traditional paper folding technique native to the Philippines.

Photo 16 Photo 17

And I saved the best for last: a fishmongers called Kate’s Plaice! Everything you see here is either knitted or sewn, and the details just make it extraordinary.

Photo 18 Photo 19 Photo 20


The artist herself.

Photo 21

Did you go to the K&S? What caught your eye? And am I going mad for taking more time to look at art instead of yummy yarn?

Thank you Leonor for taking us on this great fibre adventure!

Third Quarter Challenge 2015 by Carole Gascoigne

Third Quarter Challenge 2015 by Carole Gascoigne

Today our guest artist/writer is Carole Gascoigne aka Craftywoman.  She also maintains a Facebook page just for fun — Bagsalicious.  Here is Carole’s contribution for the Third Quarter Challenge.

I have to say this is a first all round – first time attempting nuno felting and first time writing a blog for this felting site.

It was a treat to be asked, then came the big challenge: what to write about.

We have a quarterly challenge and this one is to take a photo, take it into a colour palette site and find the colours for a project.

cg 1

I half completed this challenge, in that I found myself trying to capture the image into a nuno scarf or shawl, rather than, as I had originally envisaged, creating something more abstract.

Armed with my 3mm silk chiffon and pre-dyed coloured fibres, I started to develop my scarf.

cg 2

Top and bottom I used merino and silk in greens and blues. To the blue part I added white viscose fibres for sheen, and turquoise locks. The poppies (sorry about the blurred pic) were first a layer of raw silk fabric cut up into random poppy shapes in salmony pinks, with pink locks and fine red merino over laid.

cg 3

All of this, the silk fabric and the fibre design was laid out on bubble wrap – bubble side up.

Then came the hard work. I hadn’t appreciated how difficult nuno was going to be. Initially, I covered my design with net and wet felted the design into place. I then rolled it all up onto a foam roller, tied it together and started rolling. I think I rolled about 400 times, 200 each way – then I removed the net.

I re-rolled about another 600 times, changing the end I started with to ensure all the fibres had a chance to be on the inside and the outside of the rolling.

When I was happy that the fibres had migrated through the silk chiffon I added more hot water and threw the piece on to a towel. I continued doing this until I felt it had been felted enough.

Here is my ‘Poppies by the Sea’ inspired nuno felted scarf.

cg4

Carole, thanks for completing the Third Quarter Challenge and sharing your first nuno felting journey with us!  It was worth the effort the scarf is beautiful!


Russian Felt Costumes

Russian Felt Costumes

This is a guest post by my friend Penny Peters. Penny is a wonderful stitcher who travels extensively so I have asked her to do a guest post for us. Penny recently visited Russia and saw some interesting uses of felt that I thought you might all be interested in. She did see the Pazyryk burial felt which I have posted about before. 

During a recent visit to St Petersburg I was fortunate to be able to visit the famous ethnographic collections at the Kunstkamera and the Russian Ethnographic Museums as well as archeological collections at the Hermitage. I was not permitted to photograph any of the items in the Hermitage from the Altai Burial Mounds (Pazyryk Burials) so famous for the ancient, well-preserved felt horse trappings and canopies. Good photographic images of those can easily be found online. You can search under “Pazyryk burial felt”.

I was able to photograph a unique felt wedding cloak on display at the Kunstkamera Museum. Felt cloaks once were a common item of Afghan male clothing, diverse in cut and decoration. They varied from simple cloaks worn by herdsmen to works of art signifying the owner’s social status. The most elaborate is a wedding cloak decorated with delicate embroidery and cutwork. The embroidery is comprised of tiny, uniform back stitch or knotted stitches in bands in natural wool threads. The bridegroom’s costume pictured is completed by a felt hat and luxurious shawl in gold brocade to cover the head or shoulders.

The other two felted wool costumes were located in the Russian Ethnography Museum. Unfortunately the signage was in Russian using the Cyrillic alphabet, and I was unable to understand the documentation. Having said that, both items of male attire are probably from central Russia— a very cold climate region. The coat-like garment is very plain, decorated only with a belt buckle featuring deer or reindeer and patterned knitted mittens at the waist. The short jacket is again decorated with tiny back stitches in natural wool threads.

These 19th century garments are of such classic design they could probably be worn on the street today without attracting much attention, except from us textile enthusiasts. If you have a chance to visit St Petersburg, the Kunstkamera and Russian Ethnography Museums shouldn’t be missed. The Kunstkamera houses a marvelous costume collection from around the world—especially the Northwest Coast and Alaskan indigenous people since Russian explorers were trading in that region long before other Europeans reached it. The Russian Ethnography Museum displays mostly 19th century costumes of the dozens of distinctly different people who inhabit their enormous country.

Thanks Penny! I enjoyed seeing these felt costumes and reading your explanations. Thanks for taking us on a short trip to Russia!

3rd Quarter Challenge Entry from Teri Berry

3rd Quarter Challenge Entry from Teri Berry

This is a guest post by one of our forum members ‘Teri Berry’. Teri has a wonderful blog if you’d like to see more of her work. Teri has completed the 3rd Quarter challenge in record time and tells us about it here:

Marilyn posted the 3rd quarter challenge a couple of weeks ago, initially I was disappointed because this meant I had been mulling over the 2nd quarter challenge for so long I had missed the end of Q2 (shame on me). Determined not to let the same happen again I was spurred into action. I already had an idea from Q2 that I wanted to use silk cocoons to add some three-dimensional impact, a little bit like this sample:

Teri 1

Added to this, I have been wanting to interpret a favourite photo taken by my better half on a diving trip into felt for far too many years so this seemed the ideal opportunity. Isn’t this fish a beauty?

Teri 2

As per Marilyn’s challenge instructions, I ran this photo through 2 programs, Colour Adobe and Palette Fx.

Teri 3

Teri 4

I much preferred the wider range of colours provided by Palette FX so set about dyeing some cocoons, yarn and silk while blending some previously hand dyed Norwegian and Merino wools (with a little bit of dyed trilobal nylon for some sparkle – I’m a sucker for a bit of sparkle!).

Considering the materials were all dyed in the same bath, I was surprised by the range of colours that came out of the orangey brown bath, everything from bright orange to a lovely chestnut brown. These are the carded batts:

Teri 8

I started by laying out two tones of purple, when the piece is fulled, these different tones will create subtle areas of light and dark on the face of the hanging.

Teri 9


Then laying out the batts, I love working with batts, they are so quick and easy to lay out.

Teri 10

I like to think about movement and the balance of colours and tones when laying out my wall hangings, I find repetition of shapes and colours works well. Here I have laid out 3 deeper colours and added splashes of a bright colour to create movement. I think it is important to keep stepping back and looking at your piece, if it doesn’t feel right now, it’s unlikely to feel right as you add more layers and detail.

Next I added my dyed cocoons, ponge 5 silk and felt ropes for extra texture before wetting it out to regain some control over the growing pile of fluff.

Teri 11

Then some of my dyed yarn, I was thinking about how to lead the viewer’s eye around the hanging when laying these out.

Teri 12

Looking at it again, I felt it was too dark and needed more contrast and the large bumps from the cocoons needed to be balanced by something, the solution, to add some yellow chiffon with felt pebbles underneath.

Teri 13

I made some prefelts with the left over batts, I love working with prefelts and silk papers, they permit a far wider range of shapes than I can create with loose wool tops.

From these I started cutting out shapes, laying them on the base. For me, this stage is very much trial and error; placing piece of felt, deciding I don’t like it, cutting them into smaller pieces, swapping them out for other colours, moving them around. After some time I finally settled on this.

Teri 14

And started rubbing, and rubbing, and rubbing…. I quite like the look of the plastic covered in suds with the design showing through.

Teri 15

More rubbing, and finally a bit of throwing (the large bumps created by the cocoons made this a difficult piece to roll).

Here is the fulled piece after opening up the cocoons to reveal their dyed innards, contrasting with the wool wrapped over their surface. I’m really pleased with the one that spilled out a trail of silk as I opened it up.

I was a little bit disappointed with how the edges of the orange prefelts had gone fuzzy (I should have used a firmer prefelt) so added some machine embroidery to visually sharpen the edges again.

Teri 18

Letting me loose with a sewing machine on a piece of felt is a risky move, I couldn’t stop a just “fixing” one area 🙂

After looking at it the next morning, some more embroidery was needed…

Unlike most of my hangings the felt on this one is relatively fine so instead of hanging from a sleeve or wooden rod I decided to mount it on a canvas frame. To ensure the felt doesn’t stretch and go baggy over time I fixed it to a sheet of poplin cotton with running stitch before stretching it over the frame and stapling it into place.

Teri 25

Thank you Ruth, Zed, Ann and Marilyn for inviting me to post on the forum, this has been a real pleasure. If anyone would like to see some of my other work, please feel free to visit my blog at http://teriberrycreations.blogspot.co.uk

Thanks Teri for sharing your work with us!


Art Therapy

Art Therapy

I mentioned on the Forum a few weeks ago that I’m going to be doing some wet felting as art therapy at a well-being centre in about a month or two. The budget for supplies isn’t huge and will mostly go on wool tops, so I asked if any of our UK felters had any spare bits of wool or fibres they could donate so we had a nice variety of supplies. I was looking for anything really, especially those last little bits of wool tops that end up a half felted at the bottom of a bag. Teri, Galina and Lyn all kindly said they had a few bits they could spare. They weren’t really telling the truth though, they had a lot to spare! In fact, they were so unbelievably generous, I just had to show everyone! There were a few small odds and ends of wool tops and I had a few small bits too, so I carded up a few colourful and variegated batts:

OLYMPUS DIGITAL CAMERAThere were also some nice blended tops:

OLYMPUS DIGITAL CAMERALots of natural and neutral wool tops, some of which I carded into batts too:

OLYMPUS DIGITAL CAMERALots of gorgeous natural fleeces and locks:

OLYMPUS DIGITAL CAMERAAnd lots of beautifully dyed (by hand, I think) locks:

OLYMPUS DIGITAL CAMERAAn unbelievable amount of embellishment fibres:

OLYMPUS DIGITAL CAMERALots of fabric:

OLYMPUS DIGITAL CAMERAAnd last, but not least, lots of yarn:

OLYMPUS DIGITAL CAMERAI was talking to the others involved about what direction the group may take long term after the initial learning and exploring and expressing stages. Maybe being part of some local or national project or initiative, or taking part in some kind of exhibition, something that would give the group a theme to work on and an aim. I don’t have any previous experience of anything like that, and don’t even know where to start looking, I see events ‘featuring local community art groups’ all the time, but never see the initial invitation for groups to take part, so if anyone has any info that might help, even if it’s just where or how to start looking, I’d be really grateful 🙂 You can contact me on the forum or using the Contact Form here, or even on Facebook. Thanks so much to Teri, Galina and Lyn for being so generous 🙂

Artist Residency — Breckenridge, Colorado

Artist Residency — Breckenridge, Colorado

Cathy Wycliff (Luvswool) shares her experience of her recent artist residency in Breckenridge,  Colorado.

Just about one year ago, I started thinking about artist residencies and how much I would like to be granted one.

I had lots of ideas in mind about where I wanted to go, and all of the ideas had to do with nature in all its beauty.

That could mean the ocean, the mountains or anyplace naturally beautiful. I started thinking about the National Parks in America and how much I have enjoyed visiting them over the years, beginning when I was just a child and the family packed up in the station wagon to begin the journey from Chicago to Colorado. We sometimes went to Wyoming and Montana as well, but we always started in Colorado.

There are many artist residencies available around the world, but I had my sights set close to home–that is, the USA.  Although I have enjoyed foreign travel over the years, I decided local would be a good start. I applied to three different organizations, and two of them came through for me (huge surprise!) and offered 2 weeks to one month artist residencies.

I completed my two weeks in the Arkansas Ozarks during April (you can see my previous post about natural dyeing on the Studio blog here   http://feltingandfiberstudio.com/2015/05/09/dyeing-with-plants/ ).  I was thrilled when I received the Breckenridge, CO artist residency offer for the full month of June, but because of obligations at home, I accepted a two-week residency.

I flew into Denver from Chicago, and then shared a Colorado Mountain van with several other passengers, arriving in Breckenridge late afternoon. The mountains greeted me in all their splendor, and after meeting the director of the Arts Council, I tucked into my studio/living space at the old Tin Shop.  Yes, you may notice from the photos that the shop looks old, and it is–from the mid-1800’s when this was a mining town. Many of the “downtown” buildings have been saved, preserved and restored–and many of them have been turned into artist studios and classrooms for the arts.

IMG_0694 IMG_0705 IMG_0732

IMG_0756

The first thing I did besides unpacking was to begin decorating the downstairs studio portion of my little house. But that would have to wait until morning, as I was struck with altitude sickness. Breckenridge is 10,000 feet and most well-known today for skiing, so that’s pretty high in the sky. I had read about this before leaving Chicago, so I was prepared with Advil, and I knew there was an Oxygen Bar in town. Some of the symptoms of A.S. include headache, fatigue, nausea, bloody nose, shortness of breath; and yes, I experienced all of them most of the time I was there.

So my art decor was not perhaps as good as it should or could have been (and neither were the photos taken with my I-phone), but I managed to spruce the place up a bit.  My main goal was to have a comfortable felting table table set-up facing the door so I could view folks as they walked in during “studio time.”

IMG_0766 IMG_0770
I would have loved to have brought my framed landscapes with me, but it was physically impossible; however, I did have business cards with my portfolio weblink available to all studio visitors.  I brought as many “soft” and light, unstructured items as I could stuff into a box which I previously shipped ahead of my arrival. Since I would be teaching a class, I also stuffed in as much fiber as I could in my carry-on duffel!

IMG_0767

The terms of the residency were very generous, with open studio time a requirement, as well as teaching one class. The rest of the time was my own.

Some of the wet-felted items I made while in Colorado include a mountain landscape, a vessel I named, “The Colors of Breckenridge,” and a large panel inspired by the Nebraska crop circles we flew over enroute to Denver.

IMG_0791 IMG_0820 IMG_0792
I also crafted a few nesting “balls” for the birds.

IMG_0768

I thoroughly enjoyed my artist residency in Breckenridge! People seemed genuinely interested in hearing about the process of wet-felting. The town of Breckenridge has done an amazing job of making the arts visible and accessible to all residents, including children. There is a full calendar of art classes, open studios, music and fun events throughout the summer. The downside was the altitude sickness which prevailed even with the help of Advil, the Oxygen Bar, and liters and liters of water. But the scenery, fresh mountain air, and the many friendly visitors I met made it all worthwhile.

Thanks Cathy for sharing this wonderful experience with us!

Featuring Tips on Beading from Artist Mary Stori

Featuring Tips on Beading from Artist Mary Stori

Mary  Stori is  a new forum member, but has extensive experience in quiltmaking and fiber art.  She introduced herself to us in January as “‘ a wanna be felter living outside of Asheville, NC.  For the past 25+ years I’ve traveled the national and international quilting circuit as an author, lecturer, workshop leader, cruise host…..bla, bla, bla.  The focus of my work began with wearable art, fine hand quilting, whimsical and highly embellished quilts.”

She attended a class with Chad Alice Hagen a few years ago and is now “hooked.” Her focus went from quilts to felt.  But one thing hasn’t changed — her love of embellishments, particularly beading which she has authored several books on. So, with her permission I have put together some of her tips from her blog on beading.

Storage

I’m often asked how I organize my beads……this method works well for me.

First of all……you won’t use them if you can’t find them, so take the time to gather them from all your hiding places, organize them, and then put them in a convenient place…no matter how many or few you have.

A location away from sunlight, heat, and excess moisture is best.

bead storage 1

Because there are no closets in my studio, my teaching materials are stored in a large walk in closet in a guest room nearby. The bulk of my workshops in recent years have focused on beading techniques or projects that incorporate beads. Therefore, I purchase a LOT of beads in bulk from a distributor for my classes. They generally come as strung kilos, which I repackage into kits and store in boxes and plastic bins.

Above is my own personal stash…… One entire side of the closet is fitted from floor to ceiling with shelves…and almost all are used to store my embellishments. I could consolidate them if the space was needed for other things, but as it is now, I’m easily able to walk in and quickly find what I’m looking for without having to dig through dozens of items stacked on top of each other.

floss cases2

I like to use plastic fishing tackle boxes, or embroidery floss containers. Beads are stored by style and color in see-thru plastic tubes or small bags. Here you see some seed beads.

hardware storage unit 3

Besides using beads, I utilize many other embellishments, trinkets, charms, buttons, found objects into my work. This unit has plastic pull out containers with large divided sections which are more suitable for these items. It too goes on my shelves in the closet.

slide.012 4

If tubes or small bags aren’t handy for you….try storing beads in small containers such as film canisters, pill bottles, or metal breath mint cases. If you glue a bead to the lid….you’ll always be able to quickly know what’s inside!

slide.016 5

Another big key to beading……is making your environment comfortable during the task. A table top or floor model Ott light will save on eye strain. As will a pair of ‘cheater glasses’. I always tell my students that one of the biggest secrets to successful beading is ‘spacing’….and the ability to see the bead and to judge the placement of the needle into the fabric is vital.

slide.017 6

Self-explanatory!

Bead Test

Many people are unaware that beads may not necessarily be colorfast. For instance, this beautiful blue bugle bead below may appear as if it’s blue glass. Not so……it’s clear glass that has been dyed or painted blue. Often the color remains secure on the bead, other times not. So…..if you think there’s a possibility that your project will be washed, become damp, or even require high steam for pressing…..take a few minutes and test your beads for colorfastness.

Most of the time, there isn’t a problem, but for that heirloom project….you’d be devastated if during a final steam pressing, the bead color ran into your fabric. The pricier beads may be just at risk as the less expensive ones…..you can’t tell by looking.

Here’s how to test:

– Fill a shallow dish with hot sudsy water….drop in a few beads….let it sit for 15 mins.
– Remove them…rinse and let dry on a paper towel.

Note….sometimes color will be visible in the water, other times….the color will slowly eek out as it dries. As you can see….this blue bead has run…..red is another color I check carefully.

Don’t let this scare you…….we are all aware that colorfastness can be an issue with fabrics……now you know that beads carry the same risk. Even if the bead color doesn’t run….sometimes the fancy coatings……that make a bead’s surface shimmer with various affects, (like rainbow) can dissipate……and the bead will lose its luster.

I’ve tested very, very few beads that I decided not to use……or that I’ve used with caution……beading is worth any effort….hopefully with this hint….all your projects will continue to shine brightly!

bead test

Beading Tip

I’m a stickler for good quality construction…..for me it’s not all about fast, rather…it’s about great design that has been executed to the best of my ability. If precautions aren’t taken, beading can cause fabrics to distort. Therefore, I ALWAYS secure my work in a Q-snap frame.  The only exception is when I’m beading the bindings/edges of my quilts.

DSCN2315

Q-snap frames are simply PVC tubes which come in a variety of sizes. This one is 11″ x 11″, my choice for smaller projects. The work is attached using clips that snap over the frame. Though you could use a round embroidery hoop…..I don’t because it pulls the fabric diagonally which can stretch the bias. I’ve found it’s best to keep the fabric ON GRAIN by using a square or rectangular frame when beading.

As for felt, unless the felt is super thick and sturdy, I always secure fabric (of any kind) in a Q-snap frame for beading and embroidery. However, I generally avoid using the plastic clips…….instead I attach the material using muslin sleeves or pin the fabric around the frame to avoid damage to the fabric and beads. There’s nothing more unattractive than distorted, stretched out wool!!!

DSCN2314

However, as the beading design develops, requiring repositioning of the fabric, I avoid using the clips in places where they could damage the beads. Instead, if the piece is large enough as it is in this sample, I wrap the excess snugly around the frame, and secure the layers together using straight pins or by thread basting. This keeps the fabric on grain, and well stabilized to assure good thread and fabric tension.

DSCN2313

My ‘artist’ inspired piece is now in the beading phase…. The piece is attached to an 11″x17″ Q-snap frame…note I used 1 clip at the top, where it didn’t interfere with the beads.

I also want to mention that I’m beading through 2 layers only…..the quilt top which has been stabilized with batting. This approach will hide and protect the threads once the backing is added later.

You can find more information on Mary’s website and blog.  She’s also the author of “Beading Basics,” “All-in-One Beading Buddy,” & DVD – “Mary Stori Teaches You Beading on Fabric” & “Embellishing With Felted Wool”

web: www.marystori.com
Blog: www.marystori.blogspot.com

Thanks Mary for sharing some of your beading tips with us!

Guest Post – A Trip to Peru

Guest Post – A Trip to Peru

The post today is from one of our forum members, Elizabeth Sutherland, who recently took a trip to Peru.  I hope you enjoy this virtual trip!

Our Peru trip started with a week cruising on the Amazon, followed by a week of visiting Incan ruins at Macchu Pichu and the Sacred Valley of Cusco. The Amazon cruise was on a very nice riverboat – good beds, good food, good baths.

photo by Elizabeth Sutherland

We (my husband Doug and I) were accompanied by only 15 other travelers on a 29-passenger boat.

photo by Elizabeth Sutherland

Each day we took 2-3 excursions by small launches to view the wildlife. We had some phenomenal local guides who could spot a gnat on a mosquito because they knew where to look. They had also been guides for scientists and amazed me with their understanding and use of scientific terms and explanations.

It was the end of the rainy season so the rivers and side creeks were very flooded. We were sad that we couldn’t walk in the jungle, but the guides said that the animals were more closely congregated and we’d see more. One morning they fed us breakfast on the small boats. Another day we visited a local village (they rotate among them) where we delivered school supplies and sang songs with the children.

photo by Elizabeth Sutherland

The women there were rolling & twisting palm fibers into string that they would then use to sew into bags, plates, and fanciful creatures for us to buy. It wasn’t weaving or crocheting or knitting, but they used a needle to form the bags. I didn’t ask what dyes they used for the fibers, but many of the colors did not look natural.

We had an excursion into a local market and saw lots of fruits, grains, potatoes, and fish for sale. One afternoon the guides gave us a demonstration of the local fruits. I must say that most of them were not very tasty and had little edible flesh. One afternoon we also fished in one of the creeks. We mainly caught piranha, which the chefs cooked up for us. It tasted like dark meat chicken with a little fishy overtone. We also had a chance to kayak for a few hours up a side channel.

We had happy hour every night, accompanied by a band formed from the boat crew, variously called the Chunky Monkeys, Dung Beetles of LiverPoop and Amazonian Rat Pack. They layed a selection of Peruvian music as well as classic rock tunes arranged for pan flutes. They also got most of us to try a few salsa steps.

photo by Elizabeth Sutherland

Most of the animals we saw were birds and monkeys, but we were able to take one walk through the forest and see snakes, arthropods, and frogs. I was a bit frustrated as a horticulturalist since I wanted to know more about the flora I was seeing. We didn’t see any orchids on the Amazon, but a few bromeliads blooming. The pink and gray river dolphins were very good at eluding the photographers, but were quite active. Our trip was topped off with a float plane ride to see the Amazon from above.

After the wonderful week on the Amazon we returned to Lima and dropped off most of our fellow travelers. One couple stayed with us to travel to Cusco and Macchu Pichu, and we picked up another couple and our guide for the rest of our tour. I had been working out on stairs to prepare for the trip, but there was no way to prepare for the 11,150-foot altitude (3,400 M) of Cusco (Dallas is only 500 feet). I could feel it as soon as I got off the plane, but as long as I took it easy I was OK. They had coca everything for sale – tea, cookies, gum, candy. I’m not sure if it helped or not, but I tried most of it.

photo by Elizabeth Sutherland

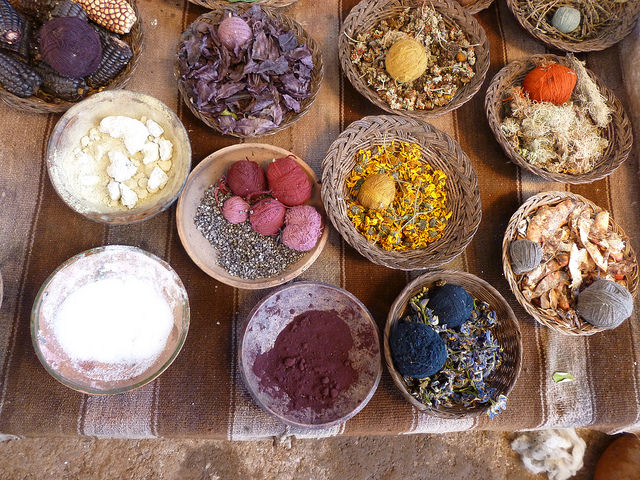
What really helped was the trip to The Center for Traditional Textiles of Cusco where we had the raw fiber to finished product demonstration that I had been hoping for. I was fascinated at the range of dyes they could get from the traditional plants. Their products were beautiful and very intricate. They said that it used 500 warp strands and took over a week to weave. I think the altitude was getting to me because I only purchased a little fiber instead of asking for a bale! I did purchase beautiful poncho (S/500 = $155) and some other souvenirs. They were very interested in the nuno scarf that I brought along. They had a few alpaca there, as well as guinea pigs (dinner?) and some other traditional food – dried beans & quinoa, potatoes.

We went to another small market and saw more varieties of potatoes, including naturally freeze-dried potatoes that could be rehydrated and eaten 20 years later We also purchased some coca and chewed on it like natives (or not – yuck!). We ate lunch at a lovely buffet where we could taste many of the local foods. They also had llamas, alpacas, & a couple of vicuna. Sadly, none would let me close enough to pull of the scissors for fiber samples. Macchu Pichu was the next day. It is lower than Cusco, at 7,972 ft (2,430 m), so we had a night to acclimate a bit.

Our day at Macchu Pichu started off beautifully. I was able to take some post-card quality photos. We hiked along the Inca Trail up to the Inca Bridge; we were not allowed past it. The trail was not too dicey; the guide took suitable breathing breaks. The scenery was beautiful. As usual, I wish I knew more about the flora in the area.

Nights were at the Inkaterra Lodge – a beautiful property that I wish I could call home. If you didn’t like the color green, then you were out of luck. Even though orchid blooming season was past, there were plenty of beauties to look at. The staff regularly ‘baited’ trees with bananas to attract birds, as well as keeping the humming-bird feeders well-stocked.

After Macchu Pichu we returned to Cusco via Ollantaytambo and Saqsaywaman, two more amazing ruins. Our guide for this part of the trip was just as knowledgeable as our Amazon guides. I regret not taking more notes, but I enjoyed all of it. We saw where the quarry for the stones at Saqsaywaman was across the river and up at the top of a mountain. These multi-ton stones were moved by a civilization that had not invented the wheel yet. Amazing what a LOT of person-power could do. At Ollantaytambo the granaries also were across the river and up the mountainside. I guess the women couldn’t send their husbands out for a cup of quinoa very easily.

photo by Elizabeth Sutherland

From Cusco we flew back to Lima and modern-day civilization. I was sad to say goodbye to Peru, but looking forward to my own bed and getting back to family, friends, fiber, and furry cats.