


This past Christmas I received an electric needle-felting tool. This one was made in Ukraine using 3D printing. It had a small motor driving a single needle. Glenn found it on Etsy after he notice I had been having long online chats with a representative, (Amy), of the brand XianDafu, sold by William Wool Felting Supplies Store. Who manufactures a different style of hand-held electric Felting machine from China.
Poor Amy, I spent a long time asking questions, mostly about their needles, what gauge, shape, and how many barbs per side. They are using needles with the crank and part of the shaft cut off (there are a couple of hand-held needle holders that require that the crank be removed too, but they’re not common). Ann’s very kind husband has cut needles for her before but I thought it sounded a bit intimidating so had been hesitant to buy one. Amy was excellent to chat with, being quite familiar with the machine but didn’t have as much background with commercial felting needles. So I went into teaching mode and likely overwhelmed her with details and info on needle shapes, gauges, barb placement…… and finally manufacturers I suggested checking out both the Chinese manufacturer Doer and the German Gross-Brecket. I passed on her information to Ann who decided it sounded interesting and placed an order.
By the time Ann’s order arrived and I got the chance to check it out, I decided it might be useful to have a second style of machine) the price had gone up! (Stupid fluctuating dollar value). The positive was that now there were a few options for accessories; I could order extra needles and/or extra screws. (They are tiny screws, so I thought it might be a good idea to get extras)


You can see my unboxing here https://feltingandfiberstudio.com/2023/02/04/felting-machines-from-ukraine-and-china/ The synopsis, in case you don’t want to go back and read the post, for the packaging from China it was amazing in its use of extreme layers of skid wrap, over Bubble wrap, over shrink wrap and inside the box, lots of good foam. I suspect the Ukrainian machine was also well packed for shipping, but it was not wrapped for shipping when I was given it, in Christmas wrapping. (I am pretty sure it did not arrive through the mail covered only in Christmas wrapping paper)
The concepts of having an electric needle-felting machine are:
- reduce strain on your body (reduce repetitive strain injuries or tendinitis irritation)
- increase the speed you felt at (the machine can poke holes into wool far faster than I can.) you can also adjust the speed of the needle in both the Ukrainian and Chinese machines that we looked at)
other things to think of, Mechanical considerations:
- Ergonomics: Is it comfortable to hold and use?
- How difficult is it to change the needles?
- Both have a limited run time for the motor then it will have to rest and cool down. We seemed to work for up to 5 minutes then pause to adjust or add wool. The suggested run time is 10 minutes for the Chinese version, so well over what we had been doing. It would be important to adhere to the run times so you don’t burn out the motor which would not let you enjoy the benefits of the machine
- Vibration, noise and Kick back should be considered.
- How many needles can the machine hold and effectively work?
Ann and I have been trying to meet on a Monday before a social at the local guild to try out your new felting tool. We had a few things we wanted to test with both machines. My pre-test suspicion was that the Chinese machine would be best for pictures and the single-needle Ukrainian machine best for sculpture. Let us see if I am correct and what you think from our initial test runs.
Let’s start by looking at the Silver Metal Electric Needle felting tool from China first. (The script on the box seems to say “Zendaifuku fibre moulding machine”)
Let’s start with how to add needles, since if it is not reasonably easy to change needles then you will be less likely to use the machine.


This machine requires that the top of the needle (the crank and part of the upper shaft) needs to be removed. This can be done with needles you already have or you can purchase precut needles from the manufacturer of this machine. This is an extra step that the Ukrainian machine does not have. On the other hand, being able to use up to 4 needles gives you more options than a single-needle machine.
We both found that adding or changing needles to this machine was not difficult. Because the screws are tiny, those with reduced eye acuity or essential tremors in their hands may find this a bit more challenging but it should still be achievable. Caution: if you want to run this one with less than 4 needles, I would suggest taking out the empty place screws and storing them in the little screw topped vile holding your needles. I would also suggest ordering extra screws they are so tiny and likely to disappear if you don’t keep your eye on them while changing needles. (Sneaky screws!!)


Ann lost one of her screws while running the tests for this machine. She took out two of the four needles to see if fewer needles would create less resistance and less kickback. She had left the two screws in the machine without the needles. She noticed one of the screws without a needle was missing and we used a tool I have shown you before to look for it. (Princess Auto has these, extendible-handled-magnet-with-light. Very handy for picking up needles, screws or pins from your weaving)


We started with the different felting surfaces we had with us; Firm foam pad (yellow), pool-noodle-type garden kneeling foam pad (green), and medium firmness wool pad (charcoal).
pool-noodle-type garden kneeling foam pad (green)


The green kneeling pad produced some kickback, but the Chinese machine did embed the fibre into the green wool felt base. Though it did work better with Ann’s machine with 2 needles rather than mine with 4 needles.
Firm foam base (a piece of the kneeling pad) yellow


The yellow firm foam had the most resistance to the needles and had the most kickback. Holding the machine on an angle helped the needle barbs engage the fibre.
Wool mat (medium softness) (I have one that is thinner and firmer and one that is thicker and softer)


On first impressions with this tool and this wool mat, Ann liked the 3d more than the 2d felting.


Increasing the speed improved felting in both 2 and 3 D but she is still having some kickback with 4 needles. She also found that working on an angle worked better than vertically. We again suspected that the lower angle might be engaging more of the barbs with the fibre, than when held vertically. With the amount of resistance felt with this surface, we may not have the speed, gauge and number of needles set up to optimize for this machine. We will investigate further.
Ann held the tool at an angle and found it worked better. We think that the surface may be too resistant to the needles in use. We suspected finer gauge needles or fewer needles might improve the felting. For a second try, Ann switched to two needles instead of four this reduced the kickback but didn’t remove it.
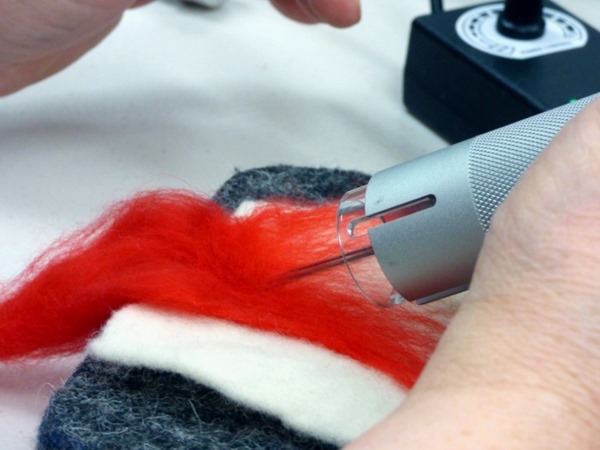

This caught and entangled fibres into the felt successfully. As you can see, Ann was running it with the guard locked in the retracted position.
After checking the mats we had with us, we came to the conclusion that there may be too much resistance and maybe we needed something more like the clover brush pad to allow the machine to work to its best potential. Neither Ann nor I have one and they are so small a work surface. We needed to come up with an alternative. I found my red kitchen scrub brush and Ann went to a hardware store and found a bristle scrub brush and a driveway brush. So we now had 3 brushes of different stiffness, height of bristles and bristle density to try next.


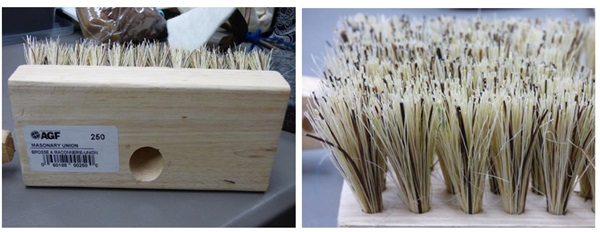


Using the driveway brush as you would a clover brush seemed to be the most effective of the options we have tried. The other two brushes were found to be too stiff (Red) and on the other, the bristles seemed too close (Black). The driveway brush created less resistance than even the pool noodle-type garden kneeling pad foam, which was better than the wool or hard foam with this machine.
I suspect that if changed to finer needles, with the barbs located closer to the tip we would again see an improvement in fibre engagement.
If this company makes a new version I would suggest it would be nice to have the guard able to lock at a couple of spots so you could set the depth the needles would penetrate. Secondly add “Extra Fine” needles to their options, with barb placement close to the tip. (a shallow working depth but maybe not as shallow as the crown needles)
The machine itself felt comfortable in the hand, it felt safe and solid to work with. The adjustable speed worked well and we remembered not to get too excited and overwork the machine, so no more than 10 minutes on. We probably were working more in the 5-minute run times, then letting it rest as we set up the next bit of wool to work on.
Next, we will look at the “orange Fly” electric needle felting machine from Ukraine. We can then compare the two.
Ann and I would be interested to hear if you have tried the metal electric needle-felting machine from China. How did you find it?
This is the link to the Chinese Needle felting Machine. The price has fluctuated quite a bit due to the strength of the Canadian dollar. https://www.aliexpress.com/item/1005004984061419.html?spm=a2g0o.detail.1000014.4.64382604aj7QsK&gps-id=pcDetailBottomMoreOtherSeller&scm=1007.40050.281175.0&scm_id=1007.40050.281175.0&scm-url=1007.40050.281175.0&pvid=c33f93e0-5aac-4884-bd34-54c5fe444a00&_t=gps-id:pcDetailBottomMoreOtherSeller,scm-url:1007.40050.281175.0,pvid:c33f93e0-5aac-4884-bd34-54c5fe444a00,tpp_buckets:668%232846%238114%231999&pdp_ext_f=%7B%22sku_id%22%3A%2212000031240835199%22%2C%22sceneId%22%3A%2230050%22%7D&pdp_npi=3%40dis%21CAD%21206.27%21206.27%21%21%21%21%21%402101d1b516779458756708517ed103%2112000031240835199%21rec%21CA%211912286868