


Preamble:
When last we chatted about the needle felted Iris flower that I am working on, I had just dodged most of the destruction from the May 21st huge storm that swept across most of Ontario. I had no power for just under a week. So had discovered you can felt in the driver’s seat of the car if you are desperate to hear the news and charge your audiobook.
Even over a month later some of the destruction is still weighting to be cleaned up, with broken limbs and broken trees still occasionally spotted. One of the smaller (yes this is considered small and low on the city’s priority) hanging limbs is on my neighbour’s tree. It is hanging dangerously close to where my front yard garden benches are and where I have planting to do in the garden.


Good News! the freeze/ thaw/ freeze again spring followed by killer storm seems to have decimated the caterpillar problem that kept me out of my front garden last year. Who wants to sit and have caterpillars fall on you or worse caterpillar droppings fall on you (YUK!) I have spotted two tiny tent caterpillars so far who did not survive the spotting! (I am not prejudiced against all caterpillars, just the ones trying to eat my tree. I don’t like the ones eating my gooseberry bush either.)
I finally have the side yard set up mostly to my liking. I am having ongoing “conversations” with the local bunny, squirrels and those evil chipmunks! Someone dug into the planters of carrots and maybe the same or a different someone has been eating the big yellow flowers carefully off each of my 3 zucchini plants. We have continued to try to explain the term “Share the garden” does not mean eat or destroy all of it. (I did not get any of the strawberries again this year!)


By now it is time to set up the skirting table, and organized the fleece washing buckets……hum. I have to move stuff first. Ok, better pot the pulled raspberry canes soaking in a smaller bucket where the skirting table gets set up, then plant out the end-of-season half-of-half-price garden plants sitting on the table in my outside studio… there are more on the back patio too it was an excellent price!


let’s just leave that for a bit longer and get back to telling you about flower felting (I Am Even On theme for the CHALLENGE!!)
ON to the Felting part:
As you saw, I had been working on the leaves and got them to the basic shape I wanted and am pleased with their thickness (thinness). I still want to adjust the colour a bit but that will be thin wisps of fibre laid over to modify the under colour, a bit like the layers of washes in a watercolour painting. There was a stretch of gray days, followed by library work and then all the impending gardening that I should be doing too. So, I put the leaves aside to fix before I add them to the final assembly of the flower.
I had finished the basic petal shapes at the chilly Demo in Manotick. I did a bit more finishing touches on the colour blending at my desk while listening to audiobooks ( I think it was more ware-wolf or vampire romance novels that don’t need a lot of attention).


Next was to add the beard to the lower petals. It is time to take a wander through my stash of fibres. Originally I had thought to make the beard yellow. Looking at the yellow colour beside the white and blue petals, I found it too contrasting and distracted from the subtle colour changes in the petals. Ok, it’s defiantly a white fibre I will need.
As you know, fibre comes in lots of different types, long or short staple length, softer or stiffer, lustrous or dull also crimpy or more hair-like. A sheep fleece that is fabulous for doing one job may be inappropriate if used in a different job. Who wants to mend the holes in the heels of 100% merino socks or make a high-traffic carpet out of it? Choosing the right fleece for the right job can make felting, spinning or weaving a joy instead of a fight to get it to do what it is not suited to due.
As much as I make snide comments about it, Merino is wonderfully soft. It’s fun to spin. It absorbs light rather than reflecting it when used in a picture (so it can make deep shadows) and can look flat. It comes in fabulous colours and blends easily with itself or other fibres, but it is much too soft to work as an iris beard.
Bluefaced Leicester was fabulous for my polar bear picture and sculpture, it has a bit of stiffness to the fibre but is still soft, it is smooth and lustrous, and it also has a good light reflection. But, it’s not quite the right stiffness. I am getting closer.
Don’t I have a clear plastic XL shoe box labelled “Mohair/Angora” in the basement? Yes! The fibre is stiff, has a bit of wave, but not really any crimp to it, is very light reflective (lustrous) and it’s filthy with bits of VM (Veggie-matter). I selected a small handful of the least dirty and brought it upstairs to the bathroom sink to wash.


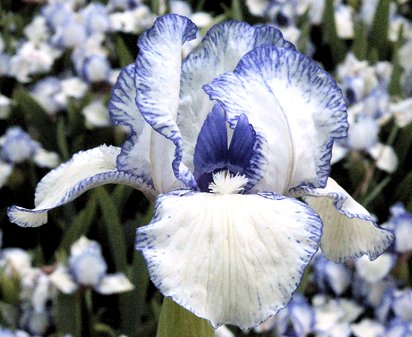
While that was drying at the edge of the sink I went back to look at the Iris reference pictures. Petals; three upper (check), Three lower (check), what are those things in the center sticking up between the upright petals? They are not in the paper iris pattern pieces!! They’re right behind the beards, I looked at more reference photos and found some were very prominent indeed! https://www.walking-p-bar.com/shopsite/media/graphicp/Stitch-Witch.jpg & https://www.americanmeadows.com/media/catalog/product/i/r/irishemstitched_2.jpg?quality=80&bg-color=255,255,255&fit=bounds&height=&width=
So while I wait for the mohair to dry, I start making the shape I think I am seeing.


I started to adhere the sections together, then added a wire with a short turn back in the center of the core and finished felting the center.
By now, the Mohair was close to dry and it was time to affix it to the lower petals. I checked the reference photos and promised no ZZ Top Beards this time.
The goal is to have that bristle brush look at the end that I wanted. I considered pile weaving, loops of weft area fixed to the ground fabric then cut to produce a pile or velvet-like surface. I bet I can do that with wool! (ok, goat)

I started with a thin strand of mohair fibres. I started at one end of the lock and focused on tacking down loops of the mohair. I worked with the needle at an almost horizontal angle and from various directions, to keep the Beard fibres from showing on the other side. (the needle in the picture is just holding the fibre in place for the photo) if you find that the mohair is resisting entanglement in the felt try adding a bit of the base petal wool between the loops like a staple to help tack it down. It will only take a little wool to do the tacking and you may not need it. Most of my needle insertion is working across the mohair, and the petal, first from one direction, then from the opposite. Once secure I would create a loop in which I used the same technique to tack down. I made all the loops a bit taller than what I thought I would like so I could trim them to the height I wanted.

I worked from near the throat of the petal (the narrow end with the wire) to the point just after where the upper and lower petals separate in the flower.

When I had the Mohair loops to the height and density I thought I wanted, it was time to find one of the fine pairs of scissors. I wound up using both the strait and curved scissors to open the loops, then trim them to the shape and height I required.


Now I have three upper petals, three lower petals with beards and the core sexy bits. Shall we put them together?


The lower petal falls between the two upper petals and the beard is center to the innermost bit. Above, I am about to position the second lower peddle the first lower petal is to the right and can be seen just above the blue fake clover tool.

I started to add the wool over the under flower and stem getting the base layer and some of the colour on in time to take it with me to the market to show Ann and get feedback on how it was coming.


24-27 – Ann checking out the flower
The next step will be adding the final colour layer to the stem and finishing the colour layer on the leaves. But first, the Blackberries are almost ready and the Raspberries need picking! So we will finish off the Iris in another post. Have fun Keep Felting and Don’t forget to check your raspberries!!!


28-30 Red Raspberry and Black Berries (and under-ripe blackberries with clematis flowers)