

Have you ever bought something, thinking “this will be great to use for…,” and then it sits on standby for a few years? Well, it’s even worse when you are a shop owner. Everything sparkles brightly, when you attend a vendor show, but then the product arrives and sits on your shelves. For me that item is ArtFelt Paper: but after a couple days of experimenting with it, I think it deserves more consideration.


ArtFelt Paper is a starch based product, created by Gerhard Schoppel, of Schoppel-Wolle in Germany. He invented it to make his daughter’s school felting project, easier. ‘Necessity is the mother of invention’ especially when helping a child with homework! This paper becomes a base on which wool and other fibers, can be fixed in place, until ready for felting. Designs can be made with shingled wool, or thin pre-felt material. You can draw on it with permanent markers, or outlined with pencil roving. Using a foam board or similar underneath, a barbed felting needle is used, to tack fiber to the paper. After the design is complete, it is wet with soapy water, rolled up in plastic and thrown in the dryer. ArtFelt paper can be used with wool and woven fabrics, like silk and cotton, with interesting results. We will be looking at all sorts of things, so lets get started.
My experiments began with batts I created on my drum carder. They were at least 70% wool with other fiber and fun bits blended in. I pulled shingles from the batt at first, and then thought, why am I not using the batt as is? So, I pulled a section off and thinned it out with my hands.

The following photos are labeled to show my process. I’m surely not an expert by any means, but there is very little information, on how to use the product. Most of the things I’ve seen it used for, are less than inspiring, so I am jumping straight into the fun part.


I didn’t stop there… I used the same batt to test bulky wool yarn, sari silk yarn, and art yarn, simply layed across the batt. I applied to the thinnest amount of wool fibers over the yarns. (top photos) Then I went crazy with whatever I could find; blue bamboo threads, sequins on and pulled off thread, chopped up pieces of sari silk ribbon. (middle photos) Then I chopped up all sorts of art yarns to see what they would do. (bottom photos)

Then, I had to test out all sorts of silks on different fiber batts. The gold fiber batt (top photo below) is 100% merino wool. I used magenta silk noil nepps, hand dyed hankies (right side) under chopped sari ribbon pieces. The blue fiber batt, contained fibers that were obviously not wool: not much shrinkage. I applied silk lapp at the bottom, sari silk roving in deep blue, silk yarns, and a blue lock that fell off after felting.

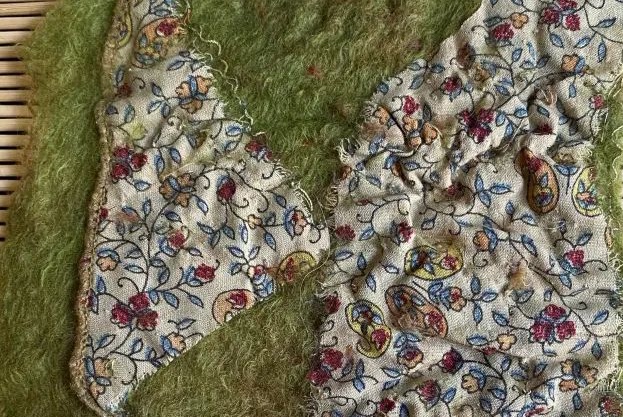
I wanted to see how ArtFelt paper worked with silk fabric. To really test it thoroughly, I used 100% NZ Merino for both tests below. The top sandwich had; ArtFelt paper bottom/wool middle/silk fabric and sari ribbons on top. The result was not much shrinkage at all. The ribbons could easily be pulled off, and the silk fabric adhered, but felt very loose. The bottom sandwich…I didn’t take a photo of the other side!! The layer order is; silk fabric bottom/ArtFelt paper middle/wool and decorative bits on top. You can see the silk peeking out from the lower left corner.

The wool layer felted really well. Even the bits of fiber are secure. How did the silk fabric do? It adhered really well to the wool fiber. It looks the ruching on the cotton fabric, but it has a softer, genteel look.

I think the possibilities are definitely positive for this product. I think there are still more things that can be done with it. I did a couple more samples to see how it would work for pre-felt pieces. The green was some wisps of fiber I had lingering in my stash. It is very thin. I thought it could be useful, as trees or grasses, in a landscape. Then I carded a batt to create a pre-felt of sky and water or land. The last photo is a brooch by Louise Giordano, (http://scarf-it-up.net) who used ArtFelt paper to create the piece.

9/18/2022 Update: 35% ArtFelt discount period has ended for this article.
Capi