

Many years ago, we bought some sweet paper lanterns, that we have used a number of times for birthday parties or other fun celebrations. They always looked warm and welcoming as the sun set, giving a lovely glow hanging from the gazebo. As we always loved the look of them, I decided to hang them up in the conservatory so we could use them all year round. Great idea….but….having little furry felines in the house, they thought it would be great fun one day to play football with them! Sadly, a number of our sweet little lanterns went from this….


……to this!!!! 

As a person who hates the thought of adding plastic to landfill, and always wanting to recycle or upcycle anything and everything; I decided that I would attempt to create a wet-felted version of the paper lantern reusing the plastic components and light.
I recently treated myself to a lovely little book by Mette Ostman, which beautifully explains how to create round open vessels using a resist. When I was reading the book, I realised that I could use this method to make a ball, that I could hopefully turn into a woolen equivalent of a paper lantern. I say “hopefully”, because as a complete novice, nothing I create is guaranteed to work!!!!
Just to add…I was hoping that Alex would be here to help me create this month’s masterpiece, but unfortunately my partner has been feeling a bit under the weather and so I made the decision not to have Alex over this week, just in case. But fingers’ crossed, next time he will be able to felt and create to his heart’s content.
So…I needed to think about materials and design. A while back, I purchased some viscose in some beautiful colours. I hadn’t plucked up the courage to use any yet, so I thought this might be the ideal project to give it a whirl. I wanted the lantern to look attractive, whether or not the lights were on and thought that the viscose would give a lovely sheen to the surface, that would catch the light and make the lantern radiate and shimmer. Having measured the original lanterns, I wanted the finished ‘ball’ to measure around 20cm diameter (when flat). Allowing for roughly 1/3 shrinkage, I considered following the plan in making the resist 30cm. But in the end, I made it slightly larger (31.5cm), but kept the total wool weight at 45g, in order to make the felt thinner. I will admit, this was pretty much guesswork, as I’ve never attempted a lamp before and I didn’t really know how thick the felt could be, yet still be able to allow the light to shine through the felt!
The proportions of wool that I used, were an inner layer of off-white wool batt weighing a total of 25g. Layer two was pale pink merino, weighing 20g and for the final outer layer of viscose, I put together 10g each of green and turquoise.

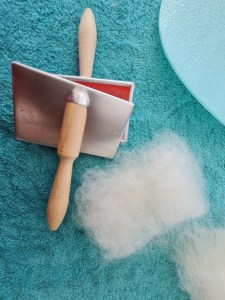

As you can see, my white wool was in a bit of a jumbled mess so I decided to card it before using it to enable me to have a little more control over how I laid the wool down.
I began laying the white wool as finely as I could….


After layering and wetting the second side, I began laying down and wetting the pink wool..

With the two colours of viscose, I mixed them by drafting them together about four of five times to achieve a merging of the two colours, but not so much that they totally blended together.


to this 

I wanted to create some blending of colour, but still allow you to still see patches of each individual colour. At this point, I was very much using guesswork as I have never made a lamp before and I’ve never used viscose!!!!!!!! Those of you who felt a lot will probably pick up that I overdid the viscose!!! But it’s all a learning curve hey?!!
Having ensured that all layers were thoroughly wet and compressed, I then started to felt. I began very gently, in order to allow the fibres to begin merging together.
I will be totally honest with you, i did not have a clue how much light would be able penetrate through the felt. I was faced with a dilemma…to little wool and viscose, and the lantern won’t hold its shape. But too much wool and viscose, the light won’t show through! So this was very much was an experiment on multiple levels for me!
I spent quite a long time working the wool through a layer of bubble wrap before I reached the point where I could start rolling the felt. It seemed to take forever to felt, but I’m guessing this is something that happens with viscose?


However, I was really pleased with how the viscose was taking shape!
I love the streaky effect I was starting to achieve…


After much felting, rolling, removing the resist and fulling, it was time to allow it to dry. When I removed the resist, I cut the tiniest hole I could, because I didn’t want to risk ending up with a hole that was larger than my plastic components! I had quite a struggle to get that resist out, but I won in the end! I then inserted a balloon and inflated it, before beating the ball with a spatula to even out the surface. I’m afraid I forgot to take a photo of this part of the process, but it worked because the surface was quite smooth by the time I finished, as you can see from the photo above. Looking at it, I wish I’d known about felting when my youngest son was little because he was totally in awe of the planets and star gazing…I would have loved to make him a whole planetary solar system!!!
Once it was dry, it was time to start assembling the project. The light box was in two parts. The light and battery component, with a lid that fixed it in place through the paper. Now all I needed to do was clip it together either side of the felt. I made a hole for the light bulb to be inserted through, and two smaller holes to allow the lugs to penetrate the wool and clip onto the lid, which I put inside the ball.


And here, you can see the battery component that lies the other side of that light bulb! 
The top proved to be a little bit more tricky to incorporate…. There were parts of the lid that had little lugs that held the handle in place. That was easy, as I could poke them through the felt. But that only meant two sides were attached! So in the end, I got my needle and thread out, and sewed some snap fasteners to the top of the felt. The other part of the fastener, I glued to the inside of the plastic ring.

And this is how it ended up…..


…and from the other side of the world….


To me, it looks like an alternative version of the Earth! I’m please with the sheen I got from using the viscose. To be honest, I’d be quite happy to have this hanging from my gazebo just as a decoration…


But…the million dollar question is, does it work as a lamp??!!


Well…to be totally honest with you, I definitely think I overdid the viscose!!! The photo of it as a lamp, shows it in a much better light (pardon the pun!) than in real life. In the photo, you can see more light showing through the viscose fibre than there actually is. When I make the next one, I think I will alter the proportions of the wool and viscose to be more wool, and use the viscose more sparingly to form more of a pattern, rather than as an overall coverage. But I will say that I like the daytime version, where it makes for a decorative ball! It does hold its shape, but I think I might opt to make it thinner next time and try using some sort of stiffener to ensure it is still able to hold its shape. That way, I think I will get a better result for use as a lantern light.
Overall, I am quite pleased with the results considering there were a number of ‘experiments’ going on here! As a novice, I have learned a lot and think next time, I should achieve a better result. But at least it wasn’t a total disaster!!