

So, I finished my last post having admitted to a rooky mistake (I had laid and worked the cord at 90 deg to the vertical! Opening out the wet structure gave me a distorted shape with 2 sides longer….oops I should have placed the cord on a curve. With my former career I have no excuses for (and nowhere to hide from) this mistake.) – the implication of that mistake went further….right to the base.


In perfect 20-20 hindsight, I should have stuck with my very original idea of a book resist, but in reality it was just so enormous….far beyond my comfort zone!
Putting that to one side, as the upper part of my structure (not the base) was the most important I decided to concentrate on getting that right.
After three days rest, while my brain was quietly whirring away in the background, ‘Gaudi’ was brought back into the action….
As I wasn’t happy with the previously stitched-in ‘cord’ that had created a fold on the inside, I cut it out – from the outside, as it would be covered later – it took a bit of tugging. The cut was then stitched closed and fibre stitches placed over to heal the long slit.


Still pondering the correct radius line – the arch was now measured and then finally, the appropriate curve drawn….this should all have been so simple for me!!!


After which I re-made and re-laid the cord.


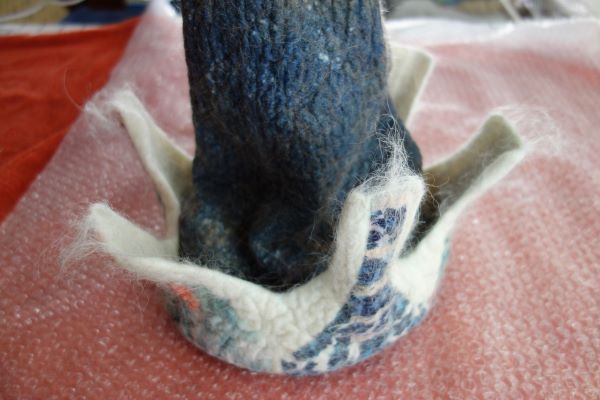
Then it was onto the previously pre-felted ‘skirt’ – I cut triangles out to shape the ‘skirt’ onto the base, stitching the edges together (with thread & fibre) before felting the entire piece.


It was at this point inspiration hit (read that as drastic thoughts). As the mediaeval crowds might roar ‘Off with his head’….I simply shouted ‘off with it’s bottom’! In fact it proved the silver lining as it gave me the opportunity to get inside (without trying to do it through the resist removal hole) to felt the fibres and also to turn it inside out.

Ooooooh boy – my hands were just continually covered in stray fibres….the result of using-up un-named supplies!


Wet damp, but not dripping, it weighed 1.2 Kg and was a monster to work.


After drying it was off to the groomers with the hairy monster! There was so much surplus.


I don’t know how many razors (or lighters) I used
Several weeks have elapsed, and I’m feeling sufficiently energised to tackle it again….mentally & physically! I think we can all get to the point of being disillusioned and I had reached it. Although I didn’t go as far as a friend who, when she reaches this point, throws her work on the fire!
I have since wet felted a bottom using the various pieces of the leftover (from creating the ‘skirt’) pre-felted quilter’s wadding which I stitched together.


I love the surface texture of the piece and how the edge sits and will use it elsewhere. I’m wondering if it will take dye well?


I’ve started applying decorative stitching, how much to do is an unknown. So too, I am undecided whether to apply its bottom (which I would attach with more decorative stitches) and create its ‘turret stopper’ or simply leave it all as it is….the little grey cells – they need to start working!


In the meantime, I have participated in 2 online felting courses – Paper & Felt with Fiona Duthie (I’ve yet to finish this in my own time) and the Milkweed seed with Judit Pócs which I successfully completed and have explored further adding a 3D resist into the mix. If you want to add to your repertoire of felting techniques, I can definitely recommend these courses.


Jan’s last post was about needle felting a tulip, a stunning framed piece for which a lovely tulip in her garden was the inspiration. I too adore tulips although our current beastly weather (frequent hail showers – some with 1cm stones!) has taken its toll. However, in amongst them there have been some surprises.….


….and some unusual seed pods have emerged too!


Just thought I’d share them with you.