
Covers for Carders
New Carders need new covers
In a recent post, I was asked about carder covers. I made mine quite a few years ago, ok at least 20 years ago, but had not got around to making ones for the other hand carders I own. (it’s just the others didn’t get out much and I got distracted, you know how that can happen I am sure!) I had picked up 3 pairs second hand I think as part of a box lot at an auction. They were ones with curved backs and not as old as some hand carders I have seen. These probably come from the 1970s. I have no guess as to the manufacturer. The only clue is a mysterious symbol on the back of each set. “A”, “B”. “C”, I am afraid that these mystic symbols are not illuminating as to their origins. Luckily these strange symbols have not affected their ability to card wool.
Last week I picked up another hand carder, this one with significantly stiffer teeth than my present collection. I have also found that my safety carders have been coming with the Mers and will also need some safety covers (but not today). I have used a thin packing foam for the pet combs until I can make them covers too.
First, let’s have a look at the new carders;
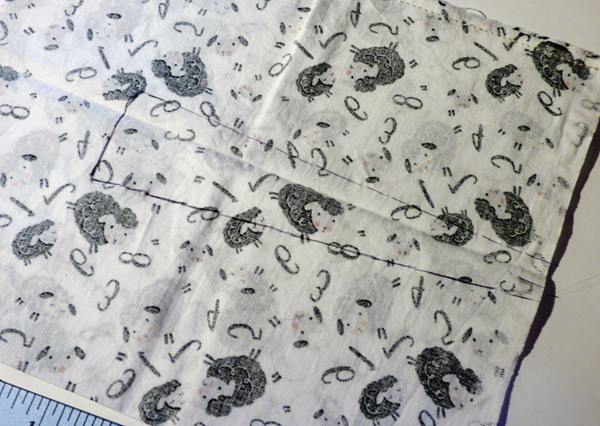
My latest acquisition is made from a soft wood that is ruff on the end grain. I suspect it is probably pine. The handles, although the same colour, seems to be made of a slightly firmer wood. The teeth are embedded in a canvas fabric, then glued and tacked to the wooden carder. Bernadette said she had a similar pair and that the stiff teeth are excellent for courser wool.
As I said the teeth are very stiff and have little flexibility. This doesn’t mean I don’t want to protect them.

 1-2 The new to me, carders before sanding
 3 close up of Foam drying pad cut to cover the carder teeth
What you will need to make these carder covers


 4-7 Items used to make the carder’s covers
- 1 Dish drying foam mat
- 2 Elastic and velcro straps
- Interesting fabric
- (you may need a sanding block or sandpaper if your carder is a bit ruff)
- A ruler, pen and sewing machine are also helpful.
When I made my first cover, I wanted to have something a bit softer than just the fabric cover to protect the teeth. I found a bathroom soft scrubby pad, it said polyurethane foam covered by a “new” microfiber top. They were available at Walmart and then Dollarama, so picked a few up. Silly me I did not reserve all I had purchased for the hand carder protection as planned but used some for their original purpose of cleaning!!! they were available for about 3 years and then mysteriously disappeared from both my sources. They were replaced by a much larger, but similar, product called a “microfiber dish drying mat”. Its tag says Polyurothatin foam and 100% polyester cover. It is very much like the original pad but huge at 15” X19.5”! (I could cover a large drum carder rather than just small hand cards with it! ….HUM………NO! NO! That will have to be a later project!!) Luckily it is easy to cut to the correct size to fit the little carders with my cheap paper scissors. Ok, now I have the foam pads to protect the teeth.
For my newest set of carders, because the end grain is ruff, I will also need a sanding block to smooth it and prevent splinters. (Splinters are never good, they wind up in either your fingers or the wool.) I found a two-pack of foam sanding blocks at Dollarama. The local hardware store will have them or some old fashion sandpaper and a block of wood. In a pinch, a foam nail file will work as sandpaper too
 8 sanding the back of the hand carder taking out chips at the edges and little scratches and punctures
 9 half the handle is sanded(lower half)
 10 working at smoothing the end grain
Now that I have the worst of the roughness smoothed and have pieces of foam to protect the teeth. now I can get the fabric and measure it out to make the covers. The overall pattern is simply, a rectangle with long tabs attached at one end. Depending on the shape of the fabric you have, changes where you will put your seams. If you don’t have much of the fabric you like (say one with sheep), you can use a different fabric on the inside. luckily I have just enough!!
To make the cover closure you have a few options, sew-on Velcro is easy to use and seems to be common. If you haven’t quite got around to sewing on the Velcro, you can try what I have been using “Stretch utility straps” (elastic with Velcro on the ends.)I wrap the elastic over the tabs and connect the velcro to hold it closed. I remember seeing closers made from ties, and even buttons, but I like the Velcro and strap closer the best.
Shark Boy has offered to help show you the old carder cover so we can make a pattern.
 11 Sharkboy volunteers (his parents are cuddling in their project bag so he offered to help)
12-21 Shark boy removing the cover and foam pads off my old carders
Now that Sharkboy has opened the carder cover, we can look at the shape and make measurements.
22-28 measuring the original carder cover
 29 This is the size I am going with, yours may be a bit different depending on your carders size
We should also notice you have three main options as to how you orient your carders for storage. (the variations are more dramatic when viewing the curved cards than the flat ones but it’s still worth considering the options available for both styles.)
 30 teeth to teeth
Option 1 stored teeth together – this leaves the teeth inter-meshing, while it may keep the teeth from snagging on any nearby object it is not great for the teeth. It also causes the handles to point outward if you have a curvature to the paddle part of the carders. This is the way most naked carders are stored.
 31 Back to back/ teeth out
Option 2 stored teeth out – this is a bit silly (but it is a possibility even if it’s silly), it will put the teeth in contact with anything in the vicinity (including your fingers) and give the carding cloth surface no protection. The only advantage is that the handles don’t stick out oddly. (I am trying to be positive.)
like the 3 bears looking for the perfect bed, this brings us to the final configuration.
 32 teeth to back
Option 3 stored teeth in the same orientation – Since one carder sits above the other, this would cause the teeth to be stored against the back of the upper carder. Ah, this is where the foam pad comes in. There were masks on the backs of the new second-hand carders which suggested this was one of the ways they had been positioned. This orientation also alines the handles which makes them fit easily into a bag or basket when they need to travel.
Now let’s make the pattern. There are two main rectangular shapes for carders; a shorter rectangle for wool carders and a longer rectangle for cotton carders. I have now seen “Student” carders which are smaller than the standard wool carders. Both shapes of carder require a very simple pattern so just adjust it to fit your size. If you are not trusting of numbers you can make a pattern using a couple taped together pieces of paper to check the fit.
I had been over at Walmart looking in their craft/sewing department. There was a selection of precut “quilting squares”, which were actually rectangles, that I looked through. They were not the finest of thread counts but they had 3 patterns with sheep, the odd cat/alpacas and one with mice. The size works out to approximately 16” wide by about 20.5” long, close enough to what I had used last time!! this is not like sewing an Elizabethan corset so if your fabric is a bit shorter in length it will still work, but with shorter tabs. As long as you have fabric adequate to cover the width and enough length to wrap around the carders with their foam spacers protecting the teeth, the extra will be the tab length. Two of my older carders have lived with a stretchy elastic with velcro and the foam pads for many years (they’re the ones that don’t get out much!) so you can fudge it if you are a bit tight on your favourite fabric.
Your other option is to make the cover out of 2 different fabrics if you’re short. This could be a fashion statement, flipping whichever side out that seems to fit your outfit that demo.
Let’s get sewing
 33 End and side seem in, locating tab length
Since I am folding on the long side, I will have a seam at the end and down the opposite side. (seam is on the left short side and at the top long side)
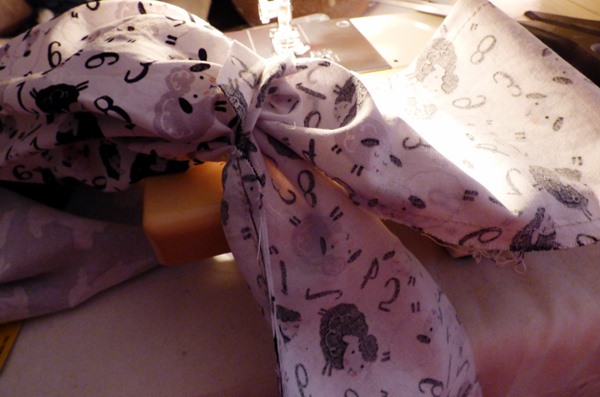
 34 Making wider tab ends
 35 marked for sewing
This time I wanted to try a wider end tab to give a bit more protection for the carder. I found the center on the unsewn end and estimated the seam placement. I used the edge of the pressure foot to give a thin seam allowance. Remember to leave the center area between the tabs open so you can turn the cover inside out. (I almost didn’t on the first one! It has been a while since I have been sewing, I should practice more.)
 36 NO WRONG WAY!!! (leave the space between the tabs un-sewn)

Trim the area between the tabs to about 1 inch from the end of the sewing line. clip back to the corner (see the pictures). The flaps will get turned into the opening and the nail pressed down after the cover is turned inside out.
 38 Turn out the body of the carder through the opening left between tabs
 39 turning out tabs
Turn the body out through the open space then turn each tab right side out. Tuck in the extra wide seam allowance at the opening. If your iron is not handy you can nail-press the opening.

Lastly, take a rounded-end chopstick and get the corners poked out. There are more expensive tools for sewers to get into corners but this works and was in with the felting tools.
The elastic straps with Velcro
 41 Sharkboy shows you the two different lengths of velcro (short and long)
The elastic straps at Dollarama come in two sizes which are not always the same length. pick one that is not too tight and compressing the foam covers but not so loose it won’t hold the carder cover on. (I know that was obvious but some really are quite different small or large than the previous ones I have purchased.)
If you want to make yours extra fancy, top stitch along all the edges. You can add two strips of sew-on velcro to the tab and the main body of the cover (try it on your carder to get the best position. If you want a fashionable 2-sided carder cover I would go with the elastic and Velcro arrangement my first cover has. (so you can turn it either side up)
For odd-size carders, you need to add teeth protection and stack them as you would like to store them. measure the distance from the base of one handle (at the edge of the carder) going directly across the width of the carder down to the underneath carder, across it stopping when you reach the other handle base. Call that X. Now decide how long you would like your tabs (t). X+T+ seam allowance= the long side of your rectangle. The width plus seam allowance x 2 is your other dimension. When in drought just use a string with knots or make a mock-up in paper. (I have found numbers can be just as tricky as letters!)
I do hope this is somewhat clearer than mud! If you decide that this is all too much work or you can’t remember where you put your sewing machine or your hand sewing needles there are a number of people selling premade covers on etsey.
Lastly, Sharkboy got all the new covers on the carders and staked them up for me. He has been working very hard and needs a treat to reward him.


42-43 Sharkboy is determined to organize the newly covered carders
This weekend (back willing) Mrs. Mer and her son Sharkboy will be going to a fibre festival south of Ottawa in search of hair. I will let you know how all our shopping goes.
 44 Sharkboy has had a busy day helping with this project and says goodnight
13 thoughts on “Covers for Carders”
Shark Boy has stolen the show. The card covers are lovely – your instructions are very clear, you’ve given good info on supplies and your writing is as entertaining as always but the photos are fab and make you smile – Shark Boy is a natural demonstrator 🙂
Thank You Both! it was very late last night and i was getting sore (harder to think when you get snide comments interjected in your editing) so i was starting to worry i had been a clear as one of our recent mud puddle! its bright and sunny out today!!!
when i went to ask the Mer’s to help they were in the …… umm… middle of a … it looked like some pationate hugg… in there clear plasdtic bag…. got to get them a room or at least an opake bag. so i went and found Shark Boy, he has been hanging around in his project bag behind my chair. (sharkette and Miss Manta are in there bags there too but dont have hands so didnt seem the best choice to help. i suspect Shark boy wants to get on line and meet other Mer people his own age, posily to play Runescape or maybe date.
as a thankyou for all his hard work want to take him and likly his mom if i can tare her away from Mr. Mer to look for long locks for hair on the weekend. there is a fiber fest under an hour south of us in Spencerville then Upper Canada Village (a historical live action museum) has free admition on saterday too if i have not worn my self out from shopping.
I hope you are enjoying spring! i finaly have 3 early tulips and the sillia are fadeing.
Jan, what an interesting & informative post. I must admit that I carefully store my carders pin to pin & altered their original box as, yes, the handles stick out! You’ve provided an alternative for consideration.
Now on to your assistant….Sharkboy has been taught well (although he is obviously enjoying the limelight!) demonstrating each stage to perfection. He definitely deserves a break & a treat….’back’ willing.
I hope you had as much fun in the studio photo session with Sharkboy as we did seeing the results!
thankyou Antje, as i was thinking about this i wondered why i had been told to store them wire to back with somthing soft to protect the wires and not scratch the back of the carders. i could not remember. so i went throught the main options and considerd each. for storage, what i was told originaly dose seem the most resonable if you have a cover and somthing between the teeth and the next serface. the posisitoning of teeth to teeth is the second best as long as you have them in a box. since if the carders are sat on, or worse rotated it may damage the the carding cloth. it also has the anoyance of not fitting together at the handles if you have the curved backs type. i definatly find carding easyer with the curved back type. (but if i had started with flat carders and had no comparison i would likely be fine with them, as long as they do the job without herting you. maybe we can get Bernadette to show some ergonomics of carder use?)
i will let shark boy know he did a good job! he was lots of fun to work with! i think he too may have a modeling carriear in his future. Now if we can find him some hair i think he will be all set. (i will have Mer-girls hanging out in the front garden wating for him all summer!!)
Thank you, Jan! Your post came at the perfect time as I finally bought my very own set of carders. Looking forward to making your case.
Congratulations Kristina!! Carders are very helpfull and save a lot of time hand blending little bits of fiber.
when you dicide if you are adding a protective layer, (thin foam covered in fabric if you can find it) you can then messure your carders (with their protective layer included) and decide how long your straps will be. you can drop the straps and put tyes in the seams to eather side of the handles if you prefer to (if your short on the fabric you like).
its such an easy basic shape i am sure you will have fun. (oh after sewing trim the corners like you would on most sewing patterns to get them to turn right side out Neetly) i havnt tryed to write a swewing pattern before!
it will be fun to have new non-nakid carders Congratulaions on their aquisition again!!
Shark Boy is so helpful!
Great post, Jan. I’ve often wondered what I could do to transport my hand carders safely, and honestly it had never occurred to me to make something myself to protect them!
Now here’s hoping I either make the time to create one of these for me, or you start selling them 😀
Great post, Jan. I agree with Leonor, perhaps you will start selling carder covers as I’m not sure I have time to get the cover made myself. It’s a great design and would really help protect the hand carders.
Shark Boy is like the new Vanna White 🙂 He’s very good at showing the various aspects of how the carder covers work. I like the way he uses his fins for upright support.
Thanks for this! I have a set of carders that need this. I had no idea that they should be protected, although mine are currently stored as method 2 and I have wondered if that was the best way to store them. I am going to make one of these as soon as the current projects are finished.
Oops! I’m late here, I’ve only just got round to reading your post in detail. I was glued to my screen yesterday watching the Coronation.
What a helpful young … er… person, Sharkboy is, there just when you need another pair of hands. This is a really helpful post, thank you both. You definitely deserve a treat and I hope that you will all enjoy the fibre festival.
We don’t seem to have the straps you mention in the UK, but having used the hook side of velcro strips to mount my pictures, I’ve got lengths of the “furry” side which I think I might use for the straps and just put hooky bits on the unattached end so that when they’re wrapped around the carder heads, the strap becomes adjustable. In fact that’s pretty much the “strap” that I use to stop rolled up wet felting from unrolling while I’m working it.
I also have a length of table protector stuff – padding attached to a plastic type backing – which helps prevent scratches and heat marks on a dining table, so I’ll use that instead of the draining cloth. I will be making some of these covers for my carders. Thanks again Jan.
(Does the “getting together” of Mr & Mrs Mer mean we can expect to see some Mer babies sometime soon?)
Ann
I have just seen news about the wildfires in Alberta. I do hope that they are not near you and that they don’t stop you all going the festival. Keep safe.
Ann
Great job! Interesting idea to cut up that drying rack stuff for padding.