
2D felted landscape workshop
Saturday, Feb 11th, 2023, was the date scheduled for the next 2D felted landscape workshop at the local guild. Before Xmas we had a lot of workshops have to reschedule. Either the weather was against us, or the instructor or the students had caught the flu going through town. (Technically that is better than covid but it still sounded awful.)
In the aftermath of the sudden arrival of winter the weekend before, I had been left fighting Glenn’s generosity (he gave me his cold). I had noticed I was feeling better each day from about Wednesday so by Saturday I was pretty optimistic that I had defeated most of it and would be able to teach. (I had been avoiding Glenn but it is a small house.) I had spent the week slowly gathering supplies, sorting out all the things the students would need and had Glenn do a run to Dollerama for the missing items.
Saturday morning started very early, Glenn loaded the supplies, samples and many bags of different fibre. When everything was in the car, there was still room in the front seats for both of us. Seeing out the back is not that important, I have side mirrors! So, off we went to the studio to set up before the workshop.
 1) small grey 4-door Kea Soul with Glenn bringing in as much as he could carry each trip. The parking space is still covered in snow and the Dairy Queen on the other side of the street is not yet open.
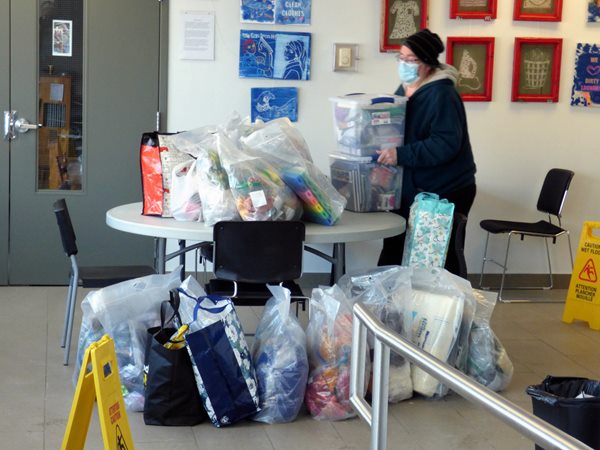 2) clustered around or on the table outside the studio; 12 giant zip lock bags, 4 large bags, one file-holding plastic box, and Glenn placing the last 2 mid-size clear ruff totes on a round plastic-topped table. There are “caution wet floor” signs in the foreground and off to one side.
Glenn unloaded the car and set up the extra tables in the studio so I could set out the student’s supplies and set up the examples.
 3) Classroom set up with each student’s notes, foam pad, frame, and needles set out at their place. To the right are examples of my work (including the Mr. and Mrs. Mer to show 3D Dry Felting). In the background, Glenn is reading and you can see a smaller table full of other supplies we will need as well as a 5-foot table overflowing with bags of wool. (There are a couple of bags sitting on my walker).
 4) Close up of examples of 2D and 3D needle felting and 3 books (Art in Felt and Stitch, Jaana Mattson’s Landscapes in Wool: The Art of Needle Felting and Painting With Wool Landscapes) I had brought for the students to look at.
In the student’s notes, I gave them a list of books that may be of interest if they enjoyed 2D picture felting.
- Painting With Wool Landscapes by Bethany Harris
- Creating Felt Pictures by Andrea Hunter
- The Art of Moy Mackay by Moy MacKay
- Art in Felt and Stitch Felting Book by Moy MacKay
- Jaana Mattson’s Landscapes in Wool: The Art of Needle Felting by Jaana Mattson
- The Art of Felt Felting Book by Loumange Francoise Tellier (inspirational)
 5) Three bins and a bag of other things the students might need or could try. Fake clover tools, bags of scissors, extra needles, pins, small pet brushes that work like mini carders, and a bag of permanent markers are arrayed on the table. There are also a couple more small samples of felting and using different types of backing or ground felt.
 6) 13? Bags of wool on a five-foot table overflowing with one on the floor and two bags on my walker.
 7) Well-padded rolling desk chair with a green and black pillow sits behind a folding table with all the students’ supplies.
I found out that one of my students had hurt her back and was not sure if she could make it or how long she would be able to felt, so had one of the comfy chairs and pillow ready for her arrival.
 8) A close-up of one of the student’s workshop supplies, with various candies and chocolates for stamina (keep watching the pictures and you will see more of the candy selection).
Most of the students had chosen an image from a selection I had sent earlier in the week. We wound up with two students working on the tree in winter with a fence and two on an ocean image. Since I had not heard from all the students I thought I better bring all the colour options so I would be ready for whatever they wanted to try. We had two missing students, one was a booking error that had been corrected but was not on my list, and the other was actually missing. ( I found out when I got home that she had not felt well and had tested positive for covid that morning!)
I had set out the student’s supplies; Name tag (rectangle thick wool felt): (safety pin & sew-on pin, sock yarn, piece of scrap paper and Marker). Foam Kneeling pad, 1 sheet of 100% wool felt (enough for two 5×7 pictures), 1 sheet of acrylic craft felt, I sheet of card stock (to make a window mat), a Plastic ruler, a Wooden Frame with a mat from Dollarama, XXL Project bag, bag for the needle, 21 pages notes and Felting needles.
- 2x T36-333 needles (Blue)
- 2x T38-333 needles (PINK)
- 2x T42-222 needles (Turquoise)
- 1x Crown 40-111 needles (Orange)
- 1x Reverse 40-222 needles (Green)
We started with a name tag; making your name in yarn to practice eye-hand coordination and get used to the needles. I usually review what’s in the notes, the basics of history of landscape, mentioning the golden mean and the rule of 3’s for photography, a review of perspective, some of the techniques that apply to pastels, acrylics and watercolours that can be used with wool. As well as blending fibres by hand or by hand cards to get the colours you want. I also chatted briefly about ways to transfer images to the felt.
I didn’t go into as much detail as I usually do since I was starting to feel a bit more brain-stuffed up than I had been when I arrived and started to set up. I was sure I was feeling better, but this cold seems to keep trying to sneak back and hit you again. Even so, the students did very well. Maybe not overloading them with info helped.
This time everyone wanted to use the “lightbox” (or window) method so I reminded them that the template version, which is good for thicker felt bases or dark-coloured base felt, was in their note if they needed to use it in the future.
 9) Student with ocean view with lots of blues teals light teals, grey and white wool strewn around. There are is also a package of rockets candy rolls in the foreground
For each image I had two copies of the original image (in case they chose the template method), a colour blocked version and a colour saturation image to show hidden colours they may want to consider. I can do this with Microsoft Word 2010. (Sometimes things work and upgrade then lose the effects you want.)
 10) The second Ocean image again has fibre strewn around it. In the foreground, my male cardinal on a branch, using the template method for transfer. Like Watercolour painting, layers of thin colour for the background and a thicker more like acrylic approach to the bird.
Normally each student has chosen a different image, this time one of the ocean images was popular and the tree in winter with a fence and hill had found favour with the other 2 students.
 11) Student working on their background behind the tree first. This time the fibre is a mix of white, grey, green-grey, light blue and brown with gray. In the foreground there is the green handle of the clover tool rake (originally designed to clean a clover brush) but works very well to hold down the wool as you felt, it keeps your fingers away from the pointy end and less bloodshed.
 12) The second tree image is having its fence added. in the foreground are works in progress of a night winter tree and on the cheap Dollar Tree craft felt a pair of sheep (you can just see the eye) and a pair of hand carders sitting on a copy of the student’s 21 pages of notes. Next to that is a brass nautical calliper, a wooden frame with an XXL project bag and a box of mini boxes of smarties (candy-coated chocolates).
Winter trees were also popular. I reminded the class that they could play God and move, remove or change trees, clouds or anything else that offended them. It was their landscape and they could adjust it so it would suit their liking.
I talked about how to think like a watercolour painting with washes and layers of thin wisps of fibre building up to a final image (not the fastest way to work but it can be very effective as in the fox who still needs to have whiskers added and I’m at about 30 hours). I also mentioned that after laying in the trunk and main branches, wisps of fibre worked well to create a hallow of tiny branches for the winter tree.
 13) The first tree picture, Using a 5×7 opening to check the framing of the image. Behind the image and card stock mat is the foam kneeling pad that we were using as a felting surface.
Using a mat or just a card stock stand-in for a mat will give your eye and brain another view of the image you have been working on.
 14) The second tree picture, held up to get a quick check for position in the mat.
Both trees look great and are their own tree, even having used the same inspiration to start with. The same individual personality happened with the stormy sky ocean picture.
 15) a very active roiling sky with sea and beach underneath, there is a seagull added to the right side.
 16) a turbulent sky and sea with a beach in the foreground.
Both have great movement in their pictures, again when using the same image each saw and focused on different aspects of the image.
I have found sometimes after working on an image for a while I need to take a break. I will put it aside and come back to consider it again later. I may decide “yes I am happy” and the picture is done or I may decide it needs a bit of fibre added here or there to complete it. Sometimes using a card stalk mat will help me consider the image, looking at the picture in a mirror or turning the image and the felt picture upside down will help you see what you are looking at, rather than what your brain says it thinks it is looking at. (It makes it easier to see the negative space and compare the image with the picture you are making).
I hope they had fun and I hope that this opened up a new expression of creativity with wool.
The class finished up early but they also took a much shorter lunch than the last class. I had given each student a project bag (giant XXL zip lock bag) to store their extra wool, felt samples and needles in. They had the leftover fibre from their first picture and a couple selected a second image to try. A different water picture and a sheep in a field of snow. it was impressive how far along they got in an hour on their second images.
 17) An hour in on a second image of a sheep in a snowfield and snowy sky, sitting in a card stalk mat
I seem to have missed getting a shot of the other ocean image! I was really only working at about 90% efficiency. It took me about an hour to pack up the workshop supplies and Glenn loaded them back into the car. Then put away the extra tables (I think tomorrow is a spinning workshop and they will need the space).
There is a very good restaurant across the street from the building the guild is in, I think I get a happy Sherpa by making sure I linger in the parking lot while he runs over and orders dinner. It was very good, the car smelt like hot pizza all the way home.
10 thoughts on “2D felted landscape workshop”
It’s nice to see someone who properly appreciates the role of sugar in the creative process.
Wow Jan, it looks like you go the extra mile and then some! I thought I sometimes take a lot of gear when I’m teaching but I’ve met my match looking at all those boxes, bags and goodies.
I bet your students learnt loads and had a ball, they certainly produced some lovely work. That pizza was well deserved.
Great Post Jan. Your workshops are very popular and with good reason. You are always generous with your knowledge and time.
Looks like a wonderful workshop Jan! It would be great if you turned it into an online workshop. Just have Ann video you 😉 The students work shows what good instruction they are getting.
Your students are spoiled by your attention to detail and generosity of your time to set-up the perfect workshop.
You must have been exhausted by the end of the day but the pizza probably tasted all the better for it.
The students’ pictures are wonderful, and for one student to make the sheep with the time leftover – well – that’s amazing.
That workshop looked really enjoyable Jan. You really go to a lot of trouble to produce everything the students need and more. I should be very surprised to learn that they weren’t all bitten with the needle felting bug by the time they went home.
I had a look on Amazon at a couple of the books you mentioned (our library hadn’t heard of them unfortunately – I like to have a good look before I buy) and by chance I saw “Next Level Felting: Professional needle-felting techniques to take your felted wool creations to the next level” by Nancy Wesley which looks quite interesting. Unfortunately the library hasn’t heard of her either so I may have to bite the bullet and buy it anyway.
Good to see Mr & Mrs Mer out of their project bags again; I trust he was behaving himself.
Ann
You have put in such a lot of work for this class. They will be back for more.
Jan, what a super workshop, you really think of everything. Your students must be very happy bunnies. You are a very generous tutor.
I am just catching up on a backlog in my email and I had the pleasure of finding and reading this super post. As others noted – you really went all out and your ‘students’ were very lucky. I would be delighted try your workshop if you run it again!
Hi Jan, enjoyed your class story very much! I teach a few classes with my local guild and always fun to hear how others manage theirs. I’ve come to understand “painting on wool” can mean a variety of things. I’m interested in your technique/method. I made a much too large Monet-like landscape yesterday and today. I’d say about 12 hours each day. I made my 19″x26″ prefelt the first day then started laying out the wool then wet felted the entire item. It’s completely wet felted now and tomorrow I will spiff it up with a bit of dry felting and likely a few embellishments. I can’t resist bling! The size of the project was really too much. Normally, I take on smaller sizes and likely won’t take on such a large size again. If you happen to see this and have the time to talk a bit about your method it would be greatly appreciated. I’m always looking to work smarter, not harder.