
Eco-printing
A guest post by Antje Ream
Creating this post for the forum I’m being very loose with the term fibre – my excuse is that both paper and plants are fibrous.
A few months ago I attended a great eco-printing workshop by Jane Hare of Pippin Textiles with fellow members of our local textile group. It was a full day of very organised activity with each person having much to show at the end. In addition to what we ourselves had gathered from our gardens, we were greeted with a large pile of interesting plant material.
We were given clear instructions and then let loose laying out our plant designs on paper, cotton sheeting, wool blanket and Tyvek….even kitchen paper didn’t escape! We tried a vinegar mordant and boiling our rolled papers and fabric, then it was paper, fabric and Tyvek with an iron mordant using the steaming method before steaming our rolls of alum mordanted paper bundles.
Thankfully it was summer and we could open all the doors otherwise pegs might have been required for our delicate noses.
Needless to say most of us were very impatient to open our parcels and see the results of our minimal efforts combined with mother nature’s magic. We were all delighted with our results.


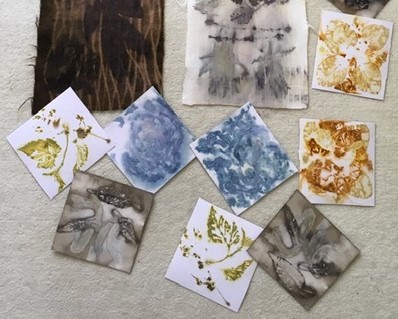
We each had this amount to show at the end of the day. The Tyvek pieces are the 4 light squares on the left hand side in the left photo. The dark long piece is the wool mordanted with iron.
Following any workshop comes the dilemma….What do I do with what I’ve produced? In August our group holds an exhibition of members’ work undertaken throughout the year. This event always galvanises my thoughts and with it fast approaching it prompted me into action.
A while ago I received a bouquet of flowers that came with a large almost cuboid box – far too good to throw out….I’m sure I’m not alone with hoarding potentially useful objects…taa daa! I used the Tyvek pieces which were almost square (13 x 13 cm) and machine embroidered them to some linen fabric, cut to size to wrap around the box.


I then added some gold gutta to provide some highlights.


One of the results of our workshop was a set of ‘book’ printed pieces of thick paper/card stock with the front of the leaves on one piece and the back of the leaves on another. I trimmed these totally square (10 x 10cm) and backed each with very fine/thin fabric dot glued to the surface, just to hold until I had done the stitching. This allowed me to machine stitch onto the paper without ending up with lots of pieces, or holes, all torn at the perforations. I stitched each to highlight the details of the leaf (and even red cabbage) prints.
On their own they didn’t look much (or more accurately – ‘what do I do with these!’) so I then decided to book bind them together.


I mentioned kitchen paper above – this was only used to ‘protect’ some of our plant designs but I found it gave quite a delicate appearance, so I acrylic wax varnished it….warning – don’t then let it dry on a hard surface without laying cling film down first, otherwise hours of scraping can be enjoyed! I then used some of this paper to cover a tall Pringles tin (as the kitchen paper was translucent I covered the tin with plain white copy paper first), then added another layer of the varnish. My friend was delighted with her very simple gift.

Whilst at a car boot I purchased some unusual pictures – stitched suedette fabric on panels of wood. Playing with yet more of my stitched squares I added them to the panels.

In the exhibition there were many lovely creations using our eco-printed products including a scarf, a cushion made using the wool and a box made from the Tyvek pieces.

Finally here are some pieces that are a favourite of mine done on wall lining paper, which I have coated with acrylic wax varnish each measuring 100 x 15 cm. They are two sided, the paler reverse side shows delicate squares – where the Tyvek pieces were laid and then all wrapped up tightly together. I like both sides and as yet haven’t come up with a way to show them off to advantage….any ideas much appreciated.


Since this very inspiring workshop and as a result of my book being in the exhibition I have been asked to do a workshop on bookbinding in January. I have a few examples of fun bindings done years ago so I will have to brush up on the techniques. I only hope that I can be as organised as Jane and enable my ‘students’ to produce lots of interesting samples.
Writing this guest post has been quite a feat and I owe a HUGE debt of thanks to the ever-so-patient Ruth who across thousands of miles (and an ocean) has not only held my hand but carried my entire bulk through what we thought would be a relatively easy process. I hope that she will continue to offer me the opportunity to post now that we have solved the problems.
Today is a special day and the bells are ringing out for Christmas so I wish everyone….
Joy and a Happy, Healthy and Creative 2019

23 thoughts on “Eco-printing”
It’s amazing how you used your workshop pieces in such a variety of very pretty ways. If we saw your finished items on a craft stall our purses would be open before we quite reached the edge of the table!
Your idea of using the boot sale pictures is very clever – they look like gallery pieces.
How wonderful to be asked to run a book-binding workshop – we hope you enjoy it and that it leads to many more.
We wish you creative success in 2019.
Thank you. Sometimes I get inspiration that pays off, with the panels it worked and means I just ‘have to keep exploring the boot/garage sales….just in case!’ Once the festivities are done i’ll have to work out my workshop strategy, i’ve already been saving anything potentially useful including white envelopes with usually blue patterned interiors….another post maybe.
Wow! Very inspiring post and beautiful work. Merry Christmas to you and yours 😁
Thank you. It is great having like minded friends to boost moral. Enjoy 2019.
Oh my!!!! So very creative!!! You made such beautiful pieces. I truly enjoyed your story about the processes you learned and undertook for each piece. I am quite certain you will find inspiration for the last two pieces when the time is right. Wishing you a bountiful and creative 2019!
Like you (and probably many of us) I believe inspiration will e-v-e-n-t-a-l-l-y strike when we make something. I think it is at that point that it becomes a ‘creation’ however small it is or whether we deem it a success or a learning experiment. I’m glad you liked my story. Thank you.
Thanks for the inspiring post and I am glad that you like my card. Yours arrived late last week and I really like it. We are spending the holidays at our cabin and it looks like a Christmas card outside with the snow covered trees.
I’m glad you liked the post. Whilst I knew the story, getting it in place was a labour of love and Ruth was by my side every step and button push of the way.
Your card has given me some great ideas, and it will last well past the festivities too….so very dual-purpose
Enjoy your Christmas scenery.
Very creative and wonderful work using your sampl3 from the class. Thanks so much for th3 post!
Thank you. I hope it will inspire you and others that sometimes ‘wacky’ ideas can work.
Really lovely work, Merry Christmas and a creative New Year to you.
I very pleased that you and others have enjoyed my post. Thank you. May 2019 be a productive one for all of us.
Merry Christmas Antje! Thanks for the inspiring post. I still have tons of eco printed paper that I didn’t know what to do with. You have been much more creative with yours than I have with mine. I wish I could take your book binding course. I always like to learn new methods of book binding.
Could you make an accordion style book with your long pieces? Then you could view it from both sides when it was not folded up.
Ruth…..what can I say? Thank you just doesn’t seem enough, but we have spoken already.
The accordion folding is a good idea, i’ll think on that one. Speak soon.
What great use of eco-printed samples. Could you add a frame piece top and bottom and then hang them in a window? that way you could see different designs inside and out. Merry Christmas and a Happy New Year.
Ah ha….another good idea, maybe using some natural shaped wood too.
At our textile exhibition members only present 3 or 4 items in total (display space being limited) from workshops undertaken throughout the year, but no one had presented these pieces of paper….probably stuck for ideas like me.
I’m glad I have my forum community to keep me going. Thank you.
Wow, so many beautiful pieces and great ideas! Great post, Antje 🙂
Thank you, i’m Glad you like the pieces. The work shop certainly was fun and productive for all of us.
Beautiful pieces. I’ve never heard of eco printing with tyvek. Thanks for sharing. Happy New
year!
And a happy, healthy new year to you and yours.
We’d never heard of eco-printing on Tyvek either but was very successful. Fortunately Jane gave us some class notes so I may be able to repeat it sometime in the future.
Very creative use of your ecoprinted samples – well done! Looks like a very productive and fun class. 🙂
Thank you. Yes it was a fun class and thankfully summer time so we were busy running outside to dry off our achievements….thankfully the local residents in the village are used to our capers!