Felt Rock Update
Last week I told you about the Big Ski Chair Affair. I was carving foam to make a rock that will look like it is holding up one end of the chair.


Here’s what it looked like after I finished carving it. I used a heat tool to carve the foam and it takes a while. You have to move slowly and it gives a very unpleasant odor. So I carved for small periods of time. After I got it carved, it was on to the felting process.

I covered the foam with batts, wet it down with warm, soapy water and kept adding more batts until it was covered.

I have to say that the quality of the wool I used was not really very good. Plus it was a bunch of different breeds mixed together that made it a bit more difficult to felt.

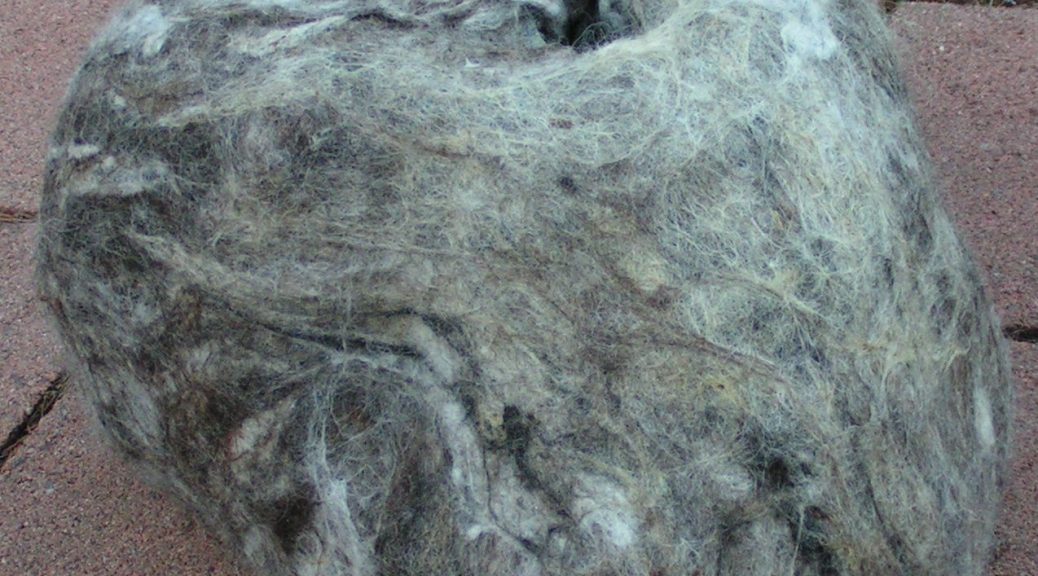
Here it is sitting over my sink after the first felting session. I spent several hours for two evenings working on it.


And here it is after the second felting session. It still is quite spongy and very hairy. I am not really satisfied with how it looks. It does look like a rock from a distance but is certainly not very smooth. I will also need to add a bit of wool to the back of the rock as there is some blue foam showing through there. Hopefully, with more rubbing the felt will smooth down a bit. I will probably have to shave it to get rid of the hairiness. Any suggestions?
29 thoughts on “Felt Rock Update”
Hi Ruth, the idea is very good. I should use foam from boat cussions and tape it together without using a heatingtool. Somewhere i read about a man (India) who burned (not totally ofcourse 😉 his carpet when finished, to get rid of upstanding hair.
Thanks Jifke. I have heard of the burning method but haven’t tried it. I would be afraid I might melt the foam.
When it come sofar it would melt the foam then the wool will be also gone , i am afraid. Just the surface, not more. Try a little piece.
I’m wondering if you could paint on something like watered down PVA or something to smooth it and perhaps give it a rocky sheen in places?
I was going to suggest painting it. Maybe shave it first….paint/ varnish, but leave some areas to attach moss and creatures!
Thanks! I like the idea of more of a sheen but it has to be weatherproof and not effected by the rain.
Thanks Anita – I had thought of adding moss but my group nixed that idea.
That was a big project,Ruth, but it turned out really well. I cannot give you any advice on how to get rid of the hairs, perhaps using some stiffener.
Thanks Nada, it is still ongoing this project but it’s been interesting. I will have to see what stiffeners I might use that are waterproof.
Yes, the watered down pva should work well – you could felt a small sample from similar fibres to try it out?
If you ever have to make another, maybe make a semi-circle resist (like a giant tea-cosy) then when it’s just holding together, cut out the resist along the bottom then drape the felt over the rock. Wearing latex gloves and using lots of soap, work/full the felt – starting from the top and working down – to the shape of the rock. That should result in a smooth finish.
Thanks Lyn, I’m afraid of the glue due to it being an outdoor thing. It needs to be waterproof and I would be afraid of the glue turning white. I did consider using a resist and then working over the rock. I think the main problem with the smoothness is the type of wool it is. Not good quality at all and a mish mash of stuff. Should have just used merino.
Would needle felting help?
Good idea Debbie – in fact, as the rock is made from foam, you could needle felt it all straight on couldn’t you?
Thanks Debbie, I am going to try some needlefelting to add some more wool on top and then wet felt again.
Lyn, I think this type of foam might break apart with much needle felting. It isn’t soft, very crisp and hard.
So far it is looking great. I would say no to the PVA glue as it will take up moisture in the humidity and rain. But the paverrpal stuff is meant to be outside in the rain and weather. It comes in mat and shiny. There are brands but I don’t know what they are. I don’t suppose there is an art store near by?
You could add some wool to give you more of a rock like appearance. the first pictures it looks brown and second set it looks gray. what do the rocks in your area look like. You could lightly needle on some wool to get the appearance you want and then wet felt it. Then shave and coat. I think that is what I would do.
Thanks Ann, I agree about the glue. I am not sure if I can find the Paverpol locally or not. Will have to look.
The wool is actually gray as opposed to overall brown. It does have some browner bits in it. Our rocks around here range from gray, brown, green, red, purple etc. All different colors.
The rock doesn’t look that bad from a distance. How about shaving, re wetting and sanding it? I would be cautious about the glue. Good luck, that’s a lot work.
Thanks Marilyn, I am not using the glue idea but may look into the Paverpol idea. It is supposed to be weather proof I think.
Marylinn,do you know the aproximate price
for alpaca wool in England?
I’m in the US, but know World of Wool has good prices in the U.K. https://www.worldofwool.co.uk/
Wow! That rock looks amazing! I enlarged the photo to see the fuzziness but still think it looks just like a rock, so good job. Burning seems like a good idea as does shaving and paverpol.
I used acrylic floor polish once to stiffen a felted bowl, it worked great but it took a long time to dry and smelled awful for awhile.
I’m inspired to go and do some felting now 🙂
Thanks Nancy! I am going to investigate the Paverpol option and I’m sure I’ll end up doing some shaving as well. I’m not sure how acrylic floor polish holds up to water. Needs to be waterproof. Smell wouldn’t really matter as it will be outside all summer.
Maybe I’m overthinking, but if a rock had been sitting under a ski chair for long enough that the ski chair had a climbing plant growing up one side of it, the rock would probably have quite a bit of moss and lichen on the exposed parts of it by now, wouldn’t it? I don’t know the geology/ecology of your area, but maybe embrace the softness of the wool and add another layer with patches of greens/yellows, even whites with some textures in there to mimic the plant life that might be growing on it in the parts that show?
I like your idea Zed
You made me laugh his morning. I hadn’t really thought of our chair sitting there so long that a vine was growing on it. 🙂
I will have to check with my cohorts to see what they think. I do think it would look better with plant life on it. And I have lots of photos of moss and lichen for inspiration.
Well, I did say I might have been overthinking it a bit 🙂
No suggestions to offer, but I’m very curious to see the end result, Ruth! Good luck 🙂
Thanks Leonor, we’ll be working on the vine for the next couple of weeks and then hopefully it will be complete.